Introduzione
This guide details the steps required to replace buttons on the back face of the camera. Please use this guide only when a specific button is not working. When the problem involves other parts of the camera or all of the buttons, you may need to replace a component of the circuit board.
Cosa ti serve
-
-
Unscrew all eight black, 4mm screws with a Philips 000. (The top-most screw shown in the third image can be accessed by lifting the cover flap off.)
-
-
-
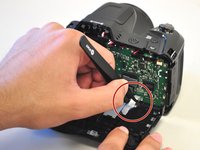
Pry case open with a metal spludger by slipping the spludger between the back and front case of the camera and wiggling the spludger forwards and backwards.
Painful to see the damage to the upper housing here done by the spudger. Don't do it this way! There is a hidden ninth screw that you can only access when the flash is opened and you look straight into the flash housing. That ninth screw is what's causing the damage in the picture. You MUST unscrew it to be able to remove the back housing without damage!
Yes, be careful ! I struggled with the case until I found this screw.
-
-
-
Attrezzo utilizzato in questo passaggio:Tweezers$4.99
-
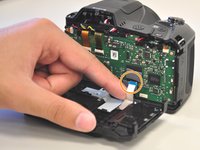
Carefully unhook the silver strip with tweezers. Get a grasp of the sides of the silver strip with the tweezers, and pull upwards and out.
-
The strip may also be identified by its blue tip, which becomes more visible once pulled out.
-
-
-
Unscrew the two, right-most, 2 mm screws with a Philips 000.
-
Unscrew the left-most, 4 mm screw with a Philips 000.
-
-
-
Slide off the button panel in the marked direction.
-


To reassemble your device, follow these instructions in reverse order.
To reassemble your device, follow these instructions in reverse order.
Annulla: non ho completato questa guida.
Un'altra persona ha completato questa guida.
Team

Cal Poly, Team 1-11, Maness Spring 2016 Membro di Cal Poly, Team 1-11, Maness Spring 2016
CPSU-MANESS-S16S1G11
4 Membri
10 Guide realizzate
⚠️ There is a ninth longer screw to unscrew under the flash to undo the case.
Musicalme - Replica