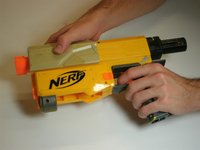
Salta al contenuto principale

Nerf Recon CS-6 Trigger Replacement

Cosa ti serve

  1. Nerf Recon CS-6 Trigger Replacement, Remove Magazine: passo 1, immagine 1 di 1
    • Skip this step if magazine is already removed.

    • Pull slide back.

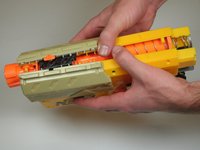
    • Pull backwards on release buttons and slide magazine out.

    • Push slide back forward and pull trigger.

  2. Nerf Recon CS-6 Trigger Replacement, Remove Visible Screws: passo 2, immagine 1 di 1
    • Use the Phillips #0 Screwdriver to remove these 9 screws.

    • All screws marked in red are 9.6 mm Phillips #0 screws.

    • Note that left most screw is longer than the rest and is a 18.6 mm Phillips #0 screw.

  3. Nerf Recon CS-6 Trigger Replacement, Remove Hidden Screws: passo 3, immagine 1 di 2 Nerf Recon CS-6 Trigger Replacement, Remove Hidden Screws: passo 3, immagine 2 di 2
    • Pull slide back to reveal more screws.

    • Remove these 2 screws.

    • Push slide forward.

    • Pull trigger to release compression of the main spring.

    • Screws are 9.6 mm Phillips #0.

    • Pulling the trigger will keep spring from launching out of the gun when the two halves are separated.

  4. Nerf Recon CS-6 Trigger Replacement, Remove Plunger Cap: passo 4, immagine 1 di 1
    • Remove the screws on the plunger cap.

    • Tug the plunger cap off.

    • Screws are 9.6 mm Phillips #0.

  5. Nerf Recon CS-6 Trigger Replacement, Remove Slide Screws: passo 5, immagine 1 di 1
    • Remove the 2 screws on the slide.

    • Screws are 9.6 mm Phillips #0.

    • Hold the two halves of the gun together to prevent any springs from launching out.

  6. Nerf Recon CS-6 Trigger Replacement, Split the Gun in Half: passo 6, immagine 1 di 2 Nerf Recon CS-6 Trigger Replacement, Split the Gun in Half: passo 6, immagine 2 di 2
    • Pull the gun apart at the middle seam.

    • Watch for any springs that might launch out.

  7. Nerf Recon CS-6 Trigger Replacement, Remove Trigger: passo 7, immagine 1 di 1
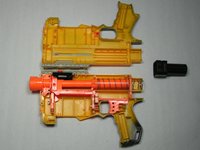
    • Lift trigger up out of the gun.

    • From here, the trigger or the trigger spring can be replaced.

Conclusione

To reassemble your device, follow these instructions in reverse order.

Un'altra persona ha completato questa guida.

Pam Ruffner

Membro da: 10/20/14

984 Reputazione

3 Guide realizzate

Team

Baylor, Team 8-14, Williams Fall 2014 Membro di Baylor, Team 8-14, Williams Fall 2014

BU-WILLIAMS-F14S8G14

3 Membri

6 Guide realizzate

0 Commenti

Aggiungi Commento

Visualizza Statistiche:

Ultime 24 Ore: 0

Ultimi 7 Giorni: 4

Ultimi 30 Giorni: 12

Tutti i Tempi: 3,865