Introduzione
Follow this guide to replace the motor and pump assembly on a Mi-T-M heater model MH-0190-0M10.
This guide includes the motor, pump, and capacitor all as one assembly. If only the capacitor needs to be replaced, follow this guide.
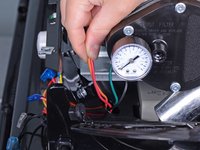
After the new motor and pump assembly is installed, use a flat blade screwdriver to adjust the pump pressure back to 7.5 PSI as instructed on page 17 of the user manual.
Cosa ti serve
-
-
Flip the power switch into the OFF position.
-
Unplug any extension cords from the included power cord.
-
-
-
Use a 5/16 inch socket or Phillips screwdriver to remove the eight screws securing the upper shell, four on each side.
-
-
-
Use a 5/16 inch socket or Phillips screwdriver to remove the four bolts securing the right-side cover.
-
-
-
Use a 5/16 inch socket or Phillips screwdriver to remove the screw securing the two green ground wires to the frame.
-
-
-
Use a pair of needle nose pliers to release the hose clamp from the fuel line.
-
Slide the hose clamp off of the nipple, about one inch down the fuel line.
-
-
-
-
Use a pair of needle nose pliers to disconnect the wires connecting the motor and pump assembly to the main PCB board:
-
One red cable labeled MOTOR 2 on the main PCB board
-
One orange cable labeled MOTOR 1 on the main PCB board
-
-
-
Use a Phillips screwdriver to remove the screw securing the capacitor band clamp.
-
-
-
Feed the orange and red wires out through the opening in the lower shell.
-
-
-
Use a 3 mm hex key to loosen the set screw securing the fan to the motor shaft.
-
-
-
Use a 5/16 inch socket or Phillips screwdriver to remove the two screws securing the motor and pump assembly to the motor mount bracket.
-


To reassemble your device, follow these instructions in reverse order.
To reassemble your device, follow these instructions in reverse order.
Annulla: non ho completato questa guida.
Un'altra persona ha completato questa guida.
