Salta al contenuto principale

Questa versione può contenere modifiche errate. Passa all'ultima istantanea verificata.

Cosa ti serve

  1. , Case inferiore: passo 1, immagine 1 di 1
    • Rimuovi le seguenti viti pentalobe P5 che tengono unita la parte inferiore del case al resto del MacBook Pro:

    • Otto da 3,1 mm

    • Due da 2,3 mm

  2. : passo 2, immagine 1 di 2 : passo 2, immagine 2 di 2
    • Sollevandolo delicatamente dal bordo vicino alla cerniera del monitor, alza il case inferiore dal MacBook Pro.

  3. : passo 3, immagine 1 di 3 : passo 3, immagine 2 di 3 : passo 3, immagine 3 di 3
    • Il case inferiore è dotato di due perni di plastica (evidenziati con i rettangoli in rosso) che si inseriscono nelle clip sempre di plastica nella parte superiore del case (evidenziate nella foto con i rettangoli color arancione).

    • Durante il riassemblaggio, spingi delicatamente verso il basso il centro del case inferiore per riattaccarlo alle due clip di plastica.

  4. , Connettore batteria: passo 4, immagine 1 di 1
    • Stacca lo sticker che copre il connettore batteria.

  5. : passo 5, immagine 1 di 3 : passo 5, immagine 2 di 3 : passo 5, immagine 3 di 3
    • Solleva con cautela ogni lato del connettore della batteria per staccare il connettore dal suo zoccolo sulla scheda logica.

    • Piega il connettore indietro verso la batteria, per evitare che possa fare contatto accidentalmente con la scheda logica.

  6. Questo passaggio è privo di traduzione. Aiuta a tradurlo

    : passo 6, immagine 1 di 3 : passo 6, immagine 2 di 3 : passo 6, immagine 3 di 3
    • Disconnect the three airport Antenna cable connectors from their sockets on the AirPort board and bend them up and out of the way.

    • Be careful to pry only against each connector, and not its cable or socket.

  7. Questo passaggio è privo di traduzione. Aiuta a tradurlo

    : passo 7, immagine 1 di 1
    • Remove the single 2.9 mm T5 Torx screw securing the AirPort board.

  8. Questo passaggio è privo di traduzione. Aiuta a tradurlo

    : passo 8, immagine 1 di 3 : passo 8, immagine 2 di 3 : passo 8, immagine 3 di 3
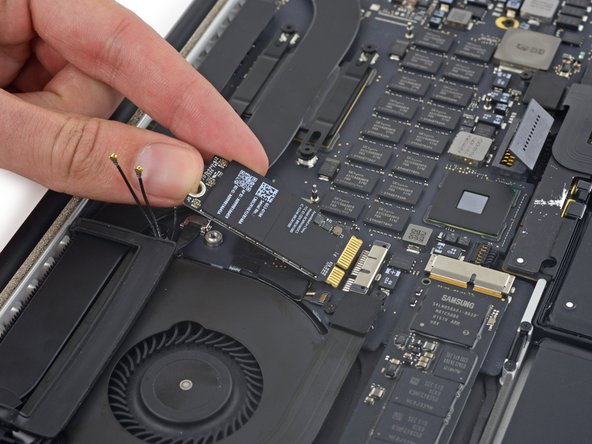
    • Lift the end of the AirPort board up enough to pass over the heat sink directly behind it.

    • Do not lift the AirPort board too high, or you could damage the contacts or socket.

    • Pull the AirPort board straight out of its socket on the logic board.

    • There is a slightly adhesive thermal pad beneath the AirPort board. Be sure to reapply this when reinstalling the board, or transfer it to your replacement board.

Linea Traguardo

Altre 20 persone hanno completato questa guida.

Team

iFixit Membro di iFixit

Staff

135 Membri

17.199 Guide realizzate

5 Commenti

Hi! I need to replace the cable with the 3 prongs on the end. Do you have a video for that and would you be able to tell me where I can buy the cable?

Maria Juliano - Replica

Hello Maria - Did you ever find the cable and how a guide to replace it? Anyone on ifixit know where to get this part? I need one too.

Tony -

Yea this cable is easily damaged. Just broke mine trying to put in the new cord…the contact got bent and is no longer able to fit on the little button like socket. So annoying! Definitely need a replacement cable now…

Alex Backman -

Is there any WiFi6 replacement card compatible, so I would not just fix a broken one, but upgrade to 802.11ax and Bluetooth 5.x? All valuable comments are welcome.

Alex AA - Replica

Bonjour,

c'est possible de la changer aussi sur le Macbook pro 13" de mi-2012 ?

Sandrine Mathieu (Sandy0500) - Replica

Aggiungi Commento

Visualizza Statistiche:

Ultime 24 Ore: 7

Ultimi 7 Giorni: 40

Ultimi 30 Giorni: 204

Tutti i Tempi: 30,985