Questa versione può contenere modifiche errate. Passa all'ultima istantanea verificata.
Cosa ti serve
-
-
Rimuovi le seguenti viti Pentalobe P5 che fissano il case inferiore del MacBook Pro:
-
Otto viti da 3,0 mm
-
Due viti da 2,3 mm
-
-
-
Usa uno spudger o delle pinzette per staccare i tre cavi dell'antenna AirPort dalle loro sedi sulla scheda AirPort.
-
Per ricollegarlo, allinea attentamente il connettore con la presa e premilo con decisione con la parte piatta della spudger.
-
-
-
Utilizza la parte piatta dello spudger per fare leva sulla copertura in gomma delle cerniere sinistra e destra.
-
-
-
Usando l'estremità piatta di uno spudger, solleva dal suo zoccolo sulla scheda logica il cavo della scheda I/O.
-
Con una procedura simile, rimuovi il connettore della scheda I/O dal suo zoccolo sulla scheda I/O.
-
Rimuovi il cavo della scheda I/O dal MacBook Pro.
-
-
-
Rimuovi la singola vite Torx T5 (T6 in alcune revisioni) da 2,9 mm che fissa la scheda AirPort alla scheda logica.
-
-
-
-
Usa l'estremità piatta di uno spudger per alzare la copertura in gomma del dissipatore dalla ventola sinistra.
-
-
-
Usa la punta di uno spudger per far scattare la linguetta di bloccaggio sullo zoccolo ZIF del cavo piatto della ventola sinistra.
-
Iniziando dalla cima del cavo, fai scorrere un attrezzo di apertura in plastica sotto il cavo della ventola destra per liberarlo dalla scheda logica.
-
Solleva dal dispositivo la ventola sinistra.
-
-
-
Usa la punta di uno spudger per alzare il blocco del cavo dati della scheda I/O e ruotalo verso il lato batteria del computer.
-
Usa l'estremità piatta di uno spudger per far scorrere il cavo dati della scheda I/O dal suo zoccolo sulla scheda logica.
-
-
-
Usa l'estremità piatta di uno spudger per sollevare il connettore dell'altoparlante sinistro e staccarlo dal suo zoccolo sulla scheda logica.
-
Usa la punta di uno spudger per sollevare il connettore dell'altoparlante destro e staccarlo dal suo zoccolo sulla scheda logica.
-
-
-
Stacca il nastro adesivo che copre il connettore del cavo a nastro della tastiera.
-
Usa l'estremità piatta di uno spudger per alzare la linguetta di fissaggio sullo zoccolo ZIF del cavo a nastro della tastiera.
-
Usa l'estremità piatta di uno spudger per spingere il cavo a nastro della tastiera fuori dalla sua sede.
-
-
-
Rimuovi il gruppo scheda logica dal MacBook Pro.
-
Quando reinstalli la scheda madre assicurati che tutti i cavi siano visibili e non siano rimasti intrappolati sotto la scheda.
-
In senso orario dall'alto: batteria, speaker destro, retroilluminazione tastiera, AirPort/fotocamera, display, microfono, speaker sinistro, tastiera e trackpad.
-
-
Questo passaggio è privo di traduzione. Aiuta a tradurlo
-
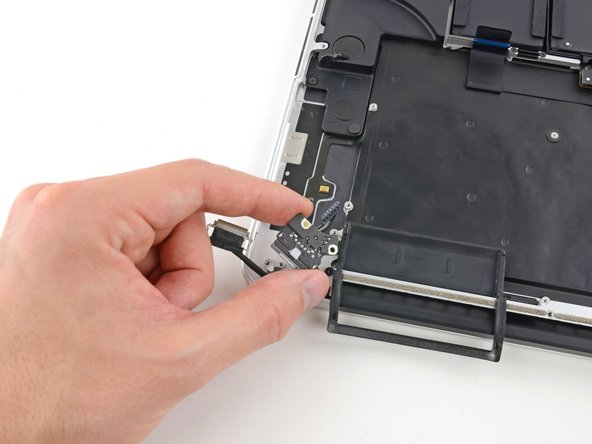
Remove the two 2.5 mm T5 Torx screws securing the MagSafe DC-In board to the upper case.
-
Slide the MagSafe DC-In board towards the right to free it from its recess within the upper case.
-
Lift and remove the MagSafe DC-In board out of the upper case assembly.
-


Annulla: non ho completato questa guida.
Altre 46 persone hanno completato questa guida.

28 Commenti
Thanks! I just completed this repair on a 15” mid 2015. It’s almost identical except there are some extra shields to remove from some of the connections (IO board cable connections, touch pad connection) which are very obvious.
I accidentally broke the flip/hinge for the ZIF on the right fan but it doesn’t seem to be an issue because the cable fits in snug anyways.
thanks a lot! I did the same repair on a 15” mid 2015 and encountered the same issues described already by Christopher. Had also a broken flip on the ZIF of the right fan. But everything works again.
I have now replaced the battery and the dc-in board, and I still can’t get the battery to charge. I also bought a new magsafe power adapter. It appears all cables are connected, and the computer runs fine on the battery (until it runs out of juice, then I will be at a complete loss). No clue what to try next. Any suggestions? Thanks!
I thought I was the only one having the same problems. I haven’t replaced my dc-in board yet nor the charger. I’m sure this has something to do with the new Battery Health Management, MacOS 10.15.5 update served. Now I just don’t know how to use my mac when the battery is 0%. Last time I could charge it by taking the battery plug out of logic board and simply putting it back in and then it charged. Any suggestions are welcome here too.
Just to add. When I have my Macbook open and charger plugged in, it shows the red charging light, but in MacOS it tells its actually not charging. When I close the lid, the red charging indicator will go off after a while, and to get it back working (reset the magsafe chargers fault mode or something), I have to take the charger out of wall socket.