Questa versione può contenere modifiche errate. Passa all'ultima istantanea verificata.
Cosa ti serve
-
-
Rimuovi le seguenti viti Pentalobe P5 che fissano il case inferiore del MacBook Pro:
-
Otto viti da 3,0 mm
-
Due viti da 2,3 mm
-
-
-
Usa uno spudger o delle pinzette per staccare i tre cavi dell'antenna AirPort dalle loro sedi sulla scheda AirPort.
-
Per ricollegarlo, allinea attentamente il connettore con la presa e premilo con decisione con la parte piatta della spudger.
-
-
-
Usando l'estremità piatta di uno spudger, solleva dal suo zoccolo sulla scheda logica il cavo della scheda I/O.
-
Con una procedura simile, rimuovi il connettore della scheda I/O dal suo zoccolo sulla scheda I/O.
-
Rimuovi il cavo della scheda I/O dal MacBook Pro.
-
-
-
Rimuovi la singola vite Torx T5 (T6 in alcune revisioni) da 2,9 mm che fissa la scheda AirPort alla scheda logica.
-
-
-
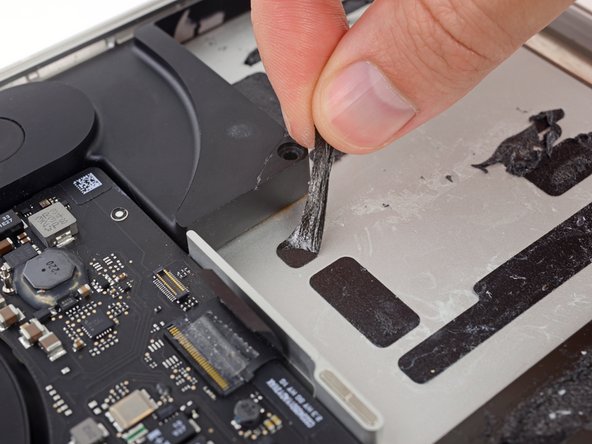
Usa l'estremità piatta di uno spudger per alzare la copertura in gomma del dissipatore dalla ventola sinistra.
-
-
-
Usa la punta di uno spudger per far scattare la linguetta di bloccaggio sullo zoccolo ZIF del cavo piatto della ventola sinistra.
-
Iniziando dalla cima del cavo, fai scorrere un attrezzo di apertura in plastica sotto il cavo della ventola destra per liberarlo dalla scheda logica.
-
Solleva dal dispositivo la ventola sinistra.
-
-
-
-
Usa la punta di uno spudger per alzare il blocco del cavo dati della scheda I/O e ruotalo verso il lato batteria del computer.
-
Usa l'estremità piatta di uno spudger per far scorrere il cavo dati della scheda I/O dal suo zoccolo sulla scheda logica.
-
-
-
Usa l'estremità piatta di uno spudger per sollevare il connettore dell'altoparlante sinistro e staccarlo dal suo zoccolo sulla scheda logica.
-
Usa la punta di uno spudger per sollevare il connettore dell'altoparlante destro e staccarlo dal suo zoccolo sulla scheda logica.
-
-
-
Stacca il nastro adesivo che copre il connettore del cavo a nastro della tastiera.
-
Usa l'estremità piatta di uno spudger per alzare la linguetta di fissaggio sullo zoccolo ZIF del cavo a nastro della tastiera.
-
Usa l'estremità piatta di uno spudger per spingere il cavo a nastro della tastiera fuori dalla sua sede.
-
-
-
Rimuovi il gruppo scheda logica dal MacBook Pro.
-
Quando reinstalli la scheda madre assicurati che tutti i cavi siano visibili e non siano rimasti intrappolati sotto la scheda.
-
In senso orario dall'alto: batteria, speaker destro, retroilluminazione tastiera, AirPort/fotocamera, display, microfono, speaker sinistro, tastiera e trackpad.
-
-
-
Rimuovi le seguenti tre viti che fissano l'altoparlante sinistro al case superiore:
-
Una vite Torx T5 da 5,6 mm
-
Una vite Torx T5 da 6,9 mm
-
Una vite Torx T5 da 2,6 mm
-
Solleva dal case superiore l'altoparlante sinistro e mettilo da parte.
-
-
Questo passaggio è privo di traduzione. Aiuta a tradurlo
-
Remove the two 3.2 mm T5 Torx screws securing the battery board.
-
-
Questo passaggio è privo di traduzione. Aiuta a tradurlo
-
To protect your display, place a sheet of aluminum foil between the display and keyboard and leave it there while you work.
-
-
Questo passaggio è privo di traduzione. Aiuta a tradurlo
-
With the front edge of the MacBook Pro facing you, lift the right side and prop it up at a slight angle, using a sturdy foam block or book.
-
-
Questo passaggio è privo di traduzione. Aiuta a tradurlo
-
Now that your MacBook Pro is fully prepped, it's time to prep yourself.
-
Wear eye protection when handling and applying the adhesive remover. (Eye protection is included in your kit.)
-
Do not wear contact lenses without eye protection.
-
Protective gloves are also included in your kit. If you are concerned about possible skin irritation, put your gloves on now.
-
-
Questo passaggio è privo di traduzione. Aiuta a tradurlo
-
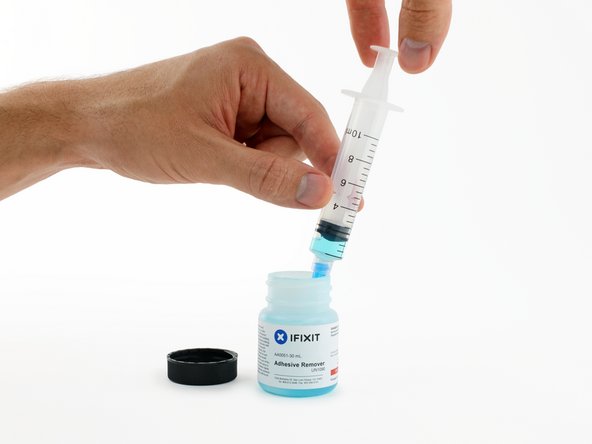
Open your container of adhesive remover.
-
Fill the syringe included in your kit with a small amount (approximately 1-2 milliliters) of adhesive remover.
-
Refill your syringe as needed throughout the rest of this procedure.
-
-
Questo passaggio è privo di traduzione. Aiuta a tradurlo
-
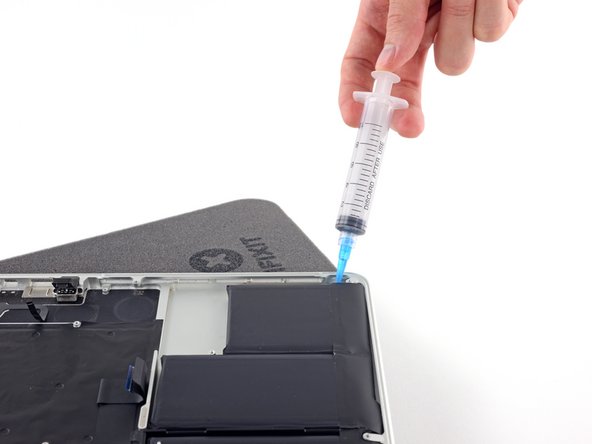
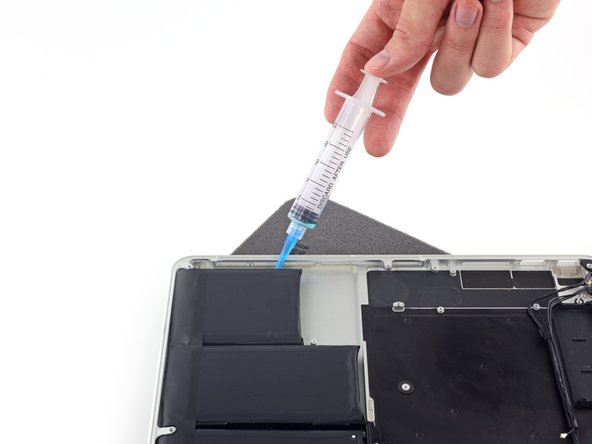
Apply a small amount of adhesive remover (approximately 1 ml) evenly along the elevated edge of the outer right battery cell.
-
Wait 2-3 minutes for the liquid adhesive remover to penetrate underneath the battery cell before you proceed to the next step.
-
-
Questo passaggio è privo di traduzione. Aiuta a tradurlo
-
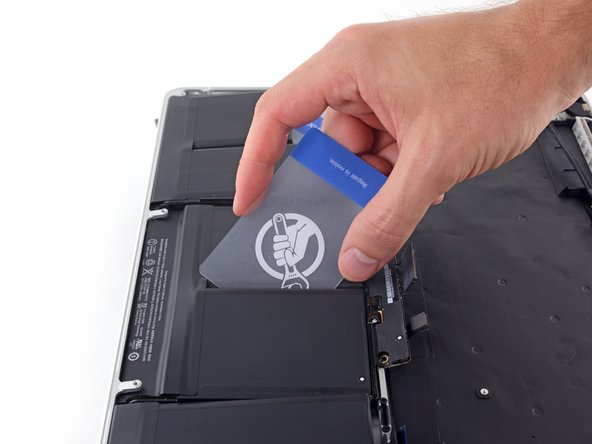
Slide one corner of a plastic card under the outer edge of the battery cell.
-
Slide the card farther underneath the battery cell to separate it from the adhesive securing it to the MacBook Pro's upper case.
-
-
Questo passaggio è privo di traduzione. Aiuta a tradurlo
-
Lift the battery cell to separate it from the MacBook Pro's upper case, but don't try to remove it.
-
Leave the plastic card underneath the battery cell to prevent it from re-adhering as you proceed to the next step.
-
-
Questo passaggio è privo di traduzione. Aiuta a tradurlo
-
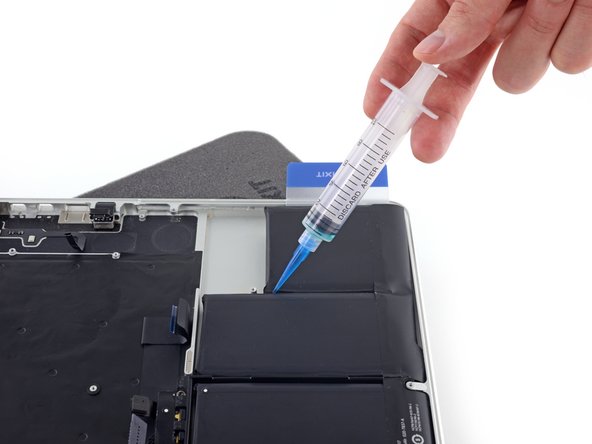
Apply a small amount of adhesive remover (approximately 1 ml) evenly along the elevated edge of the next battery cell.
-
Wait 2-3 minutes for the liquid adhesive remover to penetrate underneath the battery cell before you proceed to the next step.
-
-
Questo passaggio è privo di traduzione. Aiuta a tradurlo
-
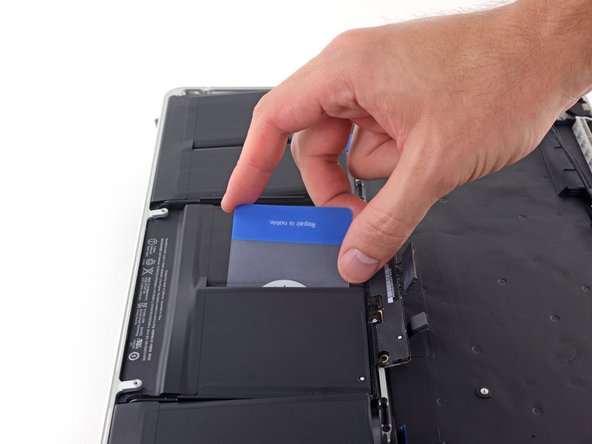
Slide one corner of your plastic card underneath the second battery cell.
-
Push the card underneath the second battery cell, and slide it side to side to separate the adhesive underneath.
-
Leave the plastic card underneath both battery cells (or flip them over) to prevent them from re-adhering as you proceed to the next step.
-
-
Questo passaggio è privo di traduzione. Aiuta a tradurlo
-
It's time to switch sides. Remove your book or foam block and place it under the opposite side of your MacBook Pro.
-
Repeat the procedure from the prior steps to separate the two battery cells on this side:
-
Apply your adhesive remover to the elevated edge of the outer battery cell, and wait 2-3 minutes for it to penetrate.
-
Work one corner of a plastic card underneath the battery cell, and slide the card fully underneath the battery cell to separate it.
-
Do the same for the adjacent cell.
-
Leave your plastic card in place or flip the battery cells over to prevent them from re-adhering during the following steps.
-
-
Questo passaggio è privo di traduzione. Aiuta a tradurlo
-
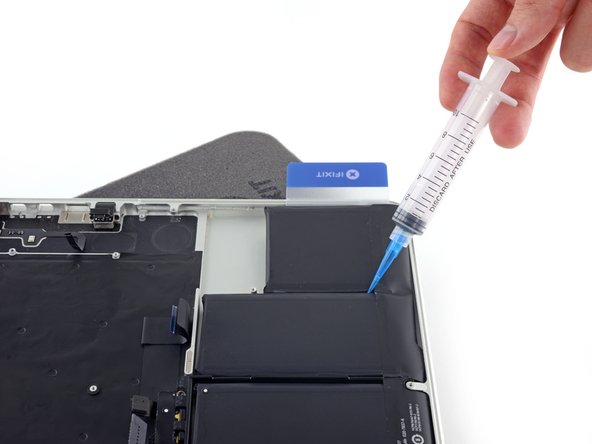
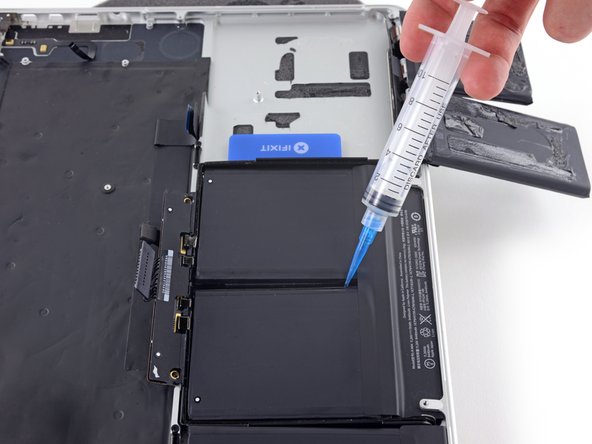
With the left edge of your MacBook Pro still propped up, apply a small amount (about 1 ml) of adhesive remover down the center line between the two middle battery cells.
-
Wait 2-3 minutes for the adhesive remover to penetrate before you continue.
-
-
Questo passaggio è privo di traduzione. Aiuta a tradurlo
-
Slide one corner of a plastic card between the middle two cells, and under the elevated edge of the center-right battery cell.
-
Slide the card farther underneath the battery cell to slice through the adhesive securing it in place.
-
Don't try to fully separate this battery cell yet. Leave your plastic card in place to prevent it from re-adhering.
-
-
Questo passaggio è privo di traduzione. Aiuta a tradurlo
-
Flip the two de-adhered right-hand battery cells over the front edge of the MacBook Pro, if you haven’t already. This will allow access to the outside edge of the center cell.
-
-
Questo passaggio è privo di traduzione. Aiuta a tradurlo
-
Push one corner of a plastic card below the plastic battery frame and underneath the remaining adhered edge of the lower center cell.
-
Slide your card all the way under the battery cell, and leave it to prevent the battery cell from re-adhering.
-
-
Questo passaggio è privo di traduzione. Aiuta a tradurlo
-
Remove the first plastic card that you inserted under the center-right battery cell.
-
-
Questo passaggio è privo di traduzione. Aiuta a tradurlo
-
Remove your book or foam block.
-
With the front edge of the MacBook Pro facing you, lift the right side and prop it up once again.
-
-
Questo passaggio è privo di traduzione. Aiuta a tradurlo
-
Apply a small amount (about 1 ml) of adhesive remover between the two center battery cells, so that it flows underneath the remaining battery cell.
-
Wait 2-3 minutes for the adhesive remover to penetrate before you continue.
-
-
Questo passaggio è privo di traduzione. Aiuta a tradurlo
-
Slide one corner of a plastic card under the elevated edge of the final battery cell.
-
Push the card farther underneath the battery cell to slice through the adhesive securing it in place.
-
Don't try to fully separate this battery cell yet. Leave your plastic card in place to prevent it from re-adhering.
-
-
Questo passaggio è privo di traduzione. Aiuta a tradurlo
-
Repeat the process you used on the center-right battery cell to finish separating the adhesive on the center-left cell:
-
Lift and flip the two outer battery cells to clear access to the remaining adhered edge of the center-left battery cell.
-
Slide your card all the way underneath the battery cell, and leave it to prevent the battery cell from re-adhering.
-
Remove the first card that you inserted under this battery cell in the previous step.
-
-
Questo passaggio è privo di traduzione. Aiuta a tradurlo
-
With one plastic card underneath each of the two center battery cells, twist and lift both cards to fully separate the battery cells, together with the plastic frame and battery board, from the MacBook Pro.
-
-
Questo passaggio è privo di traduzione. Aiuta a tradurlo
-
Lift and remove the battery.
-
With a little luck, you can slowly pull out each strip of adhesive with your fingers.
-
Otherwise, soak each strip of adhesive with a bit of adhesive remover for 2-3 minutes, and then scrape it out with a plastic tool. This can take quite a bit of work, so be patient.
-
Mop up any remaining adhesive remover and give your MacBook Pro a few minutes to air dry.
-
Calibrate your battery before using it: allow it to drain overnight, then charge it to 100% and drain it again until your MacBook Pro shuts down automatically. Charge it again and use it normally.
-


Annulla: non ho completato questa guida.
Altre 3 persone hanno completato questa guida.

