Salta al contenuto principale

Questa versione può contenere modifiche errate. Passa all'ultima istantanea verificata.

Cosa ti serve

  1. , Case inferiore: passo 1, immagine 1 di 1
    • Rimuovi le seguenti viti Pentalobe P5 che fissano il case inferiore del MacBook Pro:

    • Otto viti da 3,0 mm

    • Due viti da 2,3 mm

  2. : passo 2, immagine 1 di 1
    • Alzando il bordo vicino al profilo di copertura, solleva il case inferiore dal MacBook Pro.

    • Metti da una parte il case inferiore.

  3. , Connettore batteria: passo 3, immagine 1 di 1
    • Stacca lo sticker di avviso che copre il connettore batteria.

  4. : passo 4, immagine 1 di 2 : passo 4, immagine 2 di 2
    • Usando l'estremità piatta di uno spudger, stacca con cautela il connettore della batteria dal suo zoccolo sulla scheda logica.

    • Piega indietro il cavo della batteria per evitare che il connettore possa fare contatto accidentalmente con la scheda logica.

  5. Questo passaggio è privo di traduzione. Aiuta a tradurlo

    : passo 5, immagine 1 di 3 : passo 5, immagine 2 di 3 : passo 5, immagine 3 di 3
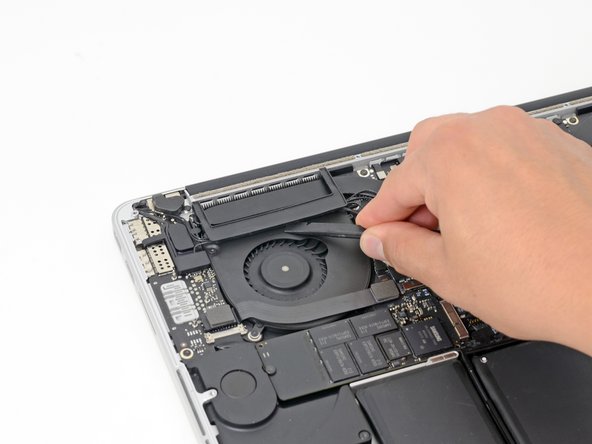
    • Insert the flat end of a spudger underneath the rubber heat sink cover on the right fan.

    • Slide the spudger underneath the length of the cover, releasing the adhesive.

    • Lift the cover and rotate it off of the heat sink.

  6. Questo passaggio è privo di traduzione. Aiuta a tradurlo

    : passo 6, immagine 1 di 3 : passo 6, immagine 2 di 3 : passo 6, immagine 3 di 3
    • In the same manner described above, release the adhesive and flip back the heat sink cover on the left fan.

  7. Questo passaggio è privo di traduzione. Aiuta a tradurlo

    : passo 7, immagine 1 di 1
    • Remove the following ten screws securing the heat sink to the logic board:

    • Two 2.4 mm T5 Torx screws

    • Six 3.4 mm T5 Torx screws

    • One 5.2 mm Raised Head T5 Torx screw

    • One 3.5 mm T5 Torx screw

  8. Questo passaggio è privo di traduzione. Aiuta a tradurlo

    : passo 8, immagine 1 di 1
    • Grasping the heat sink from one side, lift the heat sink off of the MacBook Pro, pulling it free from the computer.

    • The thermal paste may make it difficult to remove the heat sink. Pull the heat sink off gently but forcefully to avoid damaging any components on the logic board.

    • When installing the new heat sink, do not forget to replace the thermal paste underneath the heat sink. See our Applying Thermal Paste guide for further instructions.

Linea Traguardo

Altre 20 persone hanno completato questa guida.

Sam Goldheart

Membro da: 10/18/12

466.174 Reputazione

538 Guide realizzate

Team

iFixit Membro di iFixit

Staff

136 Membri

17.430 Guide realizzate

0 Commenti

Aggiungi Commento

Visualizza Statistiche:

Ultime 24 Ore: 4

Ultimi 7 Giorni: 9

Ultimi 30 Giorni: 62

Tutti i Tempi: 15,840