Introduzione
Sotituisci il subwoofer e lo speaker destro sul tuo MacBook Pro 13" Unibody Metà 2010.
Cosa ti serve
-
-
Rimuovi le dieci viti seguenti, che fissano il case inferiore al MacBook Pro Unibody da 13":
-
Sette viti con testa a croce da 3 mm.
-
Tre viti con testa a croce da 13,5 mm.
-
-
-
Solleva leggermente il case inferiore e spingilo verso la parte posteriore del computer per liberare le linguette di montaggio.
In the introduction you should link fixers to this excellent doc: https://www.ifixit.com/Misc/HD_Software_...
It is really critical, super easy, and free(!) to clone your existing drive onto the new one you will install. I ran into one error, but SuperDuper! support replied immediately on how to fix it...Thanks ifixit and SuperDuper! (I ponied up the $28 for the software anyway, I was so impressed!)
Long story short: I drank the AppleKoolAid back in 1984 and have always left the guts of my machines up to Apple - until recently when I needed to swap the SATAs from my original MacDaddy (2009 13" MBPro that I killed in 2018 - coffee + blackout = OOOOPS) into a pristine 2009 MBPro from a Goodwill in North Carolina through eBay. I need the files from iCal and MacMail that can't be opened in my newer machines.
Well . . . I ain't never done nuttin' like that, before!
Enter Luke Miani on YouTube. He raves about you guys! So, I watched everything I could, read your site, bought the right tools and at the ripe old age of 72, I sat down, this morning and did the work. Now my original MacDaddy lives in MacDaddy2.0.
Am I allowed to cry?
Seriously, I can't thank you enough for your bitchen site and killer tools. I wish I'd'a been turned on to this shizzle 30+ years ago.
IFIXIT - IDIGIT!
HAHAHAHAHAHAHAHAHAHA.
That was a brilliant read.
Yes, I came across ifixit a few years ago. Totally helped me out on several occasions.
Glad your Mac repair journey worked out.
:)
Cary B -
-
-
-
Mediante l'estremità piatta di uno spudger, sollevare il connettore del cavo della batteria dal connettore femmina sulla scheda logica staccandolo da questa.
How do you get that battery connector back on? Do you just press it in back in place after you're done?
yes. I usually plug it in before I screw it down so I can lift the battery a bit and have enough slack to be able to go straight down on the connector, otherwise it comes in on a bit of an angle, which can't be good (though not necessarily bad).
This step almost finished me, and I did extensive damage to the battery plug. Fortunately, I later replaced the battery, and the replacement came with a new plug! :) Newbies need to know - 1. The battery plug is like a thin lip on a thicker lip, so you need to pry BETWEEN 2 thin lips to get it off, else you are trying to yank out the socket. 2. Mine was initially VERY tight, and trying to get it out broke the plastic on all sides of plug, even though I was as careful as possible. Luckily, this didn't hurt functionality and I later replaced the battery. AFTER disconnecting once, it was never so tight again,
-
-
-
Rimuovere l'eventuale imbottitura morbida sulla parte superiore ed estrarre delicatamente il connettore dal rispettivo connettore femmina sulla scheda logica.
It is not necessary to remove the camera cable connector (step 5) or the camera cable connector (step 10). Simply push the camera cable gently aside to remove one of the three screws securing the optical drive (step 11). Gently wiggle the optical drive from under the camera cable connector and go to step 12. Less chance of ruining your motherboard!
Absolutely. Leave it alone, you don’t need to run the risks of removing this cable, I did the replacement fine without it
It does indeed come out of the connector, but the picture makes it hard to see how; the connector it goes into sits on top of the board—however, I, too, ripped mine off the board trying to remove it; I only got it out of the clip after I tore it off. SIMPLY DONT; it's unnecessary. I plan to solder it back if one of my Robotics club friends lets me borrow a soldering iron.
The 4-pin push connector for the sub-woofer is near impossible to reconnect
It mates with a female connector that sits on top of 4 tiny solder points (it's held on by a spot of glue, I believe), and when applying ANY pressure to connect, the side clip(s) will snap off. Then the connector itself will become unglued. It would be simple enough to connect the 2 parts, then place a drop of glue on the logic board after positioning it above the solder points, but the female connector broke apart in my hand. So now screwed, with no way to connect sub/ R speaker without installing another logic board. Fan connector looks to be exactly the same
-
-
-
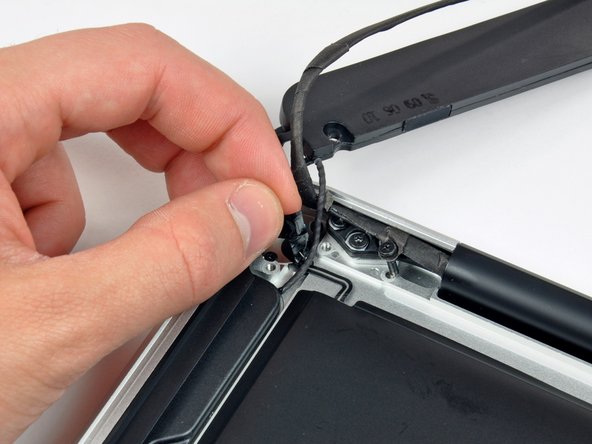
Tirare il connettore del cavo della fotocamera verso l'unità ottica per scollegarlo dalla scheda logica.
-
-
-
-
Rimuovere le viti seguenti, che fissano il subwoofer al case superiore:
-
Una vite con testa a croce da 3,8 mm
-
Una vite con testa a croce da 5 mm
-
-
-
Rimuovere le tre viti con testa a croce da 2,5 mm che fissano l'unità ottica al case superiore.
-
Sollevare l'unità ottica dal bordo destro ed estrarla dal computer.
Install 2 outside screws first and then single inside screw to allow wiggle room to get outside screws in. Do not tighten screws until all are started.
-
-
-
Rimuovi il nastro adesivo nero che copre il cavo dello speaker destro.
-
-
-
Usa la punta dello spudger per far leva sullo speaker destro e sollevarlo dall'adesivo che lo tiene fermo sulla scocca superiore.
The new speakers don’t come with adhesive, so some double sided tape is handy. Also, the right speaker cable can be rather long, so some tape is useful to carefully loop it out the way.
-


Per riassemblare il dispositivo, segui le istruzioni nell'ordine inverso.
Per riassemblare il dispositivo, segui le istruzioni nell'ordine inverso.
Annulla: non ho completato questa guida.
Altre 52 persone hanno completato questa guida.
Un ringraziamento speciale a questi traduttori:
100%


Questi traduttori ci stanno aiutando ad aggiustare il mondo! Vuoi partecipare?
Inizia a tradurre ›

3 Commenti
Hello, I've just brought a MacBook Pro 8,1 to life with an SSD. It works great but unfortunately no sound. There is no output listed in sound window. I tried cmd+opt+P+R without success. Would replacing the speaker assembly solve the problem or is this a hardware problem? Thanx
PS- I also restarted cord...something in processes that didn't work either.
Compare the short screws carefully before reinstalling them. The shouldered screws go in the holes on the front edge.
David Kilbridge - Replica
Before I started removing any screws I took a piece of paper and drew the bottom of the laptop and put a piece of double-sided tape in the spot where each screw goes. That way when I took out the screws, I could put them on the tape so I knew exactly which screw went in which spot. I did the same thing for dismantling the inside on another sheet of paper, then a third sheet for the screen after getting the front glass off.
mastover - Replica
I use a similar technique: I print out the iFixit manual for the job, and Scotch-tape down the screws/brackets/cables I remove at each step next to the component descriptions. That way, when I'm reassembling, the bits are taped right next to the photo of where they came from.
adlerpe -
That's exactly what I do for all my repairs! It's the best way to keep track of all of the parts ' original location and to make sure that you don't miss any parts during reassembly.
joyitsjennie -
Great idea and one I use often
Thomas Overstreet -
Excellent idea! Thanks for sharing it here.
Laura Sharkey -
I used a 00 that fit but the screws were very tight so I used a tiny paintbrush with some wd40 on it and put it around the edges of the screws. Worked like a charm
valentinedhdh - Replica
I use a magnetic mat and place the screws in order on that :)
Cary B - Replica