Questa versione può contenere modifiche errate. Passa all'ultima istantanea verificata.
Cosa ti serve
-
-
Posizionare i pollici negli incavi nel coperchio inferiore.
-
Ruotare il coperchio inferiore in senso antiorario finché il puntino bianco dipinto su di esso non è allineato con il cerchio in rilievo sul case esterno.
-
-
-
Rimuovere le due viti Torx T6 da 11,3 mm che fissano la ventola alla scheda logica, in prossimità della piastra dell'antenna.
-
-
-
Rimuovere le viti seguenti, che fissano la piastra dell'antenna al Mac mini:
-
Due viti Torx T8 da 6,6 mm
-
Due viti Torx T8 da 5 mm o viti esagonali da 2 mm (vanno bene entrambi i cacciaviti)
-
in fase di montaggio:
-
-
-
-
Utilizzare l'estremità piatta di un inseritore per scollegare il connettore del disco rigido dal connettore femmina sulla scheda logica.
-
-
-
Infilare lo strumento per la rimozione della scheda logica del Mac Mini nei due fori evidenziati in rosso. Verificare che avvenga il contatto con il lato superiore del case esterno sotto la scheda logica prima di procedere con l'operazione.
-
Tirare con attenzione l'attrezzo verso la scheda I/O. La scheda logica e il gruppo della scheda I/O dovrebbero scorrere leggermente fuori dal case esterno.
-
Rimuovere l'attrezzo per la rimozione della scheda logica per Mac Mini.
-
-
-
Estrarre il gruppo della scheda logica/scheda I/O dal case esterno affinché sia possibile accedere al connettore dell'alimentazione.
-
Utilizzare le dita per scollegare il cavo C.C. in ingresso dalla scheda logica.
-
Tirare il connettore del cavo di alimentazione verso il lato anteriore del Mac mini.
-
-
Questo passaggio è privo di traduzione. Aiuta a tradurlo
-
Use the tip of a spudger to carefully pry the PRAM battery up and out of its holder on the logic board.
-
-
Questo passaggio è privo di traduzione. Aiuta a tradurlo
-
Remove the PRAM battery from the logic board.
-
-
-
Rimuovi le due viti seguenti che assicurano l'altoparlante alla scheda madre:
-
Una Torx T6 da 3,5 mm
-
Una Torx T6 da 3,7 mm
-
-
Questo passaggio è privo di traduzione. Aiuta a tradurlo
-
Use the flat end of a spudger to pry both antenna connectors up from their sockets on the AirPort/Bluetooth board.
-
-
Questo passaggio è privo di traduzione. Aiuta a tradurlo
-
Use your spudger to help disconnect the AirPort/Bluetooth ribbon cable from its socket on the AirPort/Bluetooth board.
-
-
Questo passaggio è privo di traduzione. Aiuta a tradurlo
-
Remove the two 2.6 mm T6 Torx screws securing the AirPort/Bluetooth board to the logic board.
-
-
Questo passaggio è privo di traduzione. Aiuta a tradurlo
-
Remove the AirPort/Bluetooth board from the logic board.
-
-
Questo passaggio è privo di traduzione. Aiuta a tradurlo
-
Use the flat end of a spudger to pry the AirPort/Bluetooth ribbon cable up off the logic board.
-
Remove the AirPort/Bluetooth ribbon cable.
-
-
Questo passaggio è privo di traduzione. Aiuta a tradurlo
-
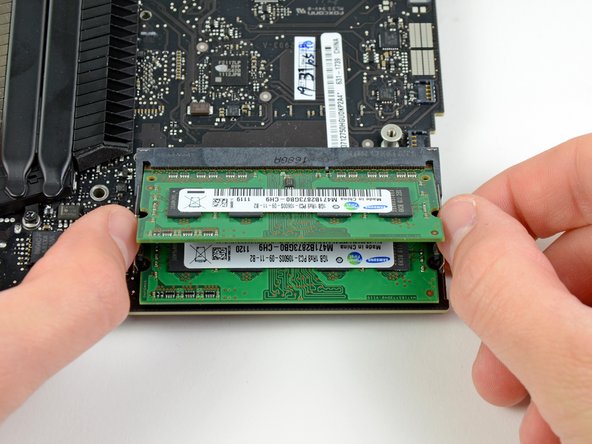
Release the tabs on each side of the RAM chip by simultaneously pushing each tab away from the chip.
-
After the RAM chip has popped up, pull it straight out of its socket.
-
-
Questo passaggio è privo di traduzione. Aiuta a tradurlo
-
Remove the single 5 mm T6 Torx standoff from the heat sink near the edge of the logic board.
-
-
Questo passaggio è privo di traduzione. Aiuta a tradurlo
-
Remove the following screws securing the heat sink to the logic board:
-
Four 8.6 mm T8 Torx screws
-
One 2.6 mm T6 Torx screw
-
-
Questo passaggio è privo di traduzione. Aiuta a tradurlo
-
Remove the heat sink from the logic board, minding any cables that may get caught.
-
Logic board remains.
-


Annulla: non ho completato questa guida.
Altre 20 persone hanno completato questa guida.

4 Commenti
I ran a hardware test on my MacMini 2012 an it gave me the error 4SNS/1/C0000008: TAOP--124. I cannot use the Mac mini anymore because the fan is on full speed and kernel_task is on >300%.
I already know that the error is the Ambient Temperature sensor but i haven't got any hint where it is located. Similar threads on forums are always about MacBooks.
Do you know wether this sensor is on the logic board or is it external? What sensors does the Mac mini 2012 has?
Many thanks.
Just a heads up, after step #15, before #16, fishing out the hard drive makes pulling the DC-In cable to the Logic Board exponentially easier.
Step 17 shows the logic board being removed with the port cover intact. Step 30 shows the logic board without the port cover. There’s no mention in between of how that cover comes off. Anyone?
Deroute the wifi cables. You will see a connector to the board on its underside for the wifi: pry up from underneath the cable to free the connector from the board. Then there's 5 T6 screws to remove, 4 on the underside, one on the top. Now there's a small insulator glued to the board between the card reader and USB ports. Pull that off. You'll need to glue that back upon reassembly. Next, you gently wiggle the board away from the port cover. I would do this upside down from the orientation of the last picture, as there are 3 foam insulators that will fall out if you do it the other way. They are not connected at all, so be prepared for them to move around as soon as the board is loose. Reverse to put it back together.