Questa versione può contenere modifiche errate. Passa all'ultima istantanea verificata.
Cosa ti serve
-
Questo passaggio è privo di traduzione. Aiuta a tradurlo
-
Open the front access door and remove any cards or cables present. Close the access door.
-
Remove the paper tray.
-
Remove the ink cartridges.
-
Open the printer cover using the finger holds on the sides.
-
Unplug and remove any cords present under the cover.
-
Remove the LAN port and EXT port caps (if present).
-
-
Questo passaggio è privo di traduzione. Aiuta a tradurlo
-
While holding the cover with one hand, pull the hook on the back of the support damper, then remove the damper from the cover.
-
Remove the damper from the support.
-
Turn the support upright and pull it straight out of the printer.
-
-
Questo passaggio è privo di traduzione. Aiuta a tradurlo
-
Use your finger or a spudger to unhook the two tabs on the right side of the harness cover by levering it up.
-
Remove the harness cover. There are two tabs on the left side that you have to wiggle free, and one on the front.
-
-
Questo passaggio è privo di traduzione. Aiuta a tradurlo
-
Remove the 6 mm Phillips #2 screw from the grounding wire of the ADF motor harness.
-
-
Questo passaggio è privo di traduzione. Aiuta a tradurlo
-
In the proceeding steps, you will disconnect the following cables:
-
CIS flat cable
-
Scanner motor harness
-
ADF motor harness
-
Document detection/document scanning position sensor harness
-
-
-
Questo passaggio è privo di traduzione. Aiuta a tradurlo
-
Pull the scanner motor harness out of its socket.
-
-
Questo passaggio è privo di traduzione. Aiuta a tradurlo
-
Pull the ADF motor harness out of its socket.
-
-
Questo passaggio è privo di traduzione. Aiuta a tradurlo
-
Pull the document detection/document scanning position sensor harness out of its sockets.
-
-
Questo passaggio è privo di traduzione. Aiuta a tradurlo
-
Insert a spudger between the scanner harness holder and frame to release the tab. There is a second tab on the opposite side.
-
Lift the scanner harness holder out of its frame.
-
-
Questo passaggio è privo di traduzione. Aiuta a tradurlo
-
Push on the tab to secure the scanner harness holder to the scanner cover.
-
De-route the document detection/document scanning position sensor harness and the ADF motor harness from the scanner harness holder.
-
-
Questo passaggio è privo di traduzione. Aiuta a tradurlo
-
Using both hands, pull the scanner cover to the rear while holding it vertically, then lift it off of the printer.
-
-
Questo passaggio è privo di traduzione. Aiuta a tradurlo
-
Remove the six 12 mm Phillips #2 screws securing the upper cover to the printer.
-
Pull off the upper cover.
-
-
Questo passaggio è privo di traduzione. Aiuta a tradurlo
-
Remove the ink absorber full sensor from its socket.
-
De-route the wiring from its harness.
-
-
Questo passaggio è privo di traduzione. Aiuta a tradurlo
-
Unclip the ink absorber from the harness by pulling it up and to the right.
-
-
Questo passaggio è privo di traduzione. Aiuta a tradurlo
-
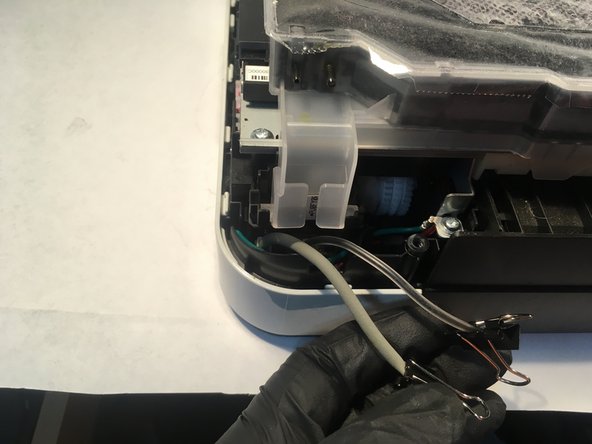
Remove the drain tube and the air vent tube from the ink absorber box. A spudger may be helpful.
-
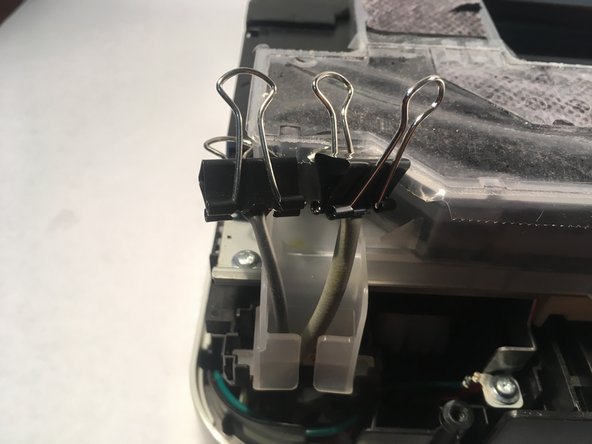
Clip the ends of the tubes so they won't leak.
-
De-route the tubes from the holder.
-
-
Questo passaggio è privo di traduzione. Aiuta a tradurlo
-
Rotate the ink absorber box 90º vertically, and pull it up out of its socket.
-


Annulla: non ho completato questa guida.
Altre 50 persone hanno completato questa guida.
Team

51 Commenti
Useful for dismantling the printer although my problem wasn’t with the waste ink component
Well, feel free to make a guide based on this one for whatever your problem was!
Calion -
Calion, you are my hero! The one place I’ve found where I can buy the replacement waste box for my Brother MFC-J4510DW does not provide directions on how to install it. And Brother itself offers neither the part nor the instructions. I thought I was going to have to buy a new printer until I came across your excellent report! Thanks so much for doing this!
You’re welcome! Very glad I could help out!
Calion -
Very informative and helpful :-)
Question could you fit a external waste ink tank ? what size are the waste ink tubes?