Salta al contenuto principale

LG V50 ThinQ Speaker & Charging Port Replacement

Cosa ti serve

  1. LG V50 ThinQ Speaker & Charging Port Replacement, Speaker System / Charger Port: passo 1, immagine 1 di 3 LG V50 ThinQ Speaker & Charging Port Replacement, Speaker System / Charger Port: passo 1, immagine 2 di 3 LG V50 ThinQ Speaker & Charging Port Replacement, Speaker System / Charger Port: passo 1, immagine 3 di 3
    • Flip the phone over, so that the back of the phone is facing you.

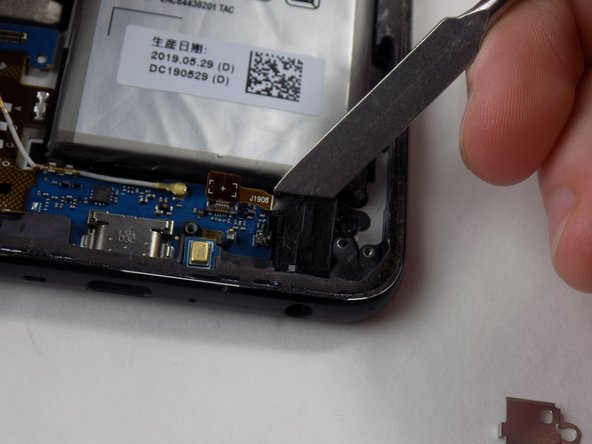
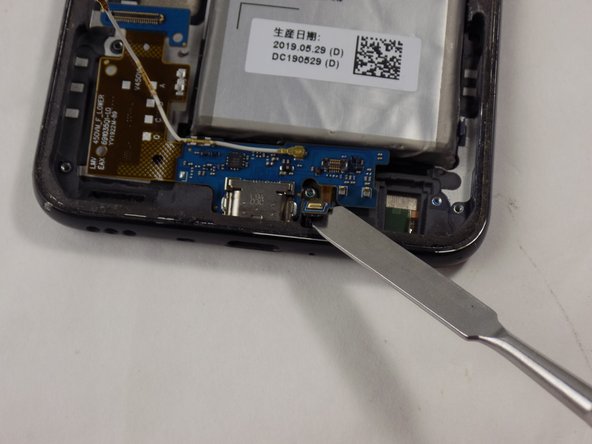
    • Using an opening pick, pry open the back cover of the phone by moving the opening pick along all sides to reveal the internal components.

  2. LG V50 ThinQ Speaker & Charging Port Replacement: passo 2, immagine 1 di 3 LG V50 ThinQ Speaker & Charging Port Replacement: passo 2, immagine 2 di 3 LG V50 ThinQ Speaker & Charging Port Replacement: passo 2, immagine 3 di 3
    • With the back side open, remove all 12 1 mm Phillips #000 screws.

    • Remember to keep the screws in a safe place for reassembly later!

  3. LG V50 ThinQ Speaker & Charging Port Replacement: passo 3, immagine 1 di 3 LG V50 ThinQ Speaker & Charging Port Replacement: passo 3, immagine 2 di 3 LG V50 ThinQ Speaker & Charging Port Replacement: passo 3, immagine 3 di 3
    • Remove the two brackets that are covering internal components.

  4. LG V50 ThinQ Speaker & Charging Port Replacement: passo 4, immagine 1 di 3 LG V50 ThinQ Speaker & Charging Port Replacement: passo 4, immagine 2 di 3 LG V50 ThinQ Speaker & Charging Port Replacement: passo 4, immagine 3 di 3
    • Disconnect the battery from the phone by removing the battery connection from the connector port.

    • Disconnect the orange cable by pulling the connector up with your fingers.

    • Pull up with tweezers on the end of the white wire to disconnect it from the two circuit boards.

    • Pull up with tweezers on the dark orange cable to disconnect it.

  5. LG V50 ThinQ Speaker & Charging Port Replacement: passo 5, immagine 1 di 3 LG V50 ThinQ Speaker & Charging Port Replacement: passo 5, immagine 2 di 3 LG V50 ThinQ Speaker & Charging Port Replacement: passo 5, immagine 3 di 3
    • Take out the SIM card by using the SIM head and pushing into the SIM ejector slot.

    • Disconnect the orange panel nearby the SIM slot from the circuit board.

    • Pull up from below the circuit board on the top, next to the CMOS battery to remove the upper circuiting from the phone.

  6. LG V50 ThinQ Speaker & Charging Port Replacement: passo 6, immagine 1 di 3 LG V50 ThinQ Speaker & Charging Port Replacement: passo 6, immagine 2 di 3 LG V50 ThinQ Speaker & Charging Port Replacement: passo 6, immagine 3 di 3
    • Pull up from the right of the metallic cover piece inside of the bottom right of the phone.

    • Remove the metallic piece's base from the board.

    • Make the cubic piece moveable by wiggling under it with an opening pick or spudger.

  7. LG V50 ThinQ Speaker & Charging Port Replacement: passo 7, immagine 1 di 1
    • Remove bottom circuiting, the speaker system is a part of the bottom circuit board.

Conclusione

To reassemble your device, follow these instructions in reverse order.

Team

0 Commenti

Aggiungi Commento

Visualizza Statistiche:

Ultime 24 Ore: 4

Ultimi 7 Giorni: 7

Ultimi 30 Giorni: 20

Tutti i Tempi: 125