Introduzione
Sostituisci l'hard drive nel tuo iMac Intel 21,5"
Questa guida include anche i passi per aggiornare il tuo disco fisso con un SSD. Descrive come installare il sensore della temperatura del SSD in modo che la ventola del Mac funziona alla velocita corretta.
Prima di iniziar qualsiasi operazione sul tuo iMac: Stacca la spina della corrente e premi e mantieni premuto per dieci secondi il bottone di accensione in modo da scaricare completamente i condensatori dell'alimentatore.
Stai molto attento a non toccare qualsiasi terminale dei condensatori o saldature esposte sul retro dell'alimentatore.
Cosa ti serve
-
-
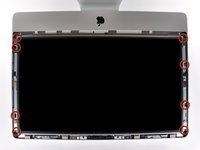
Fai aderire una ventosa accanto a ciascuno dei due angoli superiori del pannello di vetro.
-
Se la ventosa non aderisce, prova a ripulire il pannello di vetro e la ventosa con un solvente delicato.
-
-
-
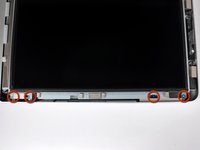
Solleva il pannello di vetro in perpendicolare rispetto alla superficie dello schermo LCD, affinché sia possibile liberare i piedini di montaggio in acciaio inseriti lungo il lato sottostante al bordo superiore del pannello di vetro.
-
Estrai il panello di vetro dal bordo inferiore dell'iMac e mettilo da parte con attenzione.
-
-
-
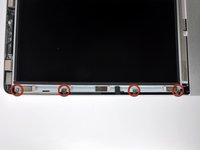
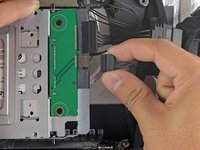
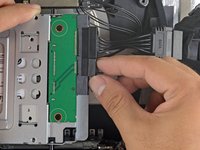
Rimuovi le otto viti Torx T10 da 8 mm che fissano il display al case esterno.
-
-
-
-
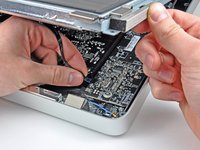
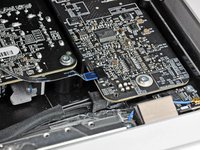
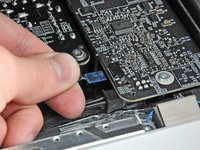
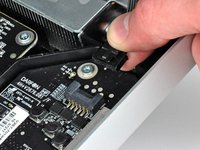
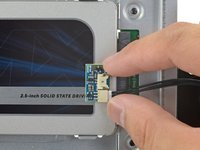
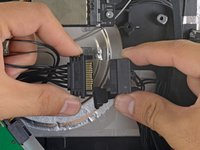
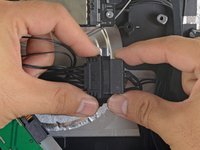
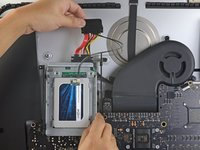
Scollegare sensore termico estraendone il connettore dalla parte laterale del disco rigido.
-
-
-
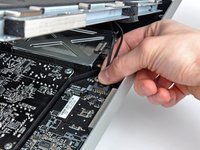
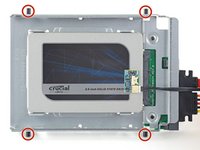
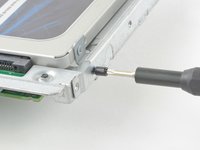
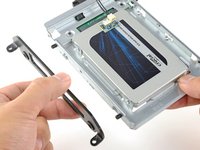
Rimuovi le due viti Torx T8 che fissano la staffa superiore all'hard drive.
-
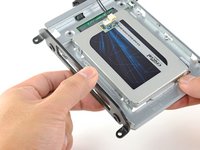
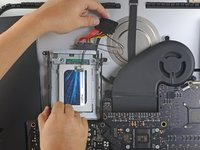
Rimuovi la staffa superiore dall'hard drive.
-
-
-
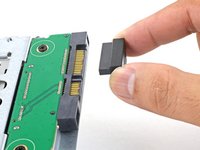
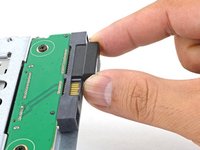
Allinea il connettore dell'SSD con i rispettivi zoccoli dell'involucro metallico.
-
Premi il disco contro gli zoccoli dell'alloggiamento finché l'SSD non si blocca in posizione corretta.
-
-
-
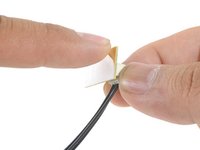
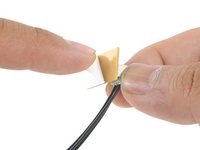
Stacca la protezione bianca dal retro della piccola scheda del sensore di temperatura per esporre l'adesivo presente su questo componente.
-
Fai aderire la scheda del sensore di temperatura su una superficie metallica esposta dell'SSD, vicino al connettore SATA.
-
Ripiega i cavi del sensore di temperatura che ingombrano in modo che non siano di intralcio in fase di montaggio dell'alloggiamento.
-
-
-
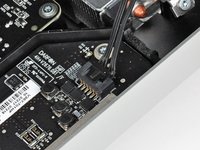
Trova il connettore sulla scheda madre etichettato HD TMP o HDD TEMP.
-
Se il precedente cavo della temperatura è ancora connesso alla scheda, scollegalo e rimuovilo. Non ti servirà più.
-
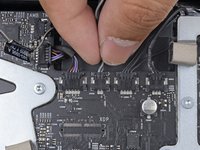
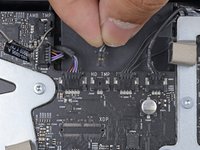
Connetti il doppio cavo rosso-nero del sensore di temperatura alla presa sulla scheda madre etichettata HD TMP o HDD TEMP.
-
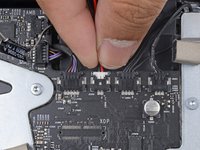
Ripiega la parte di cavo in eccesso in modo che non interferisca con altri componenti.
-


Per riassemblare il dispositivo, segui queste istruzioni in ordine inverso.
Per riassemblare il dispositivo, segui queste istruzioni in ordine inverso.
Annulla: non ho completato questa guida.
Altre 381 persone hanno completato questa guida.
Un ringraziamento speciale a questi traduttori:
100%


Questi traduttori ci stanno aiutando ad aggiustare il mondo! Vuoi partecipare?
Inizia a tradurre ›

67 Commenti
Make sure the hard drive is of the same producer and it has a temp sensor connector. It's the only way to ensure that the heat sensor connector will fit into the hard drive's socket. If you don't plug in the temp sensor iMac's HDD Fan will rotate at its maximum speed, ie. over 6000 rpms - the noise is extraordinary!!!
I replaced my internal HDD on my 215" iMac, but the iMac can't get access to the new hard disk's (Seagate Barracuda Green) temperature sensor. The HDD fan in the iMac steps up the RPM, and over about 15min reaches 6000RPM (VERY loud) and stays there until machine is shutdown or put to sleep.
I found a fix for this: http://hddfancontrol.com/HDDFanControl/H... - this tiny piece of shareware software allows the iMac to see the temperature of the drive via S.M.A.R.T., and therefore the fans react according to the correct temperature again!
One thing Andrew left out here, which I discovered on my own, is that even if you have the temperature sensor connected to the correct pins, you ALSO have to make sure that it is 'oriented' properly.
On the sensor connector (the little head that plugs into the hard drive) I saw a little white dot on one side, which it turns out, indicates that's the 'top'. So on my iMac, you have to make sure when you connect the temp sensor connector with the white dot showing.
Otherwise, I got the 6000 rpm fans.
Success. For any interested people, it's about an hour - going slowly. Now that I've done it, I assume I could do it again in 15 minutes if I had to.
Just have the right tools handy, the T 8 and T 10 bits in particular. Getting off the display screen is easy. The screws are harder than you'd think because of the magnets, but they're not that bad. I recommend having tweezers to help pull them and place them later on.
Overall, the thing that worried me most was the fan issue. And, so far... it's not an issue. I had a seagate 500 gb, and I replaced it with a seagate barracuda 3 tb hhd. Everything fit right into it, just as it did into the original. No optical sensor needed. No new sensor needed, period. No software needed. Nothing. Just put in the new hd, and it works. I'm very pleased, and very proud of myself. Good luck to anyone considering doing this upgrade. You can do it, really.
It's a pretty straightforward procedure. Took less than an hour. I replaced the 500GB Seagate Barracuda with a Seagate Barracuda 2TB, model ST2000DM001. So far, after about 30 minutes of use, it's working great, and I haven't had the fan problem, but we'll see what happens.
Kevin's advice about the tweezers for extracting and inserting the screws that attach the display to the case was right on (although I used a small pliers instead).
Before you begin the replacement procedure, I highly recommend putting the new drive into a hard drive dock, and restoring to it from a Time Machine backup. Try booting off the new drive once to make sure it works. Then, when you swap the new drive for the existing internal drive, it'll be ready to go with no further effort needed.