Salta al contenuto principale

IBM ThinkPad T42 Wi-Fi Card Replacement

Cosa ti serve

  1. IBM ThinkPad T42 Wi-Fi Card Replacement, Bottom cover: passo 1, immagine 1 di 1
    • Use a Phillips #0 screwdriver to remove the twenty screws on the underside of the T42.

  2. IBM ThinkPad T42 Wi-Fi Card Replacement, Rear screws: passo 2, immagine 1 di 1
    • Remove the four Phillips screws located on either side of the rear of the T42 (there are two on each end.)

    leave these four screws alone. No need to remove them.

    fredwb - Replica

    There are tiny numbers showing the lengths of the screws. 1-2-3-4 where 1 is the shortest.

    The dark red circles are not very easy to see. How about white ones?

    mattikaki - Replica

  3. IBM ThinkPad T42 Wi-Fi Card Replacement, Keyboard and Trackpad: passo 3, immagine 1 di 1
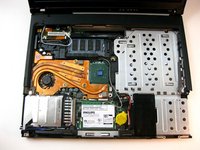
    • Flip the laptop over and open the screen to access the keyboard and trackpad.

    • The keyboard and trackpad are connected to the motherboard. Before removing the keyboard and trackpad, disconnect both components from the motherboard, as shown in the following step.

    • The bezel and keyboard will be loose, be careful.

  4. IBM ThinkPad T42 Wi-Fi Card Replacement: passo 4, immagine 1 di 2 IBM ThinkPad T42 Wi-Fi Card Replacement: passo 4, immagine 2 di 2
    • Carefully maneuver the palm rest away from the keyboard, as both the keyboard and palm rest/trackpad will come off together.

    • Remember, both the keyboard and trackpad have connectors to the motherboard. Disconnect these before completely removing either component.

  5. IBM ThinkPad T42 Wi-Fi Card Replacement, Wi-Fi Card: passo 5, immagine 1 di 1
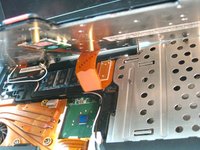
    • To remove Wi-Fi card, first disconnect both display wires on the top right.

  6. IBM ThinkPad T42 Wi-Fi Card Replacement: passo 6, immagine 1 di 1
    • Then slide both of the metal pieces holding it down outwards, and it will pop up.

  7. IBM ThinkPad T42 Wi-Fi Card Replacement: passo 7, immagine 1 di 1
    • Carefully pull it out.

Conclusione

To reassemble your device, follow these instructions in reverse order.

Altre 3 persone hanno completato questa guida.

Kevin Rehm

Membro da: 04/19/10

472 Reputazione

4 Guide realizzate

Team

Cal Poly, Team 29-76, Johann Spring 2010 Membro di Cal Poly, Team 29-76, Johann Spring 2010

CPSU-JOHANN-S10S29G76

4 Membri

37 Guide realizzate

2 Commenti

Get the HMM for the laptop! On a few of these, I have had to just pull out the internal wi-fi card, and use a USB wi-fi adapter.

Martin Campbell - Replica

The only screws that need to be removed are the ones that are numbered 1-4 on the bottom of the case. Best to remove the screws with #4 next to them, then remove the keyboard and then remove 1-3 and then the palm rest. Removing the ones on the rear is unnecessary.

John Casey - Replica

Aggiungi Commento

Visualizza Statistiche:

Ultime 24 Ore: 3

Ultimi 7 Giorni: 12

Ultimi 30 Giorni: 33

Tutti i Tempi: 13,915