Introduzione
Usa questa guida per sostituire l'altoparlante e/o il motore di vibrazione nel tuo smartphone Huawei P10 Lite. Nel rimontare il tuo telefono applica del nuovo adesivo dove necessario.
Cosa ti serve
-
-
Inserisci la punta di un plettro di apertura tra la cover posteriore e il telaio centrale e fallo scorrere attorno al telefono per tagliare l'adesivo.
-
Può facilitare le cose usare una ventosa per sollevare la cover posteriore e creare una fessura iniziale dove inserire il plettro di apertura.
-
-
-
Svita le due viti Phillips #00.
-
Svita le quattro viti Phillips #000.
Schritt 3 und 4 kann man sich komplett sparen. Wozu auch. Kann gleich mit Schritt 5 weitergemacht werden, zuvor einfach das Flachbandkabel vom Fingerabdrucksensor an der Rückabdeckung abklemmen und fertig.
Translate what Bobby mcgee said:
Step 3 and 4 can be completely ignored. What for? You can continue with step 5, just disconnect the ribbon cable from the fingerprint sensor on the back cover and you're done.
However, the reason step 3 and 4 should not be skipped is Step 6 — Use an iOpener to loosen the adhesive beneath the battery. I.e., the adhesive cannot be easily removed without heat, however, that heat might damage the electric chips. Thus they’d better be removed first.
-
-
-
-
Usa delle pinzette per rimuovere la schermatura della scheda principale.
-
Usa l'estremità piatta di uno spudger per disconnettere il cavo flessibile del sensore impronte digitali.
Welchen Klebstoff soll man verwenden?
Hallo Josef,
sollte bei deinem Ersatzteil kein Klebstoff oder Klebeband dabei gewesen sein, kannst du dünne Streifen Doppelseitiges Klebeband verwenden. Es gibt für das Huawei P10 Lite auch schon zugeschnittene Klebestreifen zu erwerben, hierbei gilt aber je nach Händler Rezessionen zu lesen, ob die Klebestreifen auch wirklich halten.
Hi darren,
pre-cut adhesive would be the best solution if you can source it. Otherwise a two-sided adhesive tape or carefully used E6000 adhesive glue will be your friend. -
-
-
Rimuovi la vite a croce che tiene in posizione la piastra del connettore della batteria.
-
Rimuovi la piastra del connettore della batteria.
-
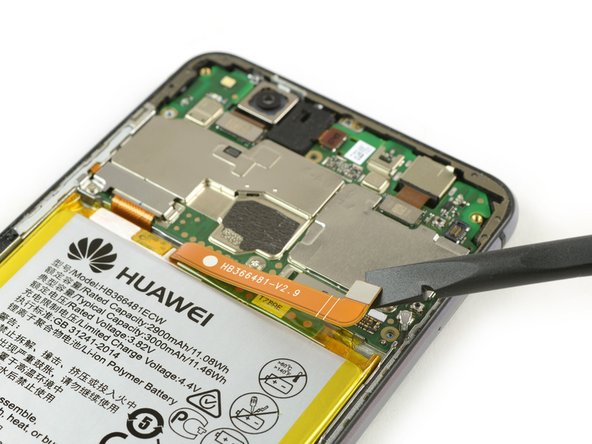
Usa l'estremità piatta di uno spudger per disconnettere il cavo flessibile della batteria.
-
-
-
Usa un iOpener per ammorbidire la colla sotto il motore di vibrazione.
-
Rimuovi il motore di vibrazione.
-


Per rimontare il tuo dispositivo, segui queste istruzioni in ordine inverso.
Per rimontare il tuo dispositivo, segui queste istruzioni in ordine inverso.
Annulla: non ho completato questa guida.
Altre 2 persone hanno completato questa guida.
Un ringraziamento speciale a questi traduttori:
100%


Questi traduttori ci stanno aiutando ad aggiustare il mondo! Vuoi partecipare?
Inizia a tradurre ›


Un commento
is it necessary to disconnect the finger print sensor flex cable in order to remove/replace the loudspeaker, or is just a precaution!?
Mit dem Saugnapf die Rückseite anheben hilft ungemein…
Matthias Eberle - Replica
Had to use blue wedge tool to wedge open bottom plate from the rim part in order to then use the tip of the blue opening pick under the back plate to then cut the glue. It’s like placing a pie server or knife under the plate once there’s a gap between the rim and the back plate.
Jane - Replica
Be careful, there’s a cable to fingerprint sensor, very close to the edge (see pictures below)… It’s very easy to cut it through with the pick, as I just learned :)
dambig - Replica