Salta al contenuto principale
How to Fix a Stuck Button in Sharp Calculator

How to Fix a Stuck Button in Sharp Calculator

Micah Bustamante

Micah Bustamante e 2 altri collaboratori

Ultimo aggiornamento il September 26, 2024

6 - 10 minuti
Facile

Introduzione

Vai al passo 1

This guide shows an easy step-by-step repair process that fixes stuck buttons on the Sharp scientific calculator quickly.

It covers the models EL-W531X, EL-W531XG, EL-W531XH, and EL-W535X for Sharp Scientific Write View Calculator. If your device does not display the inputted numbers correctly, it is likely due to sticky keys. This common issue occurs when the buttons become exposed to excessive force, such as being dropped or roughly used. As a result, some keys become sticky, knocked out from their position and unusable.

Cosa ti serve

Strumenti

  • Phillips #0 Screwdriver
    Phillips #0 Screwdriver
  • Spudger
    Spudger
  • iFixit Opening Tool
    iFixit Opening Tool

Mostra di più…

  1. How to Fix a Stuck Button in Sharp Calculator, Button Keys: passo 1, immagine 1 di 1
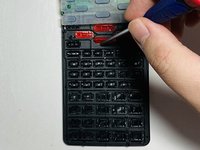
    • Turn the power off by pressing a button named 2NDF located in the top-left corner.

    • Press the button named ON/C in the top-right corner.

  2. How to Fix a Stuck Button in Sharp Calculator: passo 2, immagine 1 di 2 How to Fix a Stuck Button in Sharp Calculator: passo 2, immagine 2 di 2
    • Flip the calculator over so that the back panel is facing upwards.

    • Remove two 5mm Phillips #0 screws from the battery cover by turning the screwdriver in a counter-clockwise direction.

    • Remove the remaining four 5mm Phillips #0 screws from the back panel cover.

  3. How to Fix a Stuck Button in Sharp Calculator: passo 3, immagine 1 di 1
    • Remove the battery cover.

    • Insert a spudger into the slot located in the top-right corner and pry the battery out.

  4. How to Fix a Stuck Button in Sharp Calculator: passo 4, immagine 1 di 1
    • Remove the front panel by sticking an opening tool into a small gap between front and back panel.

    • Push the tool down with force and pry open the right side carefully.

    • Detach the front panel from the back panel by lifting the front board.

    • Separate the front and back panel slowly to avoid damaging the LCD ribbon.

  5. How to Fix a Stuck Button in Sharp Calculator: passo 5, immagine 1 di 1
    • Use a Phillips #0 screwdriver to remove the eight 5mm screws from the motherboard.

  6. How to Fix a Stuck Button in Sharp Calculator: passo 6, immagine 1 di 2 How to Fix a Stuck Button in Sharp Calculator: passo 6, immagine 2 di 2
    • Lift the motherboard by holding both sides and placing it on the top panel.

    • Lift the grey padding upwards by holding any corner and place it on top of the motherboard.

    • Press the grey padding and put pressure downward to avoid sticking from physical buttons.

  7. How to Fix a Stuck Button in Sharp Calculator: passo 7, immagine 1 di 2 How to Fix a Stuck Button in Sharp Calculator: passo 7, immagine 2 di 2
    • Use a spudger to flip, remove, and adjust the position of buttons.

    • Ensure the placement of buttons is correct. Use STEP 1 Image as a reference to the location of buttons.

Conclusione

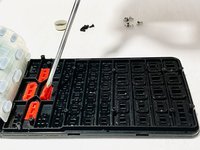
To reassemble your device, follow these instructions in reverse order.

Altre 2 persone hanno completato questa guida.

Documenti Allegati

0Commenti sulla guida

Aggiungi Commento

Visualizza Statistiche:

Ultime 24 Ore: 1

Ultimi 7 Giorni: 12

Ultimi 30 Giorni: 32

Tutti i Tempi: 5,142