Salta al contenuto principale

Questa versione può contenere modifiche errate. Passa all'ultima istantanea verificata.

Cosa ti serve

  1. Questo passaggio è privo di traduzione. Aiuta a tradurlo

    : passo 1, immagine 1 di 2 : passo 1, immagine 2 di 2
    • Face the front of the scooter towards you.

    • Remove all four 24mm bolts by turning counterclockwise using the Hex 4 screwdriver bit.

  2. Questo passaggio è privo di traduzione. Aiuta a tradurlo

    : passo 2, immagine 1 di 2 : passo 2, immagine 2 di 2
    • Remove the headlight housing.

    • The LED should release when you take off the cover.

    • Be careful when taking off the cover; the light is glued onto the cover and could harm the device.

  3. Questo passaggio è privo di traduzione. Aiuta a tradurlo

    : passo 3, immagine 1 di 2 : passo 3, immagine 2 di 2
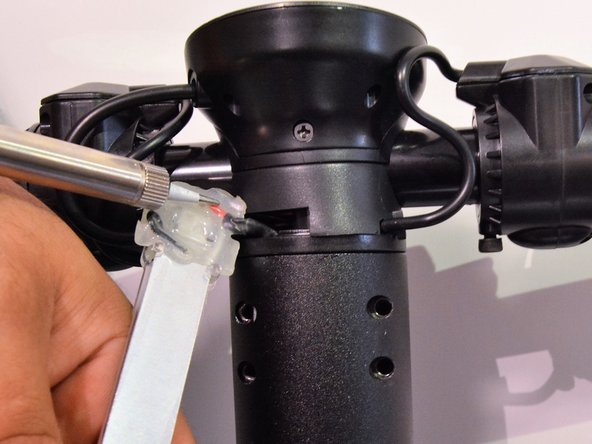
    • Disconnect the red wire using a soldering iron.

    • The soldering iron should melt the glue for you, so don't worry about removing it yourself.

  4. Questo passaggio è privo di traduzione. Aiuta a tradurlo

    : passo 4, immagine 1 di 1
    • For ease of installation, tin your new LED and the connecting wire with the soldering iron and solder.

    • Solder your new light on to the existing red wire.

    • For help on how to solder, refer to iFixit's Soldering Guide.

Linea Traguardo

Team

Cal Poly, Team S15-G5, White Fall 2018 Membro di Cal Poly, Team S15-G5, White Fall 2018

CPSU-WHITE-F18S15G5

4 Membri

5 Guide realizzate

0 Commenti

Aggiungi Commento

Visualizza Statistiche:

Ultime 24 Ore: 2

Ultimi 7 Giorni: 8

Ultimi 30 Giorni: 22

Tutti i Tempi: 3,146