Introduzione
A hard drive is a storage unit for computers, and there are two different types of hard drives HDD and SSD. HDDs are traditional storage devices with spinning platters that read and write data, and SSDs are newer technology that stores data on instantly accessible memory chips.
The HP EliteBook 8470p has a few different options for hard drive: 320/500/750GB 7200 rpm SMART SATA II or 500GB 7200 rpm SMART SATA II self encrypting drive. The EliteBook 8470p does have other storage options like a HP 3D DriveGuard (windows only), which the hard drive is mounted directly to the notebook frame, or a Solid State Drive, which can come as a; SATA 6Gb/s 128GB Solid State, or SATA 6 Gb/s 256 GB SED Solid State.
The HP EliteBook 8470p is roughly a decade old laptop, in order to keep up with the increasing programs and storage required to run these programs, the hard drive will need to be upgraded. This guide will help show how to replace the current hard drive.
Cosa ti serve
-
-
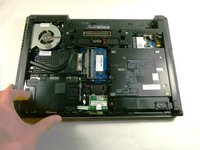
Position the computer upside down with the opening latch facing away from you and the battery facing towards you.
-
-
-
-
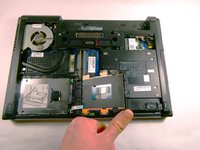
With the laptop latch still facing away from you, slide the left release latch to the left.
-


To reassemble your device, follow these instructions in reverse order.
To reassemble your device, follow these instructions in reverse order.
Annulla: non ho completato questa guida.
Un'altra persona ha completato questa guida.
Team

UMass Dartmouth, Team 5-3, Sinclaire Fall 2022 Membro di UMass Dartmouth, Team 5-3, Sinclaire Fall 2022
UMASSD-SINCLAIRE-F22S5G3
5 Membri
7 Guide realizzate
3 Commenti
I did all that but then both my Windows 10 recovery drive and an apparently successful Unbuntu 24.04 installation failed to boot. Tried the diagnostics without issue. Some time into the Windows install it reports an error then barfs. The Windows diagnostics failed to locate any issue. Not helpful.
Guessing, given the usual multiple reboots on installing Windows the new hard drive will not allow itself to reboot. Currently I am bit stuffed.
Thanks for the useful detail above.
I am here because a) my current Windows10 is in some way toxic and will no longer update itself, b) my hard drive is nearly full, c) I now use Ubuntu in preference to Win10.
Update: I have resorted to cloning the original drive to a new WD 1Tb SSD using a utility I found on the Western Digital site. I used the Windows10 recovery USB I made earlier. Top Tip: Always have a Windows 10/11 Recovery Drive.
The newly cloned drive booted the cloned toxic Win10. I then plugged in my Recovery Drive and restarted. The thing barfed as before. I am guessing that there is some secured book lock that is perhaps tied to the old drive and any attempt to recover Windows fails.
Currently I have a non-booting HP Elitebook 8470p. I am hacked off with Windows10. Its far too slow for the first hour from boot because, and on two systems, its thrashing the hard drive for an hour. As this new drive is now stuffed will re-clone and install Unbuntu 24.04. I suspect the magic feature will prevent this.
And finally ... Having had some success using the clone of the original drive followed by three failures to re-install Windows10 over the top (remember the original Win10 was refusing to update any more) from created Rescue USBs and a successful install of Ubuntu24.04 followed then by a total failure to find any bootable image on restart I found this site:
https://askubuntu.com/questions/1323124/...
Repeated as a link here : Link to Ask Ubuntu
This suggested configuring the BIOS boot mechanism from "UEFI with CSM" to "UEFI Without CSM" and now, after yet another Ubuntu install it boots. The link also outlines difficulties getting Windows to ever work on a replaced hard drive. Totally given up on getting Window10 going. Its now deprecated and I really couldn't cope with Windows 11. Phew.
Hope the above narrative is of some help to others.
One point being the WD sourced clone s/w identified the original drive as protected, I unprotected it.