Salta al contenuto principale

HP Chromebook 11-v019wm Motherboard Replacement

Cosa ti serve

  1. HP Chromebook 11-v019wm Motherboard Replacement, Keyboard: passo 1, immagine 1 di 1
    • Disconnect the power adapter from the charging port and remove all external media devices from the Chromebook.

    • Turn the Chromebook over so the bottom of the computer is facing upwards with the hinge facing away.

  2. HP Chromebook 11-v019wm Motherboard Replacement: passo 2, immagine 1 di 2 HP Chromebook 11-v019wm Motherboard Replacement: passo 2, immagine 2 di 2
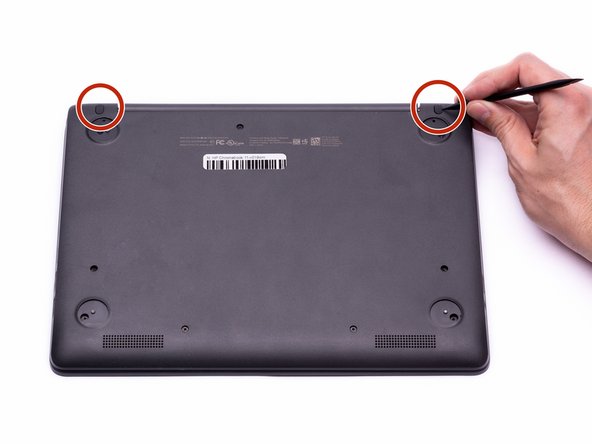
    • Remove the (4) rubber feet with the plastic spudger to reveal the screws underneath.

    • The rubber feet are secured with adhesive and may take time to remove.

  3. HP Chromebook 11-v019wm Motherboard Replacement: passo 3, immagine 1 di 2 HP Chromebook 11-v019wm Motherboard Replacement: passo 3, immagine 2 di 2
    • Remove the (2), oval shaped, rubber screw protectors near the hinge of the Chromebook.

    • The rubber screw protectors are secured with adhesive and may take time to remove.

  4. HP Chromebook 11-v019wm Motherboard Replacement: passo 4, immagine 1 di 2 HP Chromebook 11-v019wm Motherboard Replacement: passo 4, immagine 2 di 2
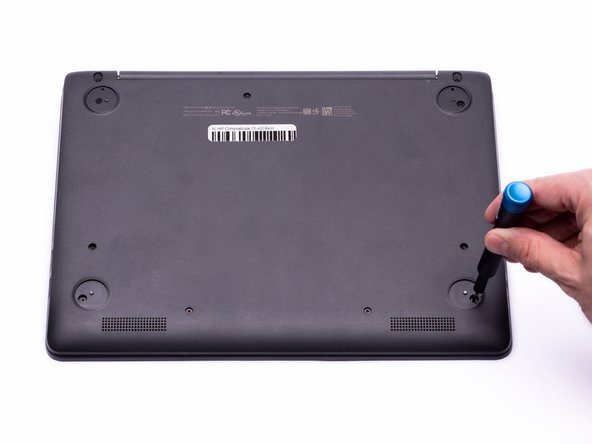
    • Remove the (11) 5.2 mm screws using a Phillips #00 Screwdriver.

  5. HP Chromebook 11-v019wm Motherboard Replacement: passo 5, immagine 1 di 2 HP Chromebook 11-v019wm Motherboard Replacement: passo 5, immagine 2 di 2
    • Place the Chromebook upright and open the screen all the way.

    • Starting towards the hinge, insert the spudger between the silver keyboard decking and the charcoal colored casing.

    • Pry upwards to release the tabs that are securing the keyboard to the casing.

    • Repeat this process around the perimeter of the keyboard to ensure all tabs are released.

    • Once all the tabs are released, gently lift the keyboard to gain access to the (2) Zero Insertion Force (ZIF) ribbon cables.

  6. HP Chromebook 11-v019wm Motherboard Replacement: passo 6, immagine 1 di 3 HP Chromebook 11-v019wm Motherboard Replacement: passo 6, immagine 2 di 3 HP Chromebook 11-v019wm Motherboard Replacement: passo 6, immagine 3 di 3
    Attrezzo utilizzato in questo passaggio:
    Anti-Static Wrist Strap
    $7.95
    Compra
    • Using the hook on the Halberd Spudger, lift up the ZIF connector tab for the keyboard ribbon cable. They keyboard ribbon cable is the larger of the two ribbon cables.

    • The remaining steps should be completed with the anti-static wrist strap to prevent damage to electrostatic discharge (ESD) sensitive components.

  7. HP Chromebook 11-v019wm Motherboard Replacement: passo 7, immagine 1 di 3 HP Chromebook 11-v019wm Motherboard Replacement: passo 7, immagine 2 di 3 HP Chromebook 11-v019wm Motherboard Replacement: passo 7, immagine 3 di 3
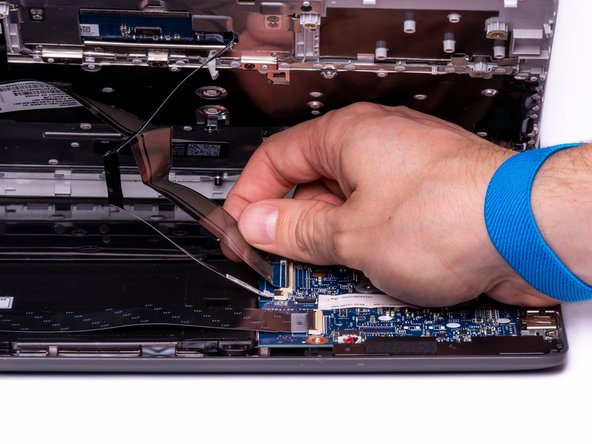
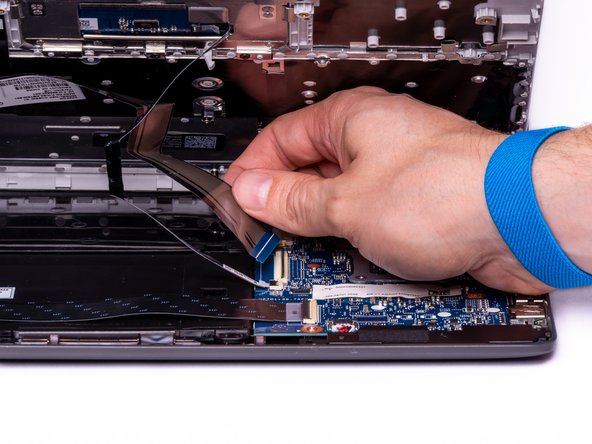
    • With the ZIF connector tab in the upright position, use your fingers to gently pull the keyboard ribbon cable out of the ZIF connector.

  8. HP Chromebook 11-v019wm Motherboard Replacement: passo 8, immagine 1 di 3 HP Chromebook 11-v019wm Motherboard Replacement: passo 8, immagine 2 di 3 HP Chromebook 11-v019wm Motherboard Replacement: passo 8, immagine 3 di 3
    • With the hook on the Halberd Spudger, lift the ZIF connector that is holding the Touchpad ribbon cable. The Touchpad ribbon cable is the smaller of the two ribbon cables.

  9. HP Chromebook 11-v019wm Motherboard Replacement: passo 9, immagine 1 di 3 HP Chromebook 11-v019wm Motherboard Replacement: passo 9, immagine 2 di 3 HP Chromebook 11-v019wm Motherboard Replacement: passo 9, immagine 3 di 3
    • With the ZIF connector tab in the upright position, use your fingers to gently pull the Touchpad ribbon cable out of the ZIF connector.

  10. HP Chromebook 11-v019wm Motherboard Replacement: passo 10, immagine 1 di 1
    • With both ribbon cables disconnected, the keyboard can now be safely removed from the Chromebook.

  11. HP Chromebook 11-v019wm Motherboard Replacement, Battery: passo 11, immagine 1 di 3 HP Chromebook 11-v019wm Motherboard Replacement, Battery: passo 11, immagine 2 di 3 HP Chromebook 11-v019wm Motherboard Replacement, Battery: passo 11, immagine 3 di 3
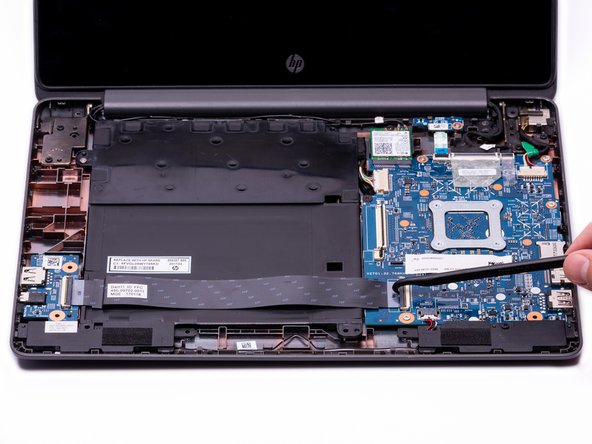
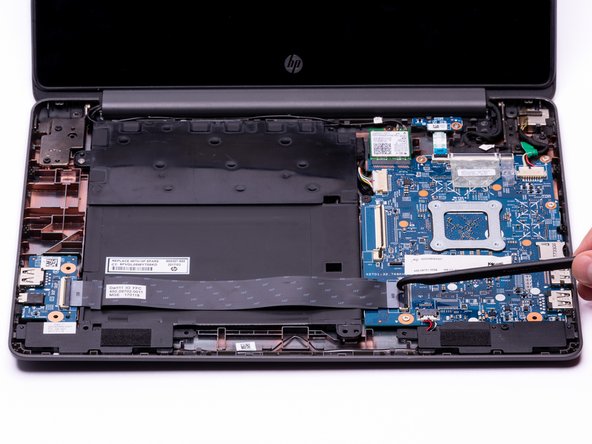
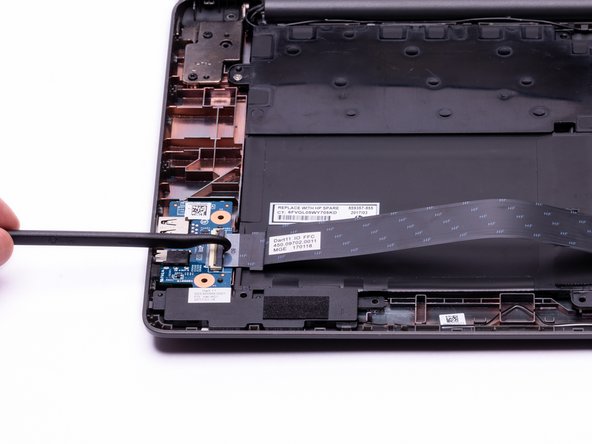
    • Using the hook on the halberd spudger, lift the external media board ZIF connector attached to the motherboard.

    • The external media ribbon cable spans across the battery and is connected to the external media board on the left, and motherboard on the right.

  12. HP Chromebook 11-v019wm Motherboard Replacement: passo 12, immagine 1 di 3 HP Chromebook 11-v019wm Motherboard Replacement: passo 12, immagine 2 di 3 HP Chromebook 11-v019wm Motherboard Replacement: passo 12, immagine 3 di 3
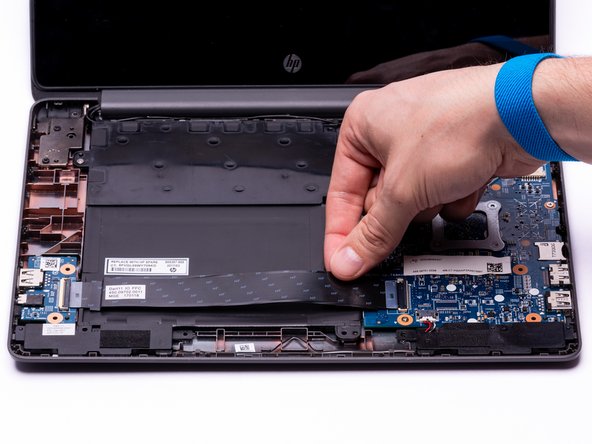
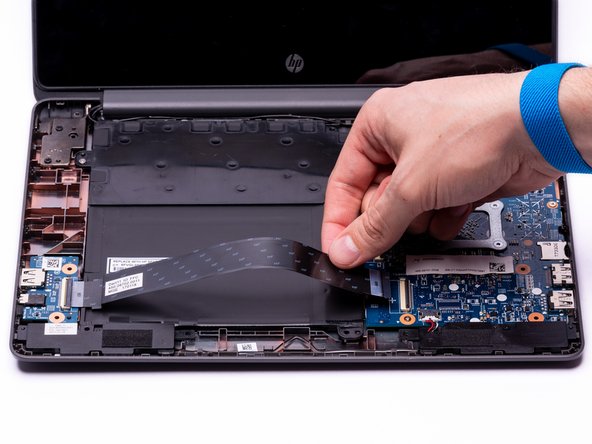
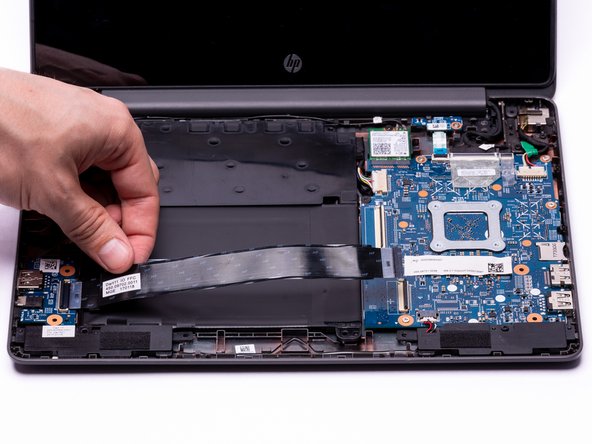
    • With the external media board ZIF connector lifted, using your fingers, gently remove the media cable from the motherboard.

  13. HP Chromebook 11-v019wm Motherboard Replacement: passo 13, immagine 1 di 3 HP Chromebook 11-v019wm Motherboard Replacement: passo 13, immagine 2 di 3 HP Chromebook 11-v019wm Motherboard Replacement: passo 13, immagine 3 di 3
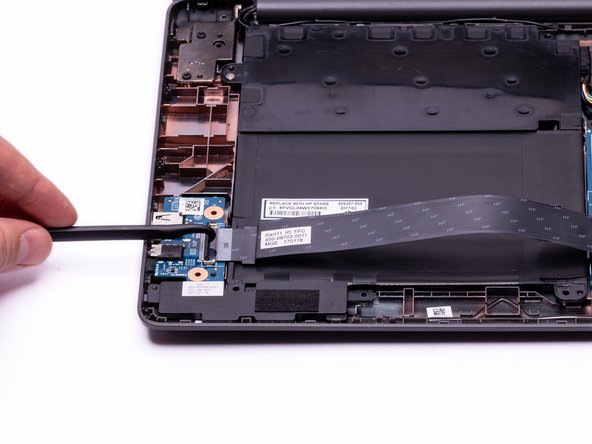
    • Using the hook on the halberd spudger lift the ZIF connector on the External Media Board.

  14. HP Chromebook 11-v019wm Motherboard Replacement: passo 14, immagine 1 di 3 HP Chromebook 11-v019wm Motherboard Replacement: passo 14, immagine 2 di 3 HP Chromebook 11-v019wm Motherboard Replacement: passo 14, immagine 3 di 3
    • With the ZIF connector in the upright position, use your fingers to gently remove the media cable completely from the computer assembly.

  15. HP Chromebook 11-v019wm Motherboard Replacement: passo 15, immagine 1 di 3 HP Chromebook 11-v019wm Motherboard Replacement: passo 15, immagine 2 di 3 HP Chromebook 11-v019wm Motherboard Replacement: passo 15, immagine 3 di 3
    • Use either end of the spudger to remove the battery bundled cable connector from the motherboard.

  16. HP Chromebook 11-v019wm Motherboard Replacement: passo 16, immagine 1 di 2 HP Chromebook 11-v019wm Motherboard Replacement: passo 16, immagine 2 di 2
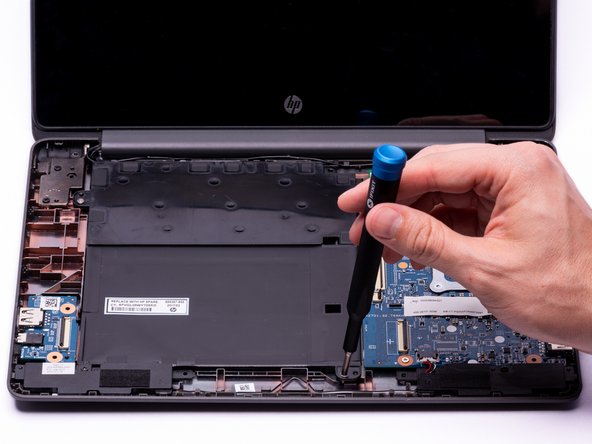
    • Using a Phillips #00 Screwdriver, remove the two silver 3.4 mm screws from the battery.

    • Using a Phillips #00 Screwdriver, remove the black 4.8 mm screw from the battery. This screw also secures the left speaker to the casing.

  17. HP Chromebook 11-v019wm Motherboard Replacement: passo 17, immagine 1 di 2 HP Chromebook 11-v019wm Motherboard Replacement: passo 17, immagine 2 di 2
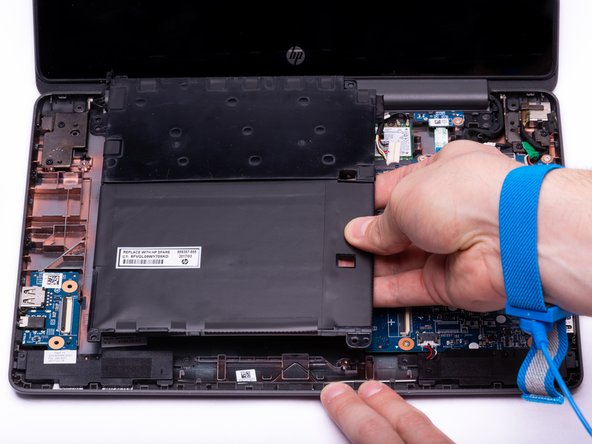
    • Gently lift the battery out of the casing.

    • The WLAN Antenna cables run through a tab in the top left corner of the battery. To avoid damaging the cable, ensure the WLAN Antenna cables are out of the way before removing the battery.

  18. HP Chromebook 11-v019wm Motherboard Replacement, Speakers: passo 18, immagine 1 di 3 HP Chromebook 11-v019wm Motherboard Replacement, Speakers: passo 18, immagine 2 di 3 HP Chromebook 11-v019wm Motherboard Replacement, Speakers: passo 18, immagine 3 di 3
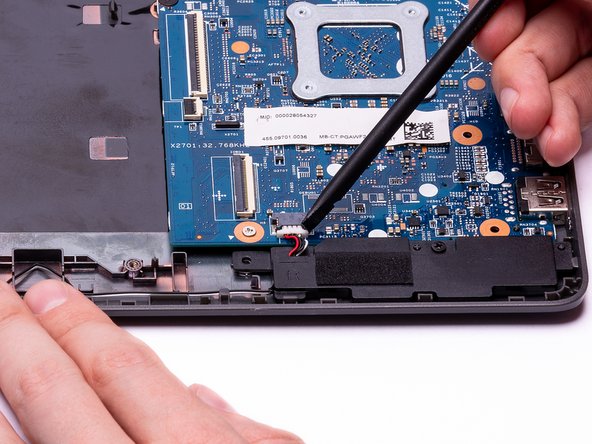
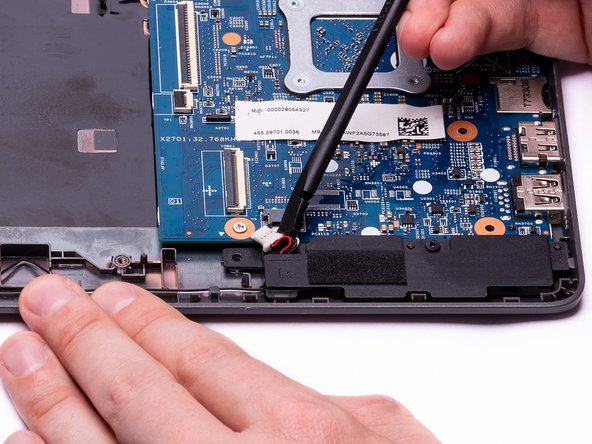
    • Using either side of the spudger, disconnect the speaker cable from the bundle connector located on the bottom of the motherboard.

  19. HP Chromebook 11-v019wm Motherboard Replacement: passo 19, immagine 1 di 2 HP Chromebook 11-v019wm Motherboard Replacement: passo 19, immagine 2 di 2
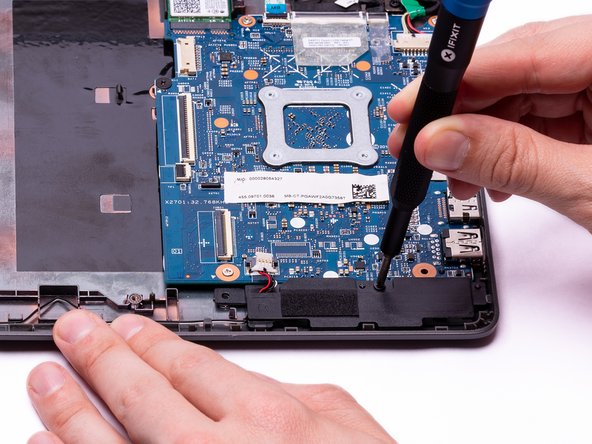
    • Using a Phillips #00 screwdriver, remove the 4.8 mm screw that secures the right speaker to the Chromebook housing.

    • The 4.8mm screw securing the left speaker was removed during the removal of the Chromebook's battery.

  20. HP Chromebook 11-v019wm Motherboard Replacement: passo 20, immagine 1 di 3 HP Chromebook 11-v019wm Motherboard Replacement: passo 20, immagine 2 di 3 HP Chromebook 11-v019wm Motherboard Replacement: passo 20, immagine 3 di 3
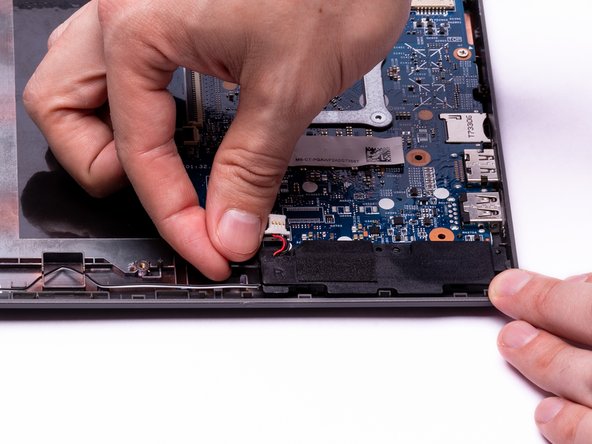
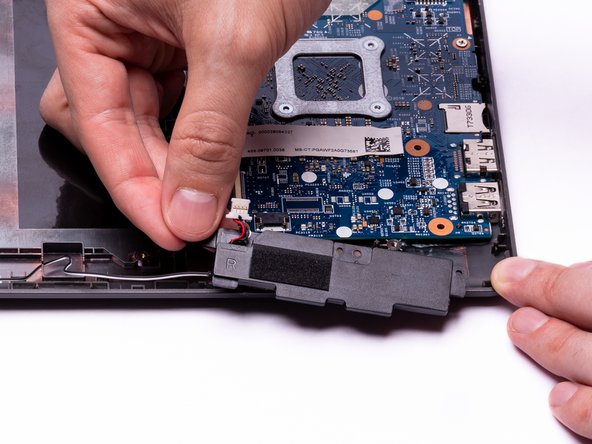
    • Gently remove the right speaker from the computer assembly.

    • The cable connecting the left and right speaker is very thin and runs along a series of small clips. During removal and installation, guide the cable through these clips and avoid pulling too hard on the cable.

  21. HP Chromebook 11-v019wm Motherboard Replacement: passo 21, immagine 1 di 3 HP Chromebook 11-v019wm Motherboard Replacement: passo 21, immagine 2 di 3 HP Chromebook 11-v019wm Motherboard Replacement: passo 21, immagine 3 di 3
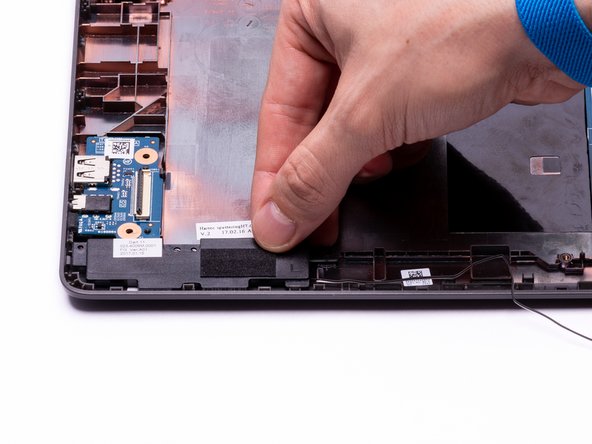
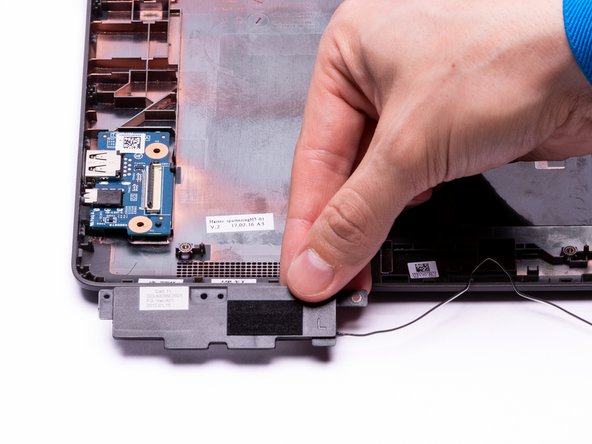
    • Gently remove the left speaker from the computer assembly.

    • The cable connecting the left and right speaker is very thin and runs along a series of small clips. During removal and installation, guide the cable through these clips and avoid pulling too hard on the cable.

  22. HP Chromebook 11-v019wm Motherboard Replacement: passo 22, immagine 1 di 1
    • The left and right speakers have been successfully removed.

  23. HP Chromebook 11-v019wm Motherboard Replacement, Motherboard: passo 23, immagine 1 di 3 HP Chromebook 11-v019wm Motherboard Replacement, Motherboard: passo 23, immagine 2 di 3 HP Chromebook 11-v019wm Motherboard Replacement, Motherboard: passo 23, immagine 3 di 3
    • Using the hook on the halberd spudger, gently lift up the ZIF connector tab that connects the Hall Sensor Board ribbon cable to the Motherboard.

  24. HP Chromebook 11-v019wm Motherboard Replacement: passo 24, immagine 1 di 3 HP Chromebook 11-v019wm Motherboard Replacement: passo 24, immagine 2 di 3 HP Chromebook 11-v019wm Motherboard Replacement: passo 24, immagine 3 di 3
    • With the ZIF connector tab in the upright position, gently pinch the blue lifting tab and remove the Hall Sensor ribbon cable from the ZIF connector.

  25. HP Chromebook 11-v019wm Motherboard Replacement: passo 25, immagine 1 di 3 HP Chromebook 11-v019wm Motherboard Replacement: passo 25, immagine 2 di 3 HP Chromebook 11-v019wm Motherboard Replacement: passo 25, immagine 3 di 3
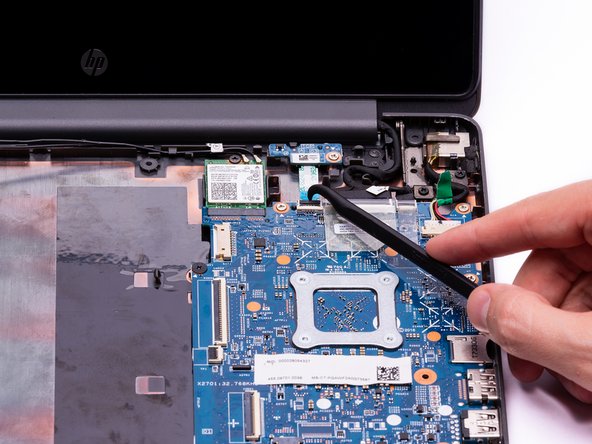
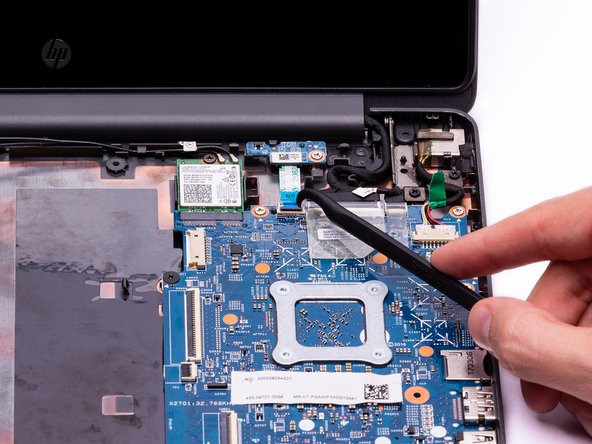
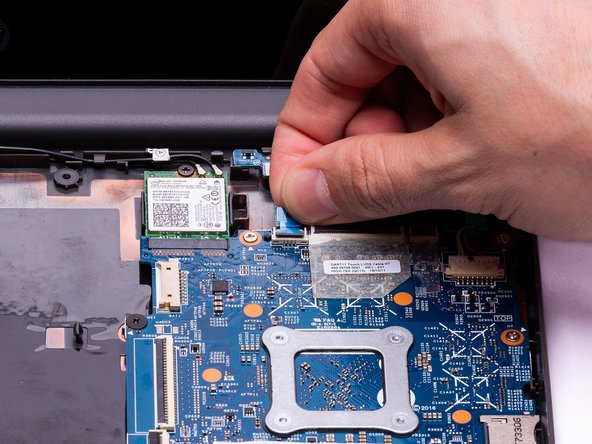
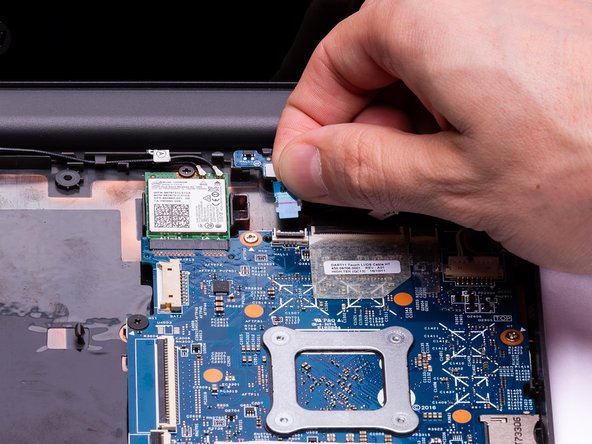
    • Using your fingers or the hook on the halberd spudger, gently lift up the clear plastic sticker to reveal the ZIF connector securing the LVDS Touch Display to the Motherboard.

    • This step is only performed to gain access to the Touch Display ZIF connector. Not all Chromebook's may have this plastic sticker covering the ZIF Connector. If there is no plastic sticker, this step may be skipped.

  26. HP Chromebook 11-v019wm Motherboard Replacement: passo 26, immagine 1 di 2 HP Chromebook 11-v019wm Motherboard Replacement: passo 26, immagine 2 di 2
    • Using the hook on the halberd spudger, gently lift the ZIF connector tab securing the Touch Display LVDS cable to the Motherboard.

  27. HP Chromebook 11-v019wm Motherboard Replacement: passo 27, immagine 1 di 3 HP Chromebook 11-v019wm Motherboard Replacement: passo 27, immagine 2 di 3 HP Chromebook 11-v019wm Motherboard Replacement: passo 27, immagine 3 di 3
    • With the ZIF connector tab in the upright position, gently remove the Touch Display LVDS cable from the ZIF connector.

  28. HP Chromebook 11-v019wm Motherboard Replacement: passo 28, immagine 1 di 3 HP Chromebook 11-v019wm Motherboard Replacement: passo 28, immagine 2 di 3 HP Chromebook 11-v019wm Motherboard Replacement: passo 28, immagine 3 di 3
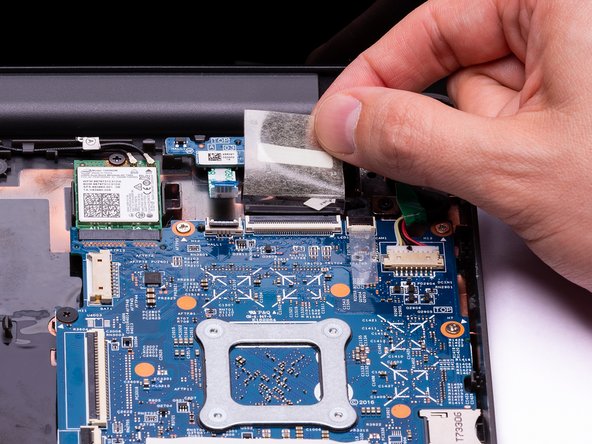
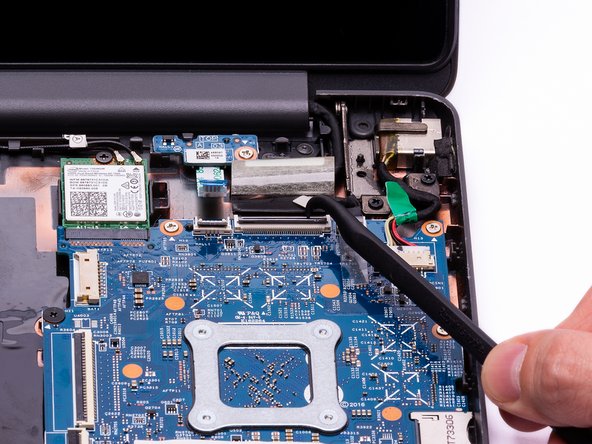
    • Using your fingers or the hook on the halberd spudger, gently lift up on the plastic sticker to reveal the Webcam ZIF connector.

    • This step is only performed to gain access to the Webcam ZIF connector. Not all Chromebook's may have this plastic sticker covering the ZIF connector. If there is no plastic sticker, this step may be skipped.

  29. HP Chromebook 11-v019wm Motherboard Replacement: passo 29, immagine 1 di 3 HP Chromebook 11-v019wm Motherboard Replacement: passo 29, immagine 2 di 3 HP Chromebook 11-v019wm Motherboard Replacement: passo 29, immagine 3 di 3
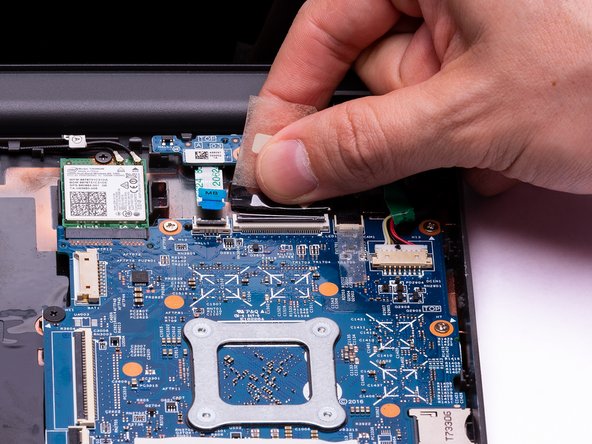
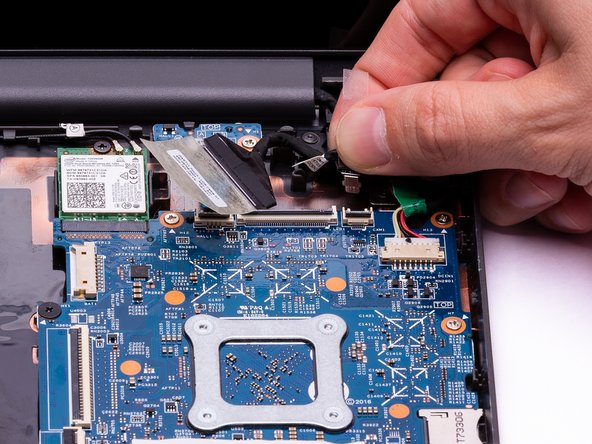
    • Using the hook on the halberd spudger, gently lift the Webcam ZIF connector tab.

  30. HP Chromebook 11-v019wm Motherboard Replacement: passo 30, immagine 1 di 2 HP Chromebook 11-v019wm Motherboard Replacement: passo 30, immagine 2 di 2
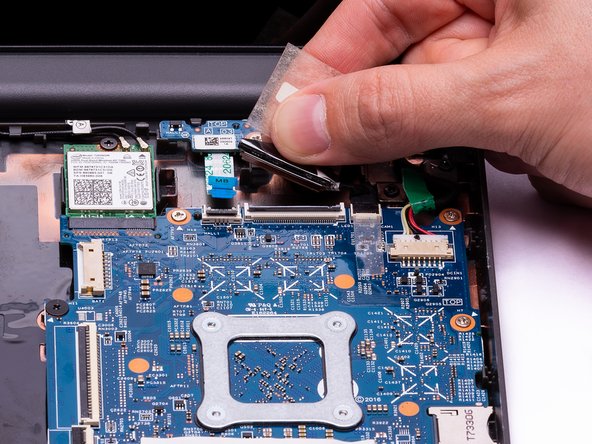
    • With the Webcam ZIF connector tab in the upright position, gently pinch the black lifting tab and remove the connector from the ZIF connector on the motherboard.

  31. HP Chromebook 11-v019wm Motherboard Replacement: passo 31, immagine 1 di 3 HP Chromebook 11-v019wm Motherboard Replacement: passo 31, immagine 2 di 3 HP Chromebook 11-v019wm Motherboard Replacement: passo 31, immagine 3 di 3
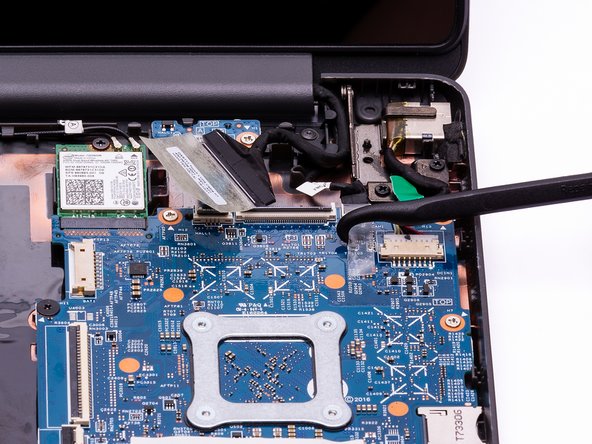
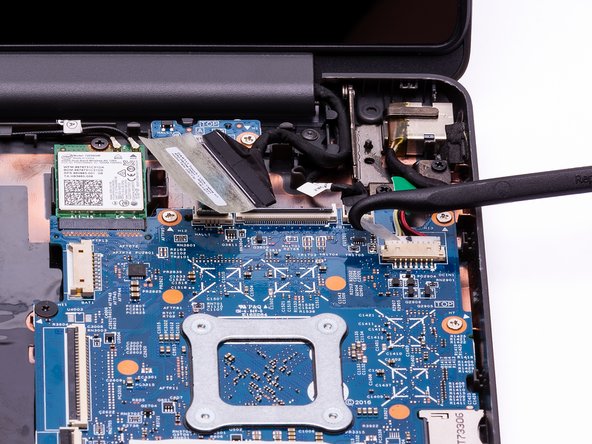
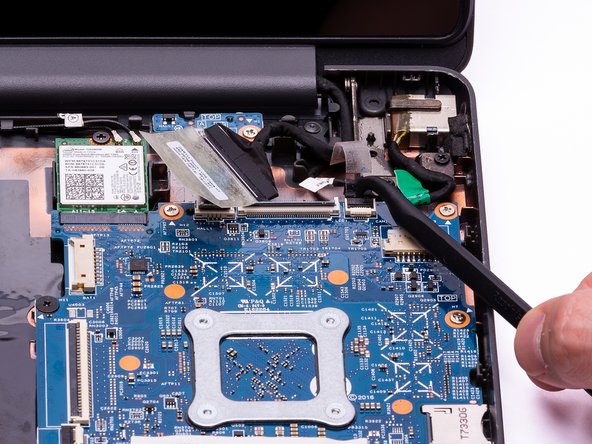
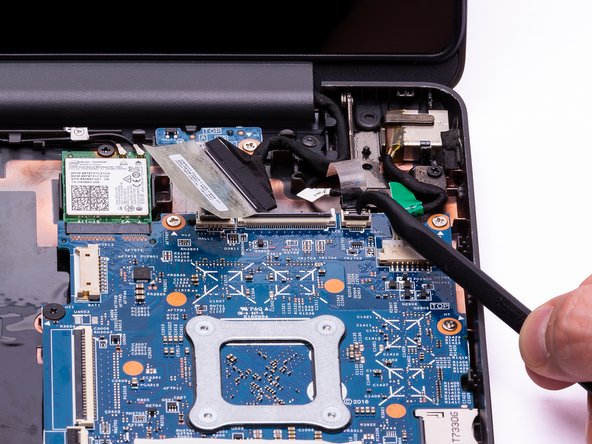
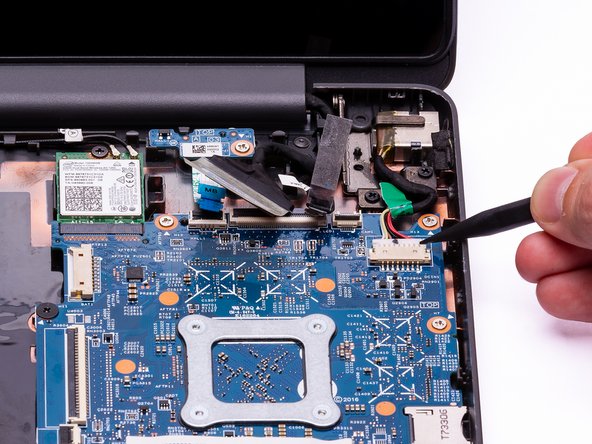
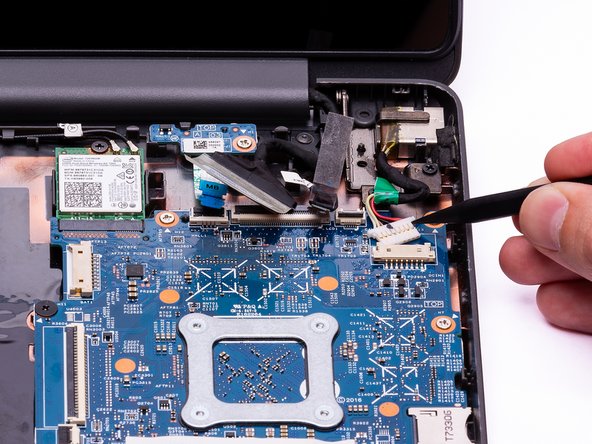
    • With either end of the spudger, remove the charging port cable from the bundle connector on the motherboard.

    • If the connector does not move when pushing on one side, push the other side to evenly remove the connector.

  32. HP Chromebook 11-v019wm Motherboard Replacement: passo 32, immagine 1 di 3 HP Chromebook 11-v019wm Motherboard Replacement: passo 32, immagine 2 di 3 HP Chromebook 11-v019wm Motherboard Replacement: passo 32, immagine 3 di 3
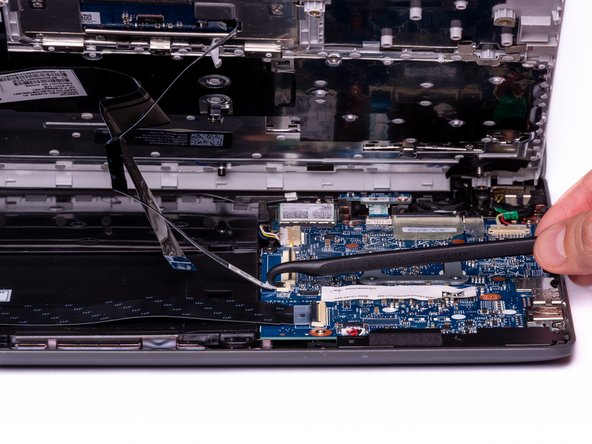
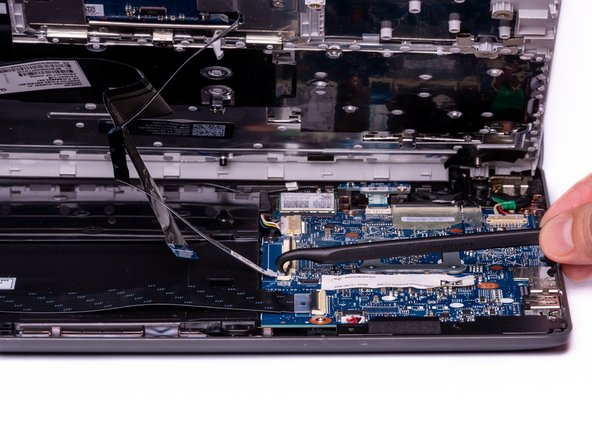
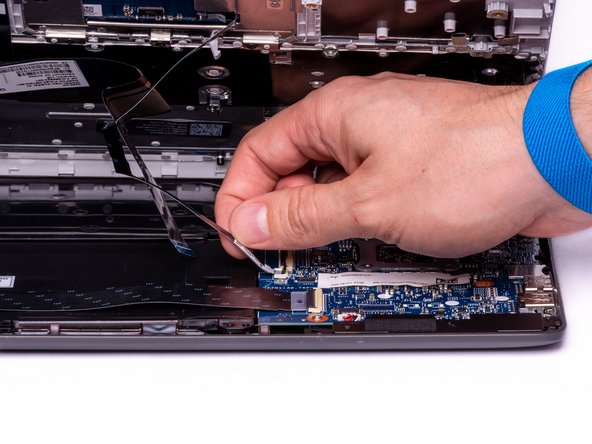
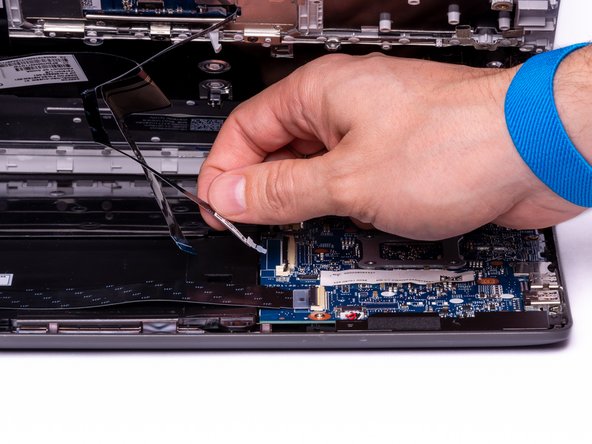
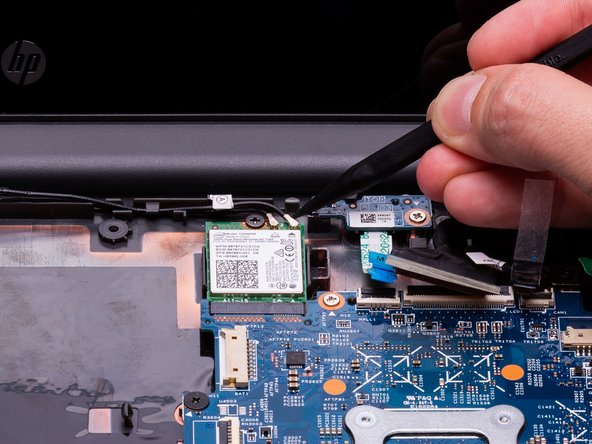
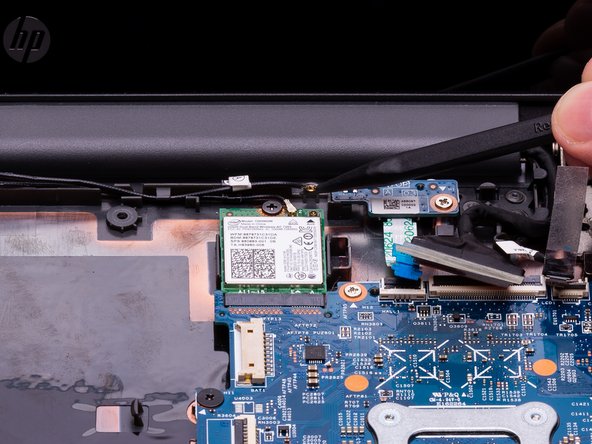
    • Using the fine point of the spudger, gently lift up the (2) antenna coaxial connectors on the WLAN module.

    • The (2) antenna cables run along the top of the Chromebook casing and are attached to the Touch Display. Make sure the antenna cables are removed from their routing tabs to avoid damaging the cables.

  33. HP Chromebook 11-v019wm Motherboard Replacement: passo 33, immagine 1 di 2 HP Chromebook 11-v019wm Motherboard Replacement: passo 33, immagine 2 di 2
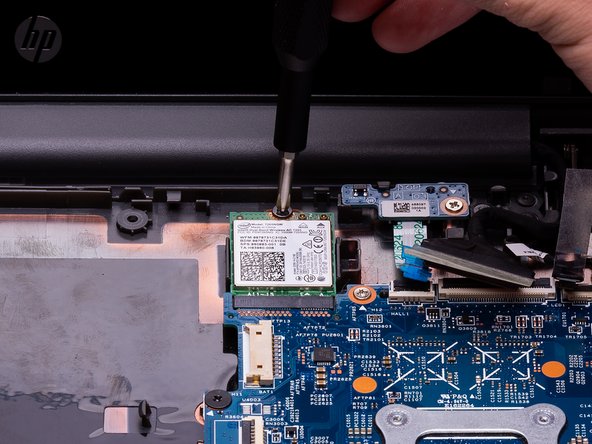
    • Using a Phillips #00 Screwdriver, remove the 3.5mm screw from the WLAN module.

  34. HP Chromebook 11-v019wm Motherboard Replacement: passo 34, immagine 1 di 3 HP Chromebook 11-v019wm Motherboard Replacement: passo 34, immagine 2 di 3 HP Chromebook 11-v019wm Motherboard Replacement: passo 34, immagine 3 di 3
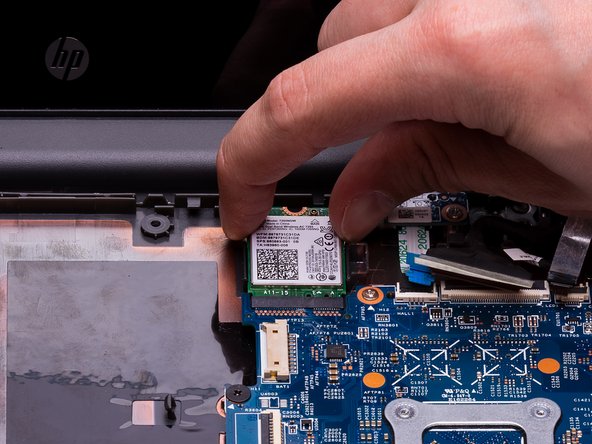
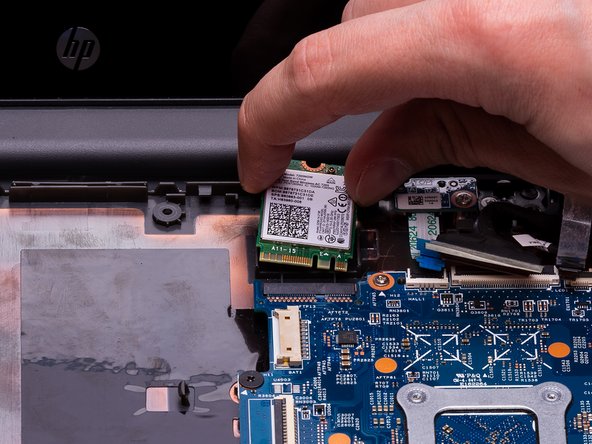
    • Gently lift and slide the WLAN module out of the WLAN connector on the top of the motherboard.

  35. HP Chromebook 11-v019wm Motherboard Replacement: passo 35, immagine 1 di 2 HP Chromebook 11-v019wm Motherboard Replacement: passo 35, immagine 2 di 2
    • Using a Phillips #00 Screwdriver, remove the (4) 3.3mm screws from the motherboard.

    • Using a Phillips #00 Screwdriver, remove the 3.5mm screw from the motherboard.

  36. HP Chromebook 11-v019wm Motherboard Replacement: passo 36, immagine 1 di 2 HP Chromebook 11-v019wm Motherboard Replacement: passo 36, immagine 2 di 2
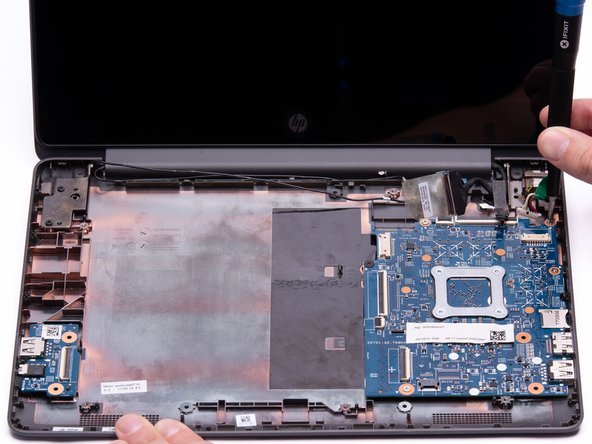
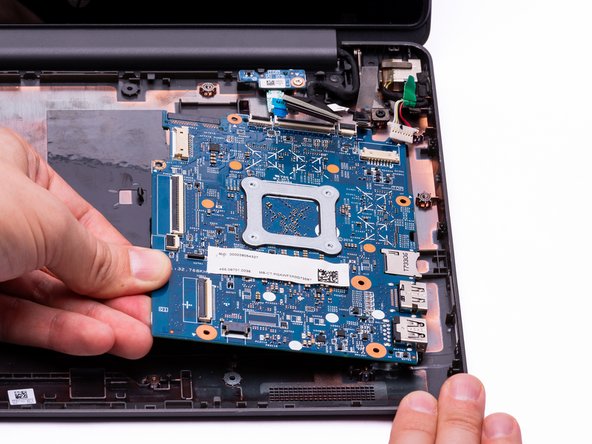
    • Gently lift and pull the motherboard towards the center of the base to remove it from the computer assembly.

Conclusione

To reassemble your device, follow these instructions in reverse order.

0 Commenti

Aggiungi Commento

Visualizza Statistiche:

Ultime 24 Ore: 0

Ultimi 7 Giorni: 0

Ultimi 30 Giorni: 1

Tutti i Tempi: 254