Introduzione
How to replace the LCD panel for Dell Latitude E5470 Laptop
Cosa ti serve
-
-
Loosen the 8 screws on the bottom cover. The screws will remain in the casing, they do not come out all the way.
-
Insert the pick or spudger between the upper and lower casing to release the plastic clips.
-
Attention needed: The clips are easily broken.
-
-
-
To disconnect the battery, pull gently upwards on the tab connector.
-
-
-
-
Using a pick or spudger, gently insert between the LCD back-cover and bezel to release the clips.
-
The bezel is also glued to the LCD panel.
-
Remove slowly to avoid tearing or damaging any components underneath.
-
-
Attrezzo utilizzato in questo passaggio:Tweezers$4.99
-
Remove the LCD paneland lay it flat on the keyboard.
-
You will be able to see the connector on the back of the LCD panel secured with some adhesive tape and a metal connector.
-
Udsing the tweezers, slowly lift the tape away to reveal the blue sticky protector. Removing the blue pad to see the metal connector underneath.
-
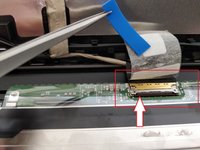
Using a spudger, lift the front of the connector up (highlighted by the white arrow).
-
Pull the cable back to release the cable from the connector.
-
To reassemble, follow the steps in reverse.
-


To reassemble your device, follow these instructions in reverse order.
Annulla: non ho completato questa guida.
Altre 4 persone hanno completato questa guida.
5Commenti sulla guida
Your presentation is perfect
Hello, will this model with touch screen work with non touch replacement LCD?
Damaged touch lcd and was not using touch , want to save some $ by installing not touch lcd..
Thanks - seems that little piece of blue sticky protector was my whole problem, months of a flickering screen, that was temporarily fixed upon pressing on the bottom of the bezel. Upon opening up the screen, it was crooked. So I straightened it, put things back together, and the flickering seems to be gone. Cross my fingers!