Salta al contenuto principale

Dell Inspiron 16-7610 Motherboard Replacement

Cosa ti serve

  1. Dell Inspiron 16-7610 Motherboard Replacement, Back Case: passo 1, immagine 1 di 2 Dell Inspiron 16-7610 Motherboard Replacement, Back Case: passo 1, immagine 2 di 2
    • Flip the device over, so the backside is facing up.

    • Use a Phillips #00 screwdriver to remove seven 4.00 mm screws.

    • Use the Phillips #00 screwdriver to unscrew or loosen two captive screws at the right and left corner near the hinges.

    • The last two screws should remain in the back case and can't be removed.

  2. Dell Inspiron 16-7610 Motherboard Replacement: passo 2, immagine 1 di 1
    • -Use the opening tool between the seams of the top and bottom case to pry the back case off of the laptop.

    • Undo the clips gently as you pry the back of the device to avoid breaking them when removing the back case.

    • Remove the back case from the device.

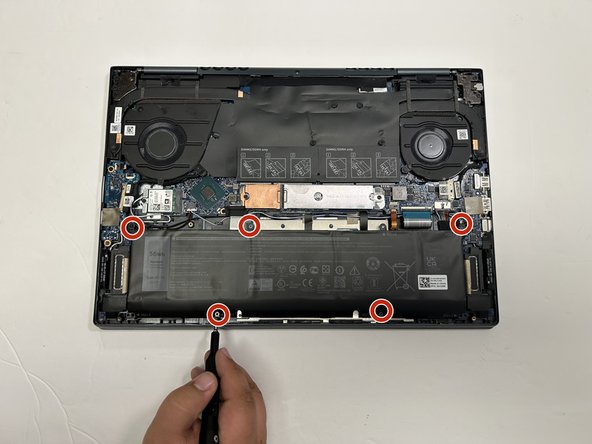
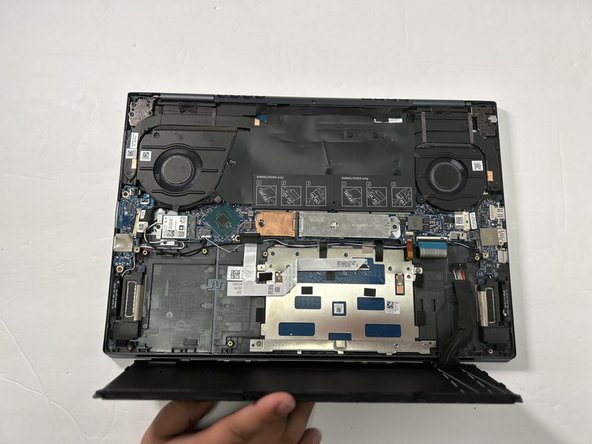
  3. Dell Inspiron 16-7610 Motherboard Replacement, Battery: passo 3, immagine 1 di 3 Dell Inspiron 16-7610 Motherboard Replacement, Battery: passo 3, immagine 2 di 3 Dell Inspiron 16-7610 Motherboard Replacement, Battery: passo 3, immagine 3 di 3
    • Use a Phillips #00 to remove the five screws securing the battery to the laptop.

    • Pull the bundled cable away from the connector in the same direction as the wires are running.

    • Pull evenly on the full width of the cable so that no individual wires are overly strained.

    • Use both hands to life the battery up and remove it from the laptop.

  4. Dell Inspiron 16-7610 Motherboard Replacement, Wi-Fi Card: passo 4, immagine 1 di 2 Dell Inspiron 16-7610 Motherboard Replacement, Wi-Fi Card: passo 4, immagine 2 di 2
    • Use a Phillips #00 screwdriver to remove the screw that secures the Wi-Fi card bracket to the system board.

    • Lift the Wi-Fi card bracket off of the Wi-Fi card.

  5. Dell Inspiron 16-7610 Motherboard Replacement: passo 5, immagine 1 di 2 Dell Inspiron 16-7610 Motherboard Replacement: passo 5, immagine 2 di 2
    Attrezzo utilizzato in questo passaggio:
    Tweezers
    $4.99
    Compra
    • Slide a thin, ESD-safe pry tool or tweezers under the wire until it's snug against the connector, and pry straight up from the board to disconnect the coaxial cables from the Wi-Fi card.

    • Slide the Wi-Fi card from the slot to remove it from the device.

  6. Dell Inspiron 16-7610 Motherboard Replacement, RAM: passo 6, immagine 1 di 3 Dell Inspiron 16-7610 Motherboard Replacement, RAM: passo 6, immagine 2 di 3 Dell Inspiron 16-7610 Motherboard Replacement, RAM: passo 6, immagine 3 di 3
    • Flip the plastic cover over to reveal the RAM stick. Do not pull the plastic cover off.

    • Pull the two RAM retaining arms away from the center of the RAM stick.

    • The RAM stick should "pop" up slightly from its socket.

    • Pull the RAM stick out of the socket. Repeat for each of the RAM sticks you are replacing.

    • Align your new RAM sticks on to the sockets when installing them to prevent any damage to the pins below.

  7. Dell Inspiron 16-7610 Motherboard Replacement, Motherboard: passo 7, immagine 1 di 1
    • Double check that every component is removed from the motherboard.

    • Disconnect all the pin and ribbon cables from the motherboard.

    • Locate and remove all the screws that are holding the motherboard in place.

  8. Dell Inspiron 16-7610 Motherboard Replacement: passo 8, immagine 1 di 3 Dell Inspiron 16-7610 Motherboard Replacement: passo 8, immagine 2 di 3 Dell Inspiron 16-7610 Motherboard Replacement: passo 8, immagine 3 di 3
    • Remove the screws and cables connecting the fans to the motherboard.

    • Lift the fans off of the board to remove.

  9. Dell Inspiron 16-7610 Motherboard Replacement: passo 9, immagine 1 di 2 Dell Inspiron 16-7610 Motherboard Replacement: passo 9, immagine 2 di 2
    • Use the Phillips #00 screwdriver to loosen the four screws from the heat sink.

    • Use both hands to gently lift the heatsink up.

    • Be mindful of the thermal paste on both the motherboard and the heatsink.

    • We recommend reapplying thermal paste on the heatsink before installing the new motherboard.

  10. Dell Inspiron 16-7610 Motherboard Replacement: passo 10, immagine 1 di 2 Dell Inspiron 16-7610 Motherboard Replacement: passo 10, immagine 2 di 2
    • Use a spudger to pry up on each side of the press-fit connector, then lift the connector straight up to disconnect it from the motherboard.

  11. Dell Inspiron 16-7610 Motherboard Replacement: passo 11, immagine 1 di 1
    • Lift the motherboard out of the device.

Conclusione

To reassemble your device, follow these instructions in reverse order.

Jerson Gomez

Membro da: 02/02/23

877 Reputazione

3 Guide realizzate

Team

Gateway, Team 1-3, Pee Spring 2023 Membro di Gateway, Team 1-3, Pee Spring 2023

GCC-PEE-S23S1G3

4 Membri

6 Guide realizzate

0 Commenti

Aggiungi Commento

Visualizza Statistiche:

Ultime 24 Ore: 5

Ultimi 7 Giorni: 17

Ultimi 30 Giorni: 55

Tutti i Tempi: 737