Introduzione
Solitamente, il cavo inizia a staccarsi proprio nel punto in cui incontra l'alimentatore di rete . Ho visto troppe persone buttare i loro caricabatterie solo per questo. Ci vogliono tempo e pazienza ma si può aggiustare!
Cosa ti serve
-
-
Guarda la linea che attraversa il caricabatterie. Questi pezzi sono incollati con una super colla che ti impedisce di smontarli.
-
Dovrai tagliare attraverso la plastica seguendo quel piccolo spazio con un taglierino.
-
Questa operazione richiederà un po' di tempo, dovrai tagliare la plastica in tutti e quattro i lati. Quando ne avrai tagliata la maggior parte, te ne accorgerai.
-
-
-
Con un cacciavite a taglio, inizia a separare le facce di plastica del caricatore. Per farlo, devi applicare un po' di forza.
-
Una volta separati tutti i lati con il cacciavite, non si staccherà ancora. Questo aggeggio è incollato su tutti i bordi di plastica.
-
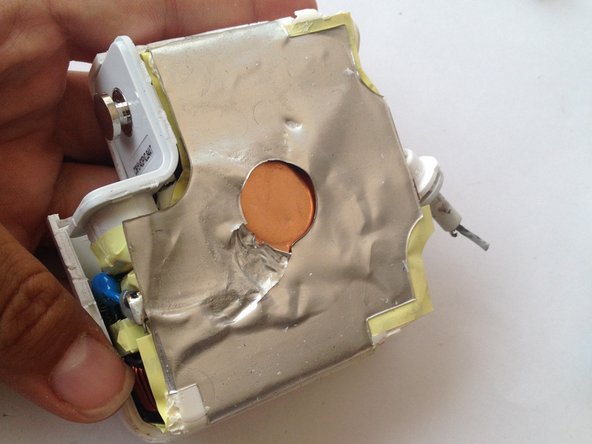
Inserisci il cacciavite nella parte superiore del caricatore e separa con cura la pellicola dalla custodia in plastica. Fai attenzione a non strappare questa copertura dalla parte interna del caricatore.
-
-
-
-
Copri con del nastro isolante il resto del cavo bianco e nero (esterno) che hai appena saldato.
-
Uniscili con del nastro isolante a formare un unico cavo e posiziona il caricabatterie in una delle facce dell'involucro di plastica.
-
Prendi tre piccole fascette e stringile attorno al cavo per impedire che possa essere estratto dalla custodia in plastica.
-
-
-
Lega quattro fascette grandi per chiudere la custodia, due su ciascun lato.
-
Alcune persone preferiscono usare solo la supercolla (cianoacrilica) perché il risultato si presenta meglio, ma le fascette lo rendono più sicuro. Se preferisci non usare le fascette, rimuovile qualche ora dopo quando la colla si sarà seccata completamente.
-


Annulla: non ho completato questa guida.
Altre 240 persone hanno completato questa guida.
Un ringraziamento speciale a questi traduttori:
100%


Questi traduttori ci stanno aiutando ad aggiustare il mondo! Vuoi partecipare?
Inizia a tradurre ›

55 Commenti
Some tips:
* There is a better way to open the enclosure without damaging the edge: using a pliers to push the two sides apart where the bunny ears lift up (google for videos).
* The cable can actually be threaded through the rubber/plastic grommet if you have the patience to remove the broken cable from it and make the two small holes bigger with a drill bit. This can be frustrating but is the only way to keep the original appearance. Be sure to leave enough cable after the grommet for soldering.
* Thin (2-3mm) heat shrink is a good way to insulate the exposed wire after threading it through the grommet.
* If you trust your soldering skills, consider de-soldering the old cables from the terminals.
* Applying a little super glue along the edge and clamping for a few hours is all that is needed to keep it closed permanently.
Thanks for the tips! If you have pictures of the processes please feel free to modify this guide (especially the opening of the enclosure!) ^__^
* I have seen that in some tutorials and I wanted to to drill a hole through the rubber plastic grommet but didn't have a drill at my office =(
* I did consider de-soldering the old cables but that involved de-soldering other components that are attached to copper plates to get to those terminals. In earlier versions of the AC Adapter this can be done with not so much trouble.
I really appreciate your feedback! Thanks!
I didn't try that... We actually ended up just heating it to soften the plastic and that worked, wouldn't advise it though
Same for me, don: see this as a much easier way to open the case: https://www.youtube.com/watch?v=Yqa9uUKu...
Would be nice if you refer to this solution as alternative, befor starting to cut the case.
Thanks for the manual, I just fixed it!
Lukas -