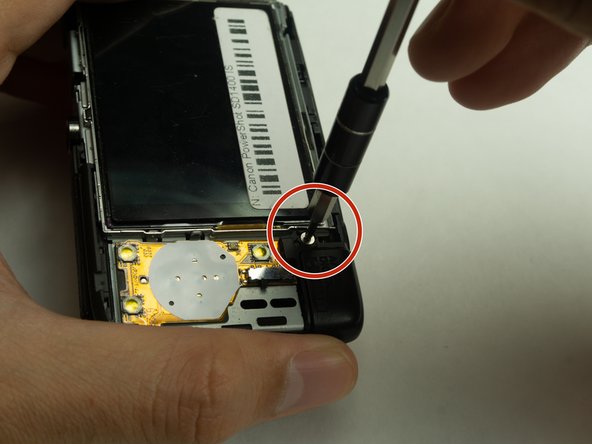
Salta al contenuto principale

Canon PowerShot SD1400 IS USB Port Replacement

Cosa ti serve

  1. Canon PowerShot SD1400 IS USB Port Replacement, USB Port: passo 1, immagine 1 di 3 Canon PowerShot SD1400 IS USB Port Replacement, USB Port: passo 1, immagine 2 di 3 Canon PowerShot SD1400 IS USB Port Replacement, USB Port: passo 1, immagine 3 di 3
    • Remove the four 2mm Phillips #00 screws on both sides of the camera.

  2. Canon PowerShot SD1400 IS USB Port Replacement: passo 2, immagine 1 di 1
    • Remove the single 4mm Phillips #00 screw from the bottom.

  3. Canon PowerShot SD1400 IS USB Port Replacement: passo 3, immagine 1 di 1
    • Remove the front face panel off of the camera.

  4. Canon PowerShot SD1400 IS USB Port Replacement: passo 4, immagine 1 di 1
    • Remove the rear panel of the camera.

    • The user interface panel, side and bottom panel of the camera may fall down by itself while you are taking the rear panel of the camera.

  5. Canon PowerShot SD1400 IS USB Port Replacement: passo 5, immagine 1 di 1
    • Remove the 3mm Phillips #000 screw from the top of the camera.

  6. Canon PowerShot SD1400 IS USB Port Replacement: passo 6, immagine 1 di 1
    • Pry the golden ribbon cable from the motherboard with a plastic opening tool.

    • A screw will be visible underneath the golden ribbon after prying it.

  7. Canon PowerShot SD1400 IS USB Port Replacement: passo 7, immagine 1 di 1
    • Remove the 3mm Phillips #000 screw from the motherboard.

  8. Canon PowerShot SD1400 IS USB Port Replacement: passo 8, immagine 1 di 1
    • Use a plastic opening tool to flip up the retaining flap on the ribbon cable ZIF socket.

  9. Canon PowerShot SD1400 IS USB Port Replacement: passo 9, immagine 1 di 2 Canon PowerShot SD1400 IS USB Port Replacement: passo 9, immagine 2 di 2
    • Unplug the small chip from the face of the camera using a pair of tweezers.

  10. Canon PowerShot SD1400 IS USB Port Replacement: passo 10, immagine 1 di 1
    • Remove the 3mm Phillips #000 screw from the rear face of the camera.

  11. Canon PowerShot SD1400 IS USB Port Replacement: passo 11, immagine 1 di 1
    • Remove the top panel from the camera.

  12. Canon PowerShot SD1400 IS USB Port Replacement: passo 12, immagine 1 di 1
    • Pry the golden ribbon cable attached to the USB port using a plastic opening tool.

  13. Canon PowerShot SD1400 IS USB Port Replacement: passo 13, immagine 1 di 1
    • Remove the 3mm Phillips #000 screw located at the top right of the USB port.

  14. Canon PowerShot SD1400 IS USB Port Replacement: passo 14, immagine 1 di 2 Canon PowerShot SD1400 IS USB Port Replacement: passo 14, immagine 2 di 2
    • Remove the USB port.

Conclusione

To reassemble your device, follow these instructions in reverse order.

Un'altra persona ha completato questa guida.

Faris Rezwan

Membro da: 05/21/18

457 Reputazione

2 Guide realizzate

Team

IUPUI, Team S1-G2, Harley Spring 2018 Membro di IUPUI, Team S1-G2, Harley Spring 2018

IUPUI-HARLEY-S18S1G2

7 Membri

4 Guide realizzate

0 Commenti

Aggiungi Commento

Visualizza Statistiche:

Ultime 24 Ore: 0

Ultimi 7 Giorni: 0

Ultimi 30 Giorni: 1

Tutti i Tempi: 268