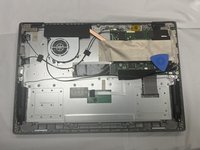
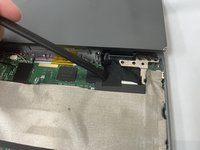
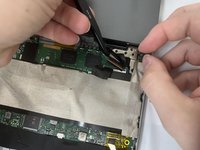
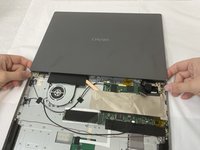
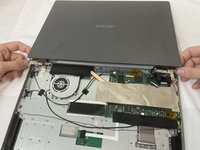
Salta al contenuto principale

CHUWI GemiBook XPro Screen Replacement

Cosa ti serve

  1. CHUWI GemiBook XPro Screen Replacement, Battery: passo 1, immagine 1 di 2 CHUWI GemiBook XPro Screen Replacement, Battery: passo 1, immagine 2 di 2
    • Peel off the black tape on the upper-right side of the motherboard.

  2. CHUWI GemiBook XPro Screen Replacement: passo 2, immagine 1 di 2 CHUWI GemiBook XPro Screen Replacement: passo 2, immagine 2 di 2
    • Use two opening tools or your fingernails to carefully "walk" the battery connector out of its socket.

  3. CHUWI GemiBook XPro Screen Replacement: passo 3, immagine 1 di 3 CHUWI GemiBook XPro Screen Replacement: passo 3, immagine 2 di 3 CHUWI GemiBook XPro Screen Replacement: passo 3, immagine 3 di 3
    • Unseat the speaker wires and antenna wire from their retaining hooks on the battery with a halberd spudger.

  4. CHUWI GemiBook XPro Screen Replacement: passo 4, immagine 1 di 1
    • Use a Phillips #1 screwdriver to remove the five 4.3 mm screws that secure the battery.

  5. CHUWI GemiBook XPro Screen Replacement: passo 5, immagine 1 di 3 CHUWI GemiBook XPro Screen Replacement: passo 5, immagine 2 di 3 CHUWI GemiBook XPro Screen Replacement: passo 5, immagine 3 di 3
    • Lift the battery up and out of the chassis.

  6. CHUWI GemiBook XPro Screen Replacement, Screen: passo 6, immagine 1 di 1
    • Carefully open the device screen side down.

  7. CHUWI GemiBook XPro Screen Replacement: passo 7, immagine 1 di 3 CHUWI GemiBook XPro Screen Replacement: passo 7, immagine 2 di 3 CHUWI GemiBook XPro Screen Replacement: passo 7, immagine 3 di 3
    • Use a Phillips #1 screwdriver to remove the four 4.3 mm screws on the left hinge, and the three 4.3 mm screws on the right hinge.

    • Use a Phillips #1 screwdriver to remove one 5.6 mm hinge screw on the lower-right side of the right hinge.

  8. CHUWI GemiBook XPro Screen Replacement: passo 8, immagine 1 di 3 CHUWI GemiBook XPro Screen Replacement: passo 8, immagine 2 di 3 CHUWI GemiBook XPro Screen Replacement: passo 8, immagine 3 di 3
    • Peel back the black tape near the right hinge.

  9. CHUWI GemiBook XPro Screen Replacement: passo 9, immagine 1 di 2 CHUWI GemiBook XPro Screen Replacement: passo 9, immagine 2 di 2
    • Disconnect the display ribbon cable.

  10. CHUWI GemiBook XPro Screen Replacement: passo 10, immagine 1 di 2 CHUWI GemiBook XPro Screen Replacement: passo 10, immagine 2 di 2
    • Lift the screen assembly off of the chassis.

Conclusione

To reassemble your device, follow the above steps in reverse order.

Take your e-waste to an R2 or e-Stewards certified recycler.

Altre 2 persone hanno completato questa guida.

0Commenti sulla guida

Aggiungi Commento

Visualizza Statistiche:

Ultime 24 Ore: 2

Ultimi 7 Giorni: 15

Ultimi 30 Giorni: 43

Tutti i Tempi: 459