Introduzione
The battery can be bought either on ebay or amazon. Verify with your old battery before purchase as Oral-B uses shorter battery outside of USA. The one sold in USA is 48mm L x 17mm D. The other size is 42mm L x 17mm D.
There are couple YouTube video which can help you visualize also
History: I have bought that toothbrush in 08/25/2009. I have replaced the battery in 07/07/2012. I am replacing again on 08/30/2014.
Cosa ti serve
-
-
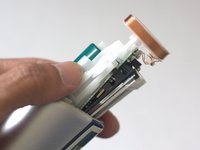
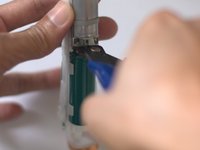
Remove plastic ring by prying it off with large screwdriver. Be careful not to damage rubber handle top or the ring.
-
-
-
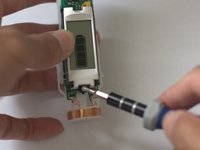
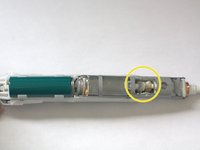
To remove the base of your handle place triangle shaped knob on your charger into hole at the bottom to unscrew and remove a small plastic screw. Turn clockwise
-
You might use a flat screw driver to help separate the bottom
To remove the base do you turn the toothbrush clockwise or anticlockwise. Your directions state. "Turn Clockwise". But what are you turning the toothbrush handle or the triangle shaped knob
I my case the screw just seems to be turning around and around and the base is not coming off. I know the screw is moving because it points in a different direction. What to do.
Advice appreciated
"clockwise" is a typo, it should be counterclockwise as basically everywhere in the world that's the standard for unscrewing, but at a certain point turning won't help anym5and the resistance drops.
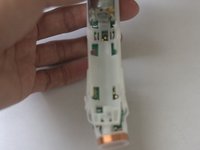
At that point you have to pull manuallythe base away from the body.
It is extremly hard to get off the base without damaging the cover. My base seems to glued in, it does not move in any way and there is no gap at all. Right now, I have no idea how to carefully loosen the base.
Warm water to loosen dirt. It wasn't difficult in my case. Be sure you unxrewed the base completely.
-
-


To reassemble your device, follow these instructions in reverse order.
To reassemble your device, follow these instructions in reverse order.
Annulla: non ho completato questa guida.
Altre 18 persone hanno completato questa guida.

17 Commenti
Tip: The 8mm Hex Bit (from the macro bit kit) can replace that silly triangular plastic tool molded into the power adapter.
While trying to do this "repair" to replace my battery, the bottom screw was in so tight that I stripped out the plastic tool.
I have just replaced the new battery on Triumph Professional Care 9000, followed all of the instructions. I charged the battery to full 100% but when I switch it on, the motor doesn't turn, it's just dead silence. The LCD displays correctly with different brushing modes but the motor and brush is not turning. I'm wondering what steps I may have missed and if you can provide some guidance on how to fix this problems. Look forward to any helpful hints and suggestions. Thanks in advance.
You can try to measure the current with a multimeter on the motor when it is turned on.
I have the same issue. It worked fine a few times and then quit. The display works fine, too.
I accidentally started it while taking it apart. When I was loosening the base, it started to work again. There's something applying enough pressure to the mechanism to stop it whenever it is pushed into the handle.
With the base re-installed, the toothbrush stops again. It works whenever I push the assembly down. I'm suspecting that the blue ring at the top may have something to do with it.
bester -
Okay, I found it.
After removing the mechanism, I turned it on and noticed that it only worked if I pushed the motor towards the battery. Once I removed the spring I noticed that one of the two metal strips connecting the motor to the board was split right where there is a slight bend. I applied a little bit of solder to repair the connection and it is working again.
bester -
To get the screw out on the circuit board, I used a small screw driver, just had the grind it slightly so it would fit into the torex. Hardest part of the whole operation was getting the small blue ring off. The battery I bought was about 3/8 in longer than the orig, course I didn't know this till I opened the case. I used it anyway. Where the spring is used to tension between the battery and motor, because this was 3/8 in smaller I had some neoprene that I cut in a circle and inserted. I still used the plastic piece to hold the neoprene away from the motor shaft. Time will tell if this is an issue.
Overall very good instructions., and things went as described.
Tks Jack D
It is a Ni-MH battery, NOT LITHIUM. Check also the linked video for confirmation.
Be careful!
How much must be the current taken by the motor on running?
I misplaced the battery spring on my Oral b Triumph 9000…any chance of getting a replacement?
So, I successfully changed the battery, had it working for about a week, and now my battery is again dead and wont charge.
Checked solder points, all good. is there a way to check if the battery charger is charging using a voltmeter?
Thanks.
1-1.2 V normal, 1.5V while charging, more or less. In general, the charging voltage should be higher than the one when the charger is far from the brush.
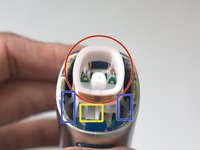
Great instructions! Especially about being extra careful not to accidentally damage the coil ring wires. Everything went smoothly, until I accidentally broke the very fragile coil ring wire. Is there a way I can fix this?
Try soldering it back together…
Otherwise it is quite involved: you should look here https://twitter.com/profsen/status/10033... and solder a wire to a certain spot, then bring out that wire to be connected to Arduino and also bring out the battery wires, then power the toothbrush externally.
Hi, I know this is an old post, but my battery seems fine and hold charge for a good few uses and had been working brilliantly up until one day, it turned on but the head didn’t turn very much on any setting. I’ve opened it up and used light oil on the gears but the motor won’t do a full rotation without a little assistance, is there a common area for these to bind or jam? Or is it my battery perhaps not giving enough power. What amperage should it put to the motor?
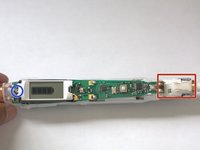
My battery does not look like the image on the iFixit website. Rather than having clearly marked positive and negative ends, the only markings say Sanyo. Also, the leads are much wider than the ones shown and the negative lead is not offset to account for the sockets being offset from each other. Also, as I suspected, this battery is a bit longer than my old battery.
Polarity: the positive end has a shallow grove around the battery just below the positive end.
Leads: they are wide enough so you can trim the leads from opposite sides to properly align with the sockets. Just make sure you trim from the appropriate side to match the socket locations. I used a sharp paper scissors to trim the leads.
Spring: I cut the retainer spring to match the difference in length between my old shorter battery and the new longer battery. I put the plastic cap on the cut end so as not to damage the battery.
Little Blue Plastic Ring at the Top: Tip - you can use a brush head to push it into place.
Solder Wick Braid: IF317-053-6