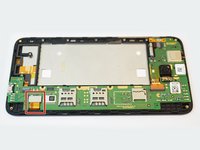
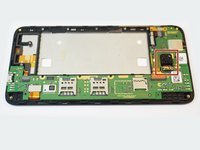
Salta al contenuto principale

Alcatel Pop 4 Plus Motherboard Replacement

Cosa ti serve

  1. Alcatel Pop 4 Plus Motherboard Replacement, Battery: passo 1, immagine 1 di 2 Alcatel Pop 4 Plus Motherboard Replacement, Battery: passo 1, immagine 2 di 2
    • Remove the back cover by sliding your fingernail in the grove around the edge of the phone and prying it off.

  2. Alcatel Pop 4 Plus Motherboard Replacement: passo 2, immagine 1 di 2 Alcatel Pop 4 Plus Motherboard Replacement: passo 2, immagine 2 di 2
    • Remove seventeen 3mm Phillips #000 screws from the mid-frame.

  3. Alcatel Pop 4 Plus Motherboard Replacement: passo 3, immagine 1 di 1
    • Use the flat end of the spudger, or your fingernail, to pry off the mid-frame.

  4. Alcatel Pop 4 Plus Motherboard Replacement: passo 4, immagine 1 di 2 Alcatel Pop 4 Plus Motherboard Replacement: passo 4, immagine 2 di 2
    • Use the flat end of the spudger disconnect the battery from the motherboard.

    • Use the flat end of the spudger tool to pry out the battery.

  5. Alcatel Pop 4 Plus Motherboard Replacement, Motherboard: passo 5, immagine 1 di 2 Alcatel Pop 4 Plus Motherboard Replacement, Motherboard: passo 5, immagine 2 di 2
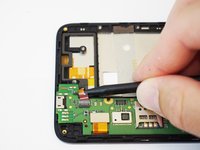
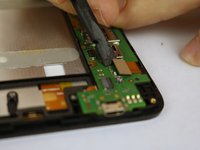
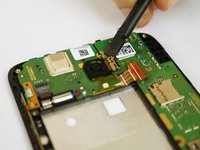
    • Use a spudger to flip up the retaining flap on the USB ribbon cable ZIF socket.

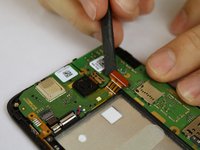
    • Slide the ribbon cable out of the socket.

  6. Alcatel Pop 4 Plus Motherboard Replacement: passo 6, immagine 1 di 2 Alcatel Pop 4 Plus Motherboard Replacement: passo 6, immagine 2 di 2
    • Use the flat end of a spudger to disconnect the ribbon cable.

  7. Alcatel Pop 4 Plus Motherboard Replacement: passo 7, immagine 1 di 2 Alcatel Pop 4 Plus Motherboard Replacement: passo 7, immagine 2 di 2
    • Using the flat end of the spudger to disconnect the ribbon cable.

  8. Alcatel Pop 4 Plus Motherboard Replacement: passo 8, immagine 1 di 2 Alcatel Pop 4 Plus Motherboard Replacement: passo 8, immagine 2 di 2
    • Using the flat end of the spudger, disconnect the camera from the motherboard.

  9. Alcatel Pop 4 Plus Motherboard Replacement: passo 9, immagine 1 di 1
    • Use the flat end of the spudger to pry off the motherboard.

Conclusione

To reassemble your device, follow these instructions in reverse order.

Altre 2 persone hanno completato questa guida.

Team

USF Tampa, Team S20-G6, Passmore Spring 2018 Membro di USF Tampa, Team S20-G6, Passmore Spring 2018

USFT-PASSMORE-S18S20G6

4 Membri

12 Guide realizzate

Un commento

Hi

I got my Alcatel Pop 4+ checked and it's Power IC was faulty. How can I replace it

I'm looking for the specific IC used in it if I can get any help regarding it.

NINJA WARRIORS - Replica

Aggiungi Commento

Visualizza Statistiche:

Ultime 24 Ore: 0

Ultimi 7 Giorni: 0

Ultimi 30 Giorni: 5

Tutti i Tempi: 944