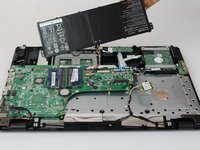
Salta al contenuto principale

Acer Aspire E5-721-64T8 Motherboard Replacement

Cosa ti serve

  1. Acer Aspire E5-721-64T8  Motherboard Replacement, Battery: passo 1, immagine 1 di 1
    • Remove the twenty-five 6mm Phillips #0 screws from the bottom panel of the laptop.

  2. Acer Aspire E5-721-64T8  Motherboard Replacement: passo 2, immagine 1 di 1
    • Using the plastic opening tool, lift up on the side opposite of the Ethernet connector.

    • With the plastic opening tool under the bottom panel, work your way around the perimeter until the panel separates.

  3. Acer Aspire E5-721-64T8  Motherboard Replacement: passo 3, immagine 1 di 1
    • Remove the two 6mm Phillips #0 screws from the battery.

  4. Acer Aspire E5-721-64T8  Motherboard Replacement: passo 4, immagine 1 di 2 Acer Aspire E5-721-64T8  Motherboard Replacement: passo 4, immagine 2 di 2
    • Disconnect the battery from the motherboard.

    • Pull the battery up and out of the laptop.

  5. Acer Aspire E5-721-64T8  Motherboard Replacement, Motherboard: passo 5, immagine 1 di 2 Acer Aspire E5-721-64T8  Motherboard Replacement, Motherboard: passo 5, immagine 2 di 2
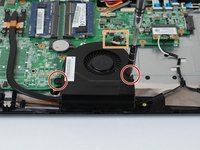
    • Remove the two 6mm Phillips #0 screws from the fan.

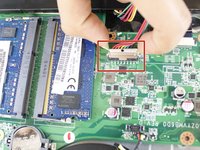
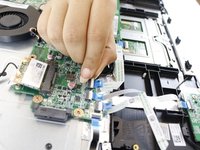
    • Disconnect the fan from the motherboard.

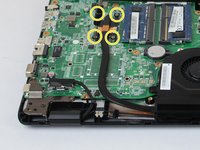
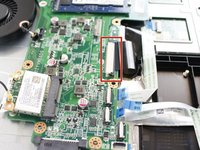
    • Remove the four 6mm Phillips #0 screws from the heat sink.

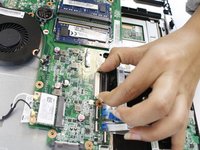
    • Lift and remove the heatsink assembly from laptop.

  6. Acer Aspire E5-721-64T8  Motherboard Replacement: passo 6, immagine 1 di 1
    • Remove the Wi-Fi card by pulling it from the motherboard socket.

  7. Acer Aspire E5-721-64T8  Motherboard Replacement: passo 7, immagine 1 di 1
    • Disconnect the display cable from the motherboard.

  8. Acer Aspire E5-721-64T8  Motherboard Replacement: passo 8, immagine 1 di 1
    • Disconnect the speaker from the motherboard.

  9. Acer Aspire E5-721-64T8  Motherboard Replacement: passo 9, immagine 1 di 2 Acer Aspire E5-721-64T8  Motherboard Replacement: passo 9, immagine 2 di 2
    • Use a spudger to flip up the retaining flaps on the ribbon cable ZIF sockets.

  10. Acer Aspire E5-721-64T8  Motherboard Replacement: passo 10, immagine 1 di 2 Acer Aspire E5-721-64T8  Motherboard Replacement: passo 10, immagine 2 di 2
    • Use a spudger to flip up the retaining flap on the black ribbon cable ZIF socket.

  11. Acer Aspire E5-721-64T8  Motherboard Replacement: passo 11, immagine 1 di 1
    • Lift the motherboard up from the narrow side and jiggle slightly so that way it doesn't get caught on the ports of the laptop case.

Conclusione

To reassemble your device, follow these instructions in reverse order.

Un'altra persona ha completato questa guida.

Team

USF Tampa, Team S7-G3, Passmore Spring 2018 Membro di USF Tampa, Team S7-G3, Passmore Spring 2018

USFT-PASSMORE-S18S7G3

4 Membri

6 Guide realizzate

0 Commenti

Aggiungi Commento

Visualizza Statistiche:

Ultime 24 Ore: 0

Ultimi 7 Giorni: 1

Ultimi 30 Giorni: 2

Tutti i Tempi: 668