Salta al contenuto principale

Cosa ti serve

Questo smontaggio non è una guida di riparazione. Per riparare il tuo toshiba satellite pro T130-138, usa il nostro manuale di assistenza.

  1. toshiba satellite pro T130-138 Teardown, turning off: passo 1, immagine 1 di 1
    • turn off your computer for safety reasons

  2. toshiba satellite pro T130-138 Teardown, unscrewing case and getting RAM boards out: passo 2, immagine 1 di 3 toshiba satellite pro T130-138 Teardown, unscrewing case and getting RAM boards out: passo 2, immagine 2 di 3 toshiba satellite pro T130-138 Teardown, unscrewing case and getting RAM boards out: passo 2, immagine 3 di 3
    • flip the computer over and remove the 12 philips 0 screws this will make the keyboard and trackpad part free

    • then unscrew the two philips 0 screws guarding the 2 RAM boards

  3. toshiba satellite pro T130-138 Teardown, getting RAM boards out: passo 3, immagine 1 di 2 toshiba satellite pro T130-138 Teardown, getting RAM boards out: passo 3, immagine 2 di 2
    • you can remove the 2 RAM boards by lifting them up

    • here we have two beautiful RAM boards

  4. toshiba satellite pro T130-138 Teardown, getting hard disk case out: passo 4, immagine 1 di 3 toshiba satellite pro T130-138 Teardown, getting hard disk case out: passo 4, immagine 2 di 3 toshiba satellite pro T130-138 Teardown, getting hard disk case out: passo 4, immagine 3 di 3
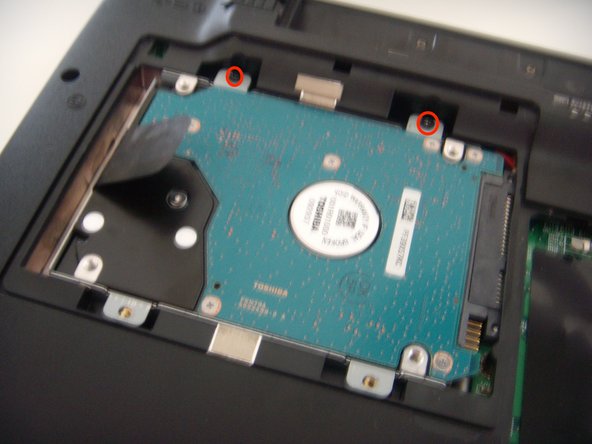
    • by unscrewing these 2 star screws size 6 we can lift the hard disk plate.

    • the hard disk is secured by two philips 0 screws

  5. toshiba satellite pro T130-138 Teardown, getting hard disk out: passo 5, immagine 1 di 3 toshiba satellite pro T130-138 Teardown, getting hard disk out: passo 5, immagine 2 di 3 toshiba satellite pro T130-138 Teardown, getting hard disk out: passo 5, immagine 3 di 3
    • unscrew the hard disk screws

    • and use the spudger to slide the hard disk out

    • pull it up and put it aside

  6. toshiba satellite pro T130-138 Teardown, getting battery out: passo 6, immagine 1 di 3 toshiba satellite pro T130-138 Teardown, getting battery out: passo 6, immagine 2 di 3 toshiba satellite pro T130-138 Teardown, getting battery out: passo 6, immagine 3 di 3
    • slide the two plastic pieces holding the battery

    • and pull it out

    • you will have to take all these silver philips 0 screws

    • but for the next step remove the ones I am pointing

  7. toshiba satellite pro T130-138 Teardown, getting the keyboard bezel out: passo 7, immagine 1 di 1
    • use a spudger to remove the bezel

  8. toshiba satellite pro T130-138 Teardown, disconnecting keyboard: passo 8, immagine 1 di 2 toshiba satellite pro T130-138 Teardown, disconnecting keyboard: passo 8, immagine 2 di 2
    • remove the 2 philips 0 screws and get the keyboard out with a spudger

    • lift the black plastic and pull the cable out

  9. toshiba satellite pro T130-138 Teardown, disconnecting trackpad, on off button and lights: passo 9, immagine 1 di 3 toshiba satellite pro T130-138 Teardown, disconnecting trackpad, on off button and lights: passo 9, immagine 2 di 3 toshiba satellite pro T130-138 Teardown, disconnecting trackpad, on off button and lights: passo 9, immagine 3 di 3
    • follow the same process to disconnect the trackpad, button and lights.

    • you will end up with something like this

  10. toshiba satellite pro T130-138 Teardown, taking top off: passo 10, immagine 1 di 3 toshiba satellite pro T130-138 Teardown, taking top off: passo 10, immagine 2 di 3 toshiba satellite pro T130-138 Teardown, taking top off: passo 10, immagine 3 di 3
    • you have to take this screw located on the RAM boards connector

    • use a spudger to lift the top off, go all around the laptop and you'll get it off

    • It looks really beautiful!

  11. toshiba satellite pro T130-138 Teardown, the trackpad button and lights: passo 11, immagine 1 di 1
    • this is not a step I am not going deeper into this so I don't break anything you can go if you want.

    • anything that you do that is not shown in the teardown is at your own risk

  12. toshiba satellite pro T130-138 Teardown, inside: passo 12, immagine 1 di 1
    • the inside contains

    • two speakers

    • one cooler

    • ports

    • screen connector

    • and a giant interesting motherboard

    • oh and don't forget about the memory card reader

  13. toshiba satellite pro T130-138 Teardown, disconnecting the rest: passo 13, immagine 1 di 3 toshiba satellite pro T130-138 Teardown, disconnecting the rest: passo 13, immagine 2 di 3 toshiba satellite pro T130-138 Teardown, disconnecting the rest: passo 13, immagine 3 di 3
    • here we disconnect the battery slot

    • and we get the card reader connector out

    • such as the screen

  14. toshiba satellite pro T130-138 Teardown, disconnecting the rest: passo 14, immagine 1 di 2 toshiba satellite pro T130-138 Teardown, disconnecting the rest: passo 14, immagine 2 di 2
    • remove the rest of the cables

    • some of the cables are glued to the mother board don't remove them

    • remove the mother board screws

    • the screen connector is secured by 2 philips 0 screws

  15. toshiba satellite pro T130-138 Teardown, the end: passo 15, immagine 1 di 1
    • if you did what I did you will end up like this

    • I don't want to go deeper because I don't want to take the risk of breaking or damaging the computer

    • if you go deeper it's at your own risk

    • I will give it an 8/10

    • after removing the screws everything is easy to remove

    • the top, bezels and keyboard come easy off

    • some of the cables and components are fragile with makes it harder to remove

    • the track pad is covered with a sticky plastic with makes it harder to tear down

    • any components that are not well connected can make the computer not function well.

    • the opening tools are there if you want to disconnect some cables that are hard to disconnect

storm builder

Membro da: 12/02/17

417 Reputazione

1 Guida realizzata

3 Commenti

you should take the battery out first, you might shock yourself

Luke - Replica

So you took the HDD out before the battery… but you turned off the computer for safety reasons.

Isaac Sastre - Replica

for everyone that was thinking I started the teardown with out removing the battery I took the battery out before starting then i showed how to remove it later but it was not in all the time

storm builder - Replica

Aggiungi Commento

Visualizza Statistiche:

Ultime 24 Ore: 1

Ultimi 7 Giorni: 11

Ultimi 30 Giorni: 16

Tutti i Tempi: 1,463