Salta al contenuto principale

Cosa ti serve

Questo smontaggio non è una guida di riparazione. Per riparare il tuo Texas Instruments TI-82, usa il nostro manuale di assistenza.

  1. Texas Instruments TI-82 Teardown, Texas Instruments TI-82 Teardown: passo 1, immagine 1 di 1
    • The calculator comes with a matching protective shield which slides down over the front; when the calculator is in use, you can slide it over the back. This is a nice touch, as it makes the cover much more difficult to lose.

  2. Texas Instruments TI-82 Teardown: passo 2, immagine 1 di 3 Texas Instruments TI-82 Teardown: passo 2, immagine 2 di 3 Texas Instruments TI-82 Teardown: passo 2, immagine 3 di 3
    • Flip the device over to access the battery cover.

    • Using a spudger, pry the release tab down and then pull the battery door up and off the calculator.

    • Remove:

    • 2 7.2mm Phillips #0 screws

    • 1 15.3mm Phillips #0 screw, and a battery retaining clip.

    • The CR1616 coin cell battery preserves settings and programs in memory while the main batteries are being changed.

  3. Texas Instruments TI-82 Teardown: passo 3, immagine 1 di 1
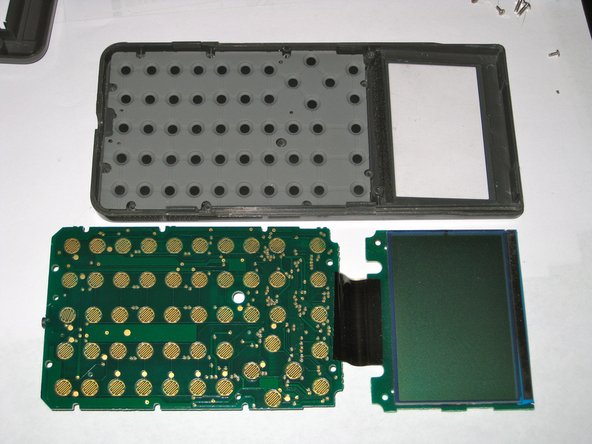
    • Insert a spudger into the seam between the two halves of the case, and pry it apart.

    • Watch out for corrosion in older calculators around the battery terminals -- this is why you should never leave batteries in electronics for extended periods of time.

  4. Texas Instruments TI-82 Teardown: passo 4, immagine 1 di 1
    • Opening the two halves of the calculator reveals a foil shield over the rest of the electronics.

    • Remove four Phillips screws to access the electronics underneath, then pull the shield away.

  5. Texas Instruments TI-82 Teardown: passo 5, immagine 1 di 1
    • ... And, here's the guts of the thing.

    • SRM20255LLM10 / F4ZM1938 (32Kbyte SRAM)

    • LH531GP4 (Mask ROM)

    • T 84C00AM-8 (Z80 CPU)

    • Toshiba / TC14L010AF / 1273 9506EAI (ASIC)

  6. Texas Instruments TI-82 Teardown: passo 6, immagine 1 di 2 Texas Instruments TI-82 Teardown: passo 6, immagine 2 di 2
    • Remove the remaining Phillips screws.

    • The screen and main board will lift out, leaving the membrane keypad in the front case.

bushing

Membro da: 04/23/10

10.250 Reputazione

13 Guide realizzate

Un commento

Minor correction, the RAM part is SRM20256LLM10, a CMOS 256 kilobit (32x8) 100ns static RAM in 28 pin SOP form factor.

Nick M - Replica

Aggiungi Commento

Visualizza Statistiche:

Ultime 24 Ore: 0

Ultimi 7 Giorni: 14

Ultimi 30 Giorni: 86

Tutti i Tempi: 20,646