Introduzione
Breaking news! Updated S9 Teardown Below!
There's a new Samsung Galaxy flagship phone in the world, the S9—and though you may have to squint to tell it apart from its predecessor, we're here to squint into its innards. It's time to tear down the Galaxy S9! Grab a spudger and let's poke around inside.
Were you hoping for something a little bigger? Try our S9+ teardown on for size.
Geek out with us on Facebook, Twitter, or Instagram, where we plug in with all our fellow tinkerers.
Cosa ti serve
Panoramica Video
-
-
This smaller version of the S9+ gets a big hardware upgrade. Let's take a look:
-
Notchless 5.8" AMOLED Display with resolution of 2960 × 1440 (~570 ppi)
-
Qualcomm Snapdragon 845 or Samsung’s own Exynos 9810, depending on location
-
12 MP OIS dual-aperture main camera—f/1.5 and f/2.4 modes—plus an 8 MP selfie cam
-
Headphone jack and microSD slot
-
IP68 water/dust-proofing rating
-
Android 8.0 Oreo
-
-
-
We start with a sneak peek—X-ray intel provided by our co-conspirators at Creative Electron.
-
If you liked the S8, we've got good news—Samsung agrees with you. The design seems almost totally unchanged, save for the new (and better) fingerprint sensor location.
-
Our S9 cozies up to its S8 ancestor on the left (reassembled from our 2017 teardown) and its S9+ sibling on the right (still sore from our teardown last weekend).
-
Props to Samsung for keeping the headphone jack and expandable storage, all while maintaining IP68 protection.
-
-
-
Getting inside a Galaxy phone hasn't gotten any easier lately, but at least the procedure is familiar:
-
Step 1: get it hot.
-
Step 2: add more heat.
-
Step 3: suction and slice, and don't hit that fingerprint sensor cable that you can't see.
-
You've probably heard us complain about this before, so we'll just add this: yes it's risky and tedious, but at least if you crack the back glass, you stand a chance of being able to replace it economically. (Our favorite fruit company is still working on that one.)
-
-
-
As if afraid the battery might run away, Samsung really didn't hold back on the glue.
-
Fear not! We've seen this before, and developed a secret formula for just this sort of sticky situation.
-
Remember when Samsung made a waterproof smartphone with a battery that you could swap in 10 seconds with no tools?
-
Although smaller than the S9+, the S9's battery is no slouch, and packs 3000 mAh at 3.85 V, for 11.55 Wh.
-
This is exactly the same as the S8, and a little larger than competitors like the Pixel 2 (10.39 Wh) and iPhone X (10.35 Wh).
-
-
-
-
Next we turn our attention to the brains of the phone, and after removing a few friendly Phillips screws, the motherboard slides free.
-
Near the top of the board we get a look at the S9's new heart rate and blood pressure sensors, a step up from the standard heart rate sensor seen on many phones.
-
Say hello to Dr. Bixby.
-
-
-
Compared to some flagships, the S9 has twice the f-stops and half the sensors.
-
Not shown: Samsung's highly touted 2 Gbit LPDDR4 DRAM, layered right underneath the image sensor.
-
Shown: Some other mystery chips.
-
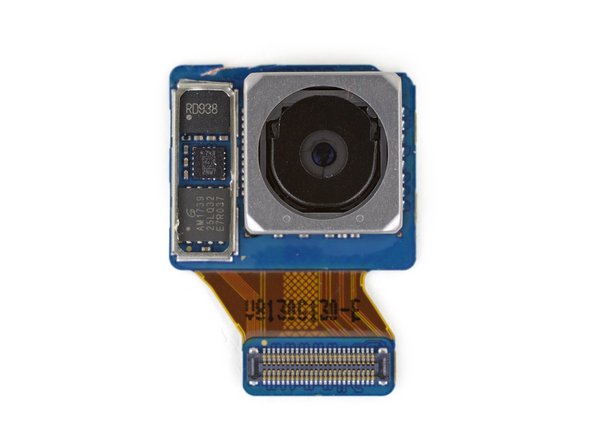
RD938
-
ST Micro 743 2NWT (likely 2-axis gyro for optical image stabilization)
-
GigaDevice GD25LQ32 32 Mb serial flash
-
-
-
We want to try out the S9's new dual aperture, but using the camera app seems a little too conventional.
-
After a bit of disassembly, a spudger seems to do the trick instead.
-
This may seem goofy, but the S9 really will have a small actuator that mechanically opens and closes the aperture—a mechanical bit that can fail.
-
Removing the lens also reveals the image sensor. Taking a closer look we see...yep that's an image sensor. Maybe some X-rays can show us that DRAM...
-
-
-
Lets take a look at the chips that power all that fancy hardware:
-
Samsung K3UH5H5-OMMAGCJ 32 Gb (4 GB) LPDDR4X DRAM, layered over a Qualcomm Snapdragon 845
-
Toshiba THGAF8G9T43BAIR 64 GB UFS (NAND flash + controller)
-
Avago AFEM-9096
-
Qualcomm Aqstic WCD9341 audio codec
-
Maxim MAX77705F PMIC
-
Skyworks 13716
-
IDT P9320S wireless power receiver likely similar to the P9320
-
-
-
There's another gathering of integrated circuits on the flip side:
-
Murata KM7N07016 Wi-Fi/Bluetooth module
-
NXP PN80T NFC controller
-
Qualcomm PM845 (likely PMIC)
-
Qualcomm SDR845 RF transceiver
-
Hard to make out, but we think this is likely the same Skyworks SKY78160-11 front-end module we found in the S9+
-
Qualcomm PM8005 PMIC
-
- Many components are modular and can be replaced independently.
- The battery replacement is technically possible, but accessing it is an unnecessary challenge.
- Glued-down glass both front and back means greater risk of breakage, and makes repairs difficult to start.
- Screen repairs require a lot of disassembly while battling tough adhesive.


Considerazioni Finali
Punteggio Riparabilità


(10 è il più facile da riparare)
16 Commenti
Hello:
So, no radio on this model either?
Thanx for another great video and teardown explanation : )