Salta al contenuto principale

Questa traduzione potrebbe non riflettere gli aggiornamenti più recenti dalla guida originale. Aiuta ad aggiornare la traduzione o visualizza la guida d'origine.

Smontaggio PlayStation 3 Super Slim - Video tutorial

Cosa ti serve

Panoramica Video

  1. Smontaggio PlayStation 3 Super Slim - Video tutorial, Smontaggio PlayStation 3 Super Slim - Video tutorial: passo 1, immagine 1 di 3 Smontaggio PlayStation 3 Super Slim - Video tutorial, Smontaggio PlayStation 3 Super Slim - Video tutorial: passo 1, immagine 2 di 3 Smontaggio PlayStation 3 Super Slim - Video tutorial, Smontaggio PlayStation 3 Super Slim - Video tutorial: passo 1, immagine 3 di 3
    • Rimuovi i tre piedini in gomma, l'etichetta della garanzia e svita e quattro viti.

    • Tira delicatamente verso l'alto la copertura inferiore per rimuoverla.

  2. Smontaggio PlayStation 3 Super Slim - Video tutorial: passo 2, immagine 1 di 3 Smontaggio PlayStation 3 Super Slim - Video tutorial: passo 2, immagine 2 di 3 Smontaggio PlayStation 3 Super Slim - Video tutorial: passo 2, immagine 3 di 3
    • Fai scorrere il coperchio dell'HDD verso la parte posteriore del dispositivo per rimuoverlo.

    • Rimuovi la vite blu mostrata per rimuovere il caddy dell'HDD con un Phillips #1.

    • Rimuovi le 3 viti del telaio con una punta TR8.

  3. Smontaggio PlayStation 3 Super Slim - Video tutorial: passo 3, immagine 1 di 3 Smontaggio PlayStation 3 Super Slim - Video tutorial: passo 3, immagine 2 di 3 Smontaggio PlayStation 3 Super Slim - Video tutorial: passo 3, immagine 3 di 3
    • Usa uno spudger in metallo per spingere la linguetta della copertura posteriore superiore, quindi sollevala per rimuoverla.

    Do you need to remove the hdd in order to remove it?

    Ky Justin - Replica

  4. Smontaggio PlayStation 3 Super Slim - Video tutorial: passo 4, immagine 1 di 3 Smontaggio PlayStation 3 Super Slim - Video tutorial: passo 4, immagine 2 di 3 Smontaggio PlayStation 3 Super Slim - Video tutorial: passo 4, immagine 3 di 3
    • Ripeti il passaggio precedente per la copertura anteriore superiore.

  5. Smontaggio PlayStation 3 Super Slim - Video tutorial: passo 5, immagine 1 di 3 Smontaggio PlayStation 3 Super Slim - Video tutorial: passo 5, immagine 2 di 3 Smontaggio PlayStation 3 Super Slim - Video tutorial: passo 5, immagine 3 di 3
    • Rimuovi le due viti TR8 indicate nel lettore di dischi.

    • Rimuovi le cinque viti Phillips #1 mostrate intorno al bordo del coperchio superiore.

    • Solleva il coperchio superiore per rimuoverlo.

  6. Smontaggio PlayStation 3 Super Slim - Video tutorial: passo 6, immagine 1 di 3 Smontaggio PlayStation 3 Super Slim - Video tutorial: passo 6, immagine 2 di 3 Smontaggio PlayStation 3 Super Slim - Video tutorial: passo 6, immagine 3 di 3
    • Sposta il gruppo lettore CD ottico a sinistra per esporre una delle viti che tiene fermo l'alimentatore.

    • Rimuovi le due viti Phillip #1 indicate e scollega con attenzione il cavo sul lato destro dell'alimentatore.

    • Solleva l'alimentatore verso l'alto per rimuoverlo.

    • Il lato sinistro ha un connettore della scheda sottostante, quindi ci sarà una certa resistenza durante il sollevamento.

  7. Smontaggio PlayStation 3 Super Slim - Video tutorial: passo 7, immagine 1 di 3 Smontaggio PlayStation 3 Super Slim - Video tutorial: passo 7, immagine 2 di 3 Smontaggio PlayStation 3 Super Slim - Video tutorial: passo 7, immagine 3 di 3
    • Scollega attentamente i cavi a nastro indicati.

    • Solleva il lettore CD per rimuoverlo.

    • Scollega e rimuovi il cavo bianco e il cavo a nastro indicati.

  8. Smontaggio PlayStation 3 Super Slim - Video tutorial: passo 8, immagine 1 di 3 Smontaggio PlayStation 3 Super Slim - Video tutorial: passo 8, immagine 2 di 3 Smontaggio PlayStation 3 Super Slim - Video tutorial: passo 8, immagine 3 di 3
    • Rimuovi le sette viti Phillips #1 indicate.

    • Solleva il gruppo scheda madre dalla metà inferiore della custodia per rimuoverlo.

    • Scollega con attenzione i cavi dell'antenna Wi-Fi e il connettore della ventola indicati dalle frecce rosse.

  9. Smontaggio PlayStation 3 Super Slim - Video tutorial: passo 9, immagine 1 di 3 Smontaggio PlayStation 3 Super Slim - Video tutorial: passo 9, immagine 2 di 3 Smontaggio PlayStation 3 Super Slim - Video tutorial: passo 9, immagine 3 di 3
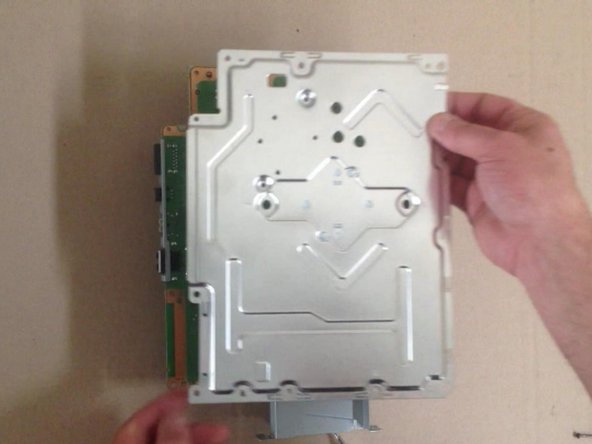
    • Rimuovi le sei viti Phillip #1 indicate per separare il dissipatore di calore e lo schermo dalla scheda madre.

    good job you just broke the ps3 super slim

    korvanjundskyrim - Replica

  10. Smontaggio PlayStation 3 Super Slim - Video tutorial: passo 10, immagine 1 di 1
    • Ecco fatto!

Conclusione

Per rimontare il dispositivo, segui le istruzioni in ordine inverso.

Altre 41 persone hanno completato questa guida.

Un ringraziamento speciale a questi traduttori:

en it

91%

Questi traduttori ci stanno aiutando ad aggiustare il mondo! Vuoi partecipare?
Inizia a tradurre ›

ZFix

Membro da: 12/09/13

191.182 Reputazione

330 Guide realizzate

Team

Master Techs Membro di Master Techs

Community

322 Membri

2.521 Guide realizzate

13 Commenti

What's the name of the screwdriver that undo's the star shaped screws?

themasterassassin8787 - Replica

It is a T8 Torx screwdriver! I'll add the tools to this guide =)

Sam Goldheart -

i took apart my ps3 super slim and put it back together but there is no power what so ever no red light at all

pastorjon.m - Replica

Same here did you fix it?

Kriss -

One thing to pay attention to: The T8 Torx screws (at least on my 500GB model) are Tamper Proof TR8 screws, meaning you need a special screwdriver to undo them. A normal T8 wont work.

Wesley V - Replica

use a cross-shaped screwdriver (idk the correct name) to tear off the little metal thing, ez

Raphaël Brenn -

Step 4: “simply remove the front finisher” - are you kidding me? I nearly broke mine!

versluis2000 - Replica

Thank you, used 1.5mm straight screwdriver to undo the T8 security screws. PS3 completely clogged up with fluff. Used WD40 on a cotton bud to redistribute old heat sink compound on re assembly. Console is like new, video output works again! I keep a stack of those small plastic take away sauce pots, place the screws for the first step in the pot, then stack the second pot on for the second step screws etc.

UK Dave SROL F&F - Replica

Oh god. A potato grew in the bottom ventilation holes. It is impossible to remove. Unbelievable

Xyzfos - Replica

😂😂 how the potato go there

Ryder -

Where does the Phillips #00 screwdriver come into play? You only used a #1.

Donovan Carlson - Replica

I am replacing the optical drive in my console. But didn't note where the drive ribbon was positioned!? Every video I have found, they just pop right in...my original and replacement drives, have larger receptacles than the ribbon it self. There are at least 5 pins, that don't have (potentially) anything connecting them, to the ribbon. I don't want to randomly place the ribbon in one of the possible (7?) positions and fry something in the process...so where do I connect the smaller ribbon?!

Robert Shelton - Replica

Hey, dear community!

I did clean my PS3, because it was running hot and freezing after about 2 hours gameplay I'd say. However it did make the Problem worse, now my PS3 runs its fan like crazy when i boot it up and once i start a game, it sounds like a helicopter taking off.

Anybody know, where the temperature Sensor is located, or if i can just hardwire the fan to a potentiometer and adjust it by hand? (Learned mechatronics, so i could do something myself).

Thanks in advance,

Felix

Felix Schrödl - Replica

Aggiungi Commento

Visualizza Statistiche:

Ultime 24 Ore: 45

Ultimi 7 Giorni: 224

Ultimi 30 Giorni: 1,087

Tutti i Tempi: 95,238