Salta al contenuto principale

Cosa ti serve

Panoramica Video

Questo smontaggio non è una guida di riparazione. Per riparare il tuo PlayStation 3 Super Slim, usa il nostro manuale di assistenza.

  1. PlayStation 3 Super Slim Teardown - Video tutorial, PlayStation 3 Super Slim Teardown - Video tutorial: passo 1, immagine 1 di 3 PlayStation 3 Super Slim Teardown - Video tutorial, PlayStation 3 Super Slim Teardown - Video tutorial: passo 1, immagine 2 di 3 PlayStation 3 Super Slim Teardown - Video tutorial, PlayStation 3 Super Slim Teardown - Video tutorial: passo 1, immagine 3 di 3
    • Remove the three rubber feet, warranty sticker and four screws.

    • Gently pull up on the bottom cover to remove it.

  2. PlayStation 3 Super Slim Teardown - Video tutorial: passo 2, immagine 1 di 3 PlayStation 3 Super Slim Teardown - Video tutorial: passo 2, immagine 2 di 3 PlayStation 3 Super Slim Teardown - Video tutorial: passo 2, immagine 3 di 3
    • Slide the HDD cover toward the rear of the device to remove it.

    • Remove the blue screw shown to remove the HDD caddy with a #1 Phillips.

    • Remove the 3 chassis screws with a TR8 Bit.

  3. PlayStation 3 Super Slim Teardown - Video tutorial: passo 3, immagine 1 di 3 PlayStation 3 Super Slim Teardown - Video tutorial: passo 3, immagine 2 di 3 PlayStation 3 Super Slim Teardown - Video tutorial: passo 3, immagine 3 di 3
    • Use a metal spudger to push the tab on the rear top finisher, and lift up to remove it.

  4. PlayStation 3 Super Slim Teardown - Video tutorial: passo 4, immagine 1 di 3 PlayStation 3 Super Slim Teardown - Video tutorial: passo 4, immagine 2 di 3 PlayStation 3 Super Slim Teardown - Video tutorial: passo 4, immagine 3 di 3
    • Repeat step 3 for the front top finisher.

  5. PlayStation 3 Super Slim Teardown - Video tutorial: passo 5, immagine 1 di 3 PlayStation 3 Super Slim Teardown - Video tutorial: passo 5, immagine 2 di 3 PlayStation 3 Super Slim Teardown - Video tutorial: passo 5, immagine 3 di 3
    • Remove the two TR8 screws indicated in the disk reader.

    • Remove the five Phillips #1 screws shown around the edge of the top cover.

    • Lift the top cover up to remove it.

  6. PlayStation 3 Super Slim Teardown - Video tutorial: passo 6, immagine 1 di 3 PlayStation 3 Super Slim Teardown - Video tutorial: passo 6, immagine 2 di 3 PlayStation 3 Super Slim Teardown - Video tutorial: passo 6, immagine 3 di 3
    • Move the optical disk reader assembly to the left to expose one of the screws holding the power supply in.

    • Remove the two Phillip #1 screws indicated and carefully disconnect the cable on the right side of the power supply.

    • Lift the power supply straight up to remove it.

    • The left side has a board connector underneath, so there will be some resistance when lifting.

  7. PlayStation 3 Super Slim Teardown - Video tutorial: passo 7, immagine 1 di 3 PlayStation 3 Super Slim Teardown - Video tutorial: passo 7, immagine 2 di 3 PlayStation 3 Super Slim Teardown - Video tutorial: passo 7, immagine 3 di 3
    • Carefully disconnect the ribbon cables indicated.

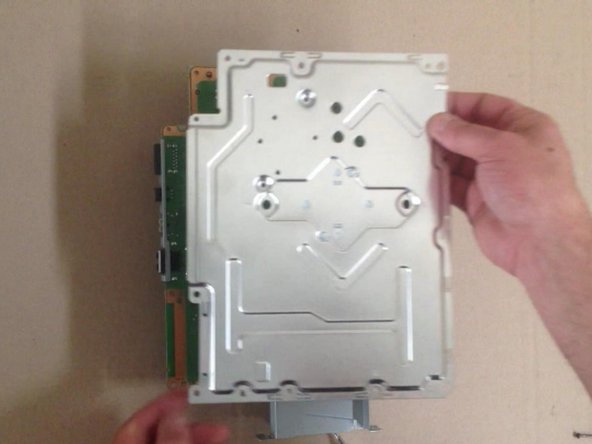
    • Lift the optical disk reader up to remove it.

    • Disconnect and remove the white cable and ribbon cable indicated.

  8. PlayStation 3 Super Slim Teardown - Video tutorial: passo 8, immagine 1 di 3 PlayStation 3 Super Slim Teardown - Video tutorial: passo 8, immagine 2 di 3 PlayStation 3 Super Slim Teardown - Video tutorial: passo 8, immagine 3 di 3
    • Remove the seven Phillips #1 screws indicated.

    • Lift the motherboard assembly up out of the lower half of the case to remove it.

    • Carefully disconnect the Wi-Fi antenna cables and fan connector indicated by red arrows.

  9. PlayStation 3 Super Slim Teardown - Video tutorial: passo 9, immagine 1 di 3 PlayStation 3 Super Slim Teardown - Video tutorial: passo 9, immagine 2 di 3 PlayStation 3 Super Slim Teardown - Video tutorial: passo 9, immagine 3 di 3
    • Remove the six Phillip #1 screws indicated to separate the heatsink and shield from the motherboard.

  10. PlayStation 3 Super Slim Teardown - Video tutorial: passo 10, immagine 1 di 1
    • Congrats!

ZFix

Membro da: 12/09/13

191.308 Reputazione

330 Guide realizzate

Team

Master Techs Membro di Master Techs

Community

322 Membri

2.535 Guide realizzate

13 Commenti

What's the name of the screwdriver that undo's the star shaped screws?

themasterassassin8787 - Replica

It is a T8 Torx screwdriver! I'll add the tools to this guide =)

Sam Goldheart -

i took apart my ps3 super slim and put it back together but there is no power what so ever no red light at all

pastorjon.m - Replica

Same here did you fix it?

Kriss -

One thing to pay attention to: The T8 Torx screws (at least on my 500GB model) are Tamper Proof TR8 screws, meaning you need a special screwdriver to undo them. A normal T8 wont work.

Wesley V - Replica

Aggiungi Commento

Visualizza Statistiche:

Ultime 24 Ore: 31

Ultimi 7 Giorni: 207

Ultimi 30 Giorni: 1,050

Tutti i Tempi: 95,463