Salta al contenuto principale

Questo smontaggio non è una guida di riparazione. Per riparare il tuo PlayStation 3, usa il nostro manuale di assistenza.

  1. PlayStation 3 Fat 4 USB Teardown, The console case: passo 1, immagine 1 di 1
    • Inserir instruções aqui.

  2. PlayStation 3 Fat 4 USB Teardown, Remove the screws: passo 2, immagine 1 di 3 PlayStation 3 Fat 4 USB Teardown, Remove the screws: passo 2, immagine 2 di 3 PlayStation 3 Fat 4 USB Teardown, Remove the screws: passo 2, immagine 3 di 3
    • Inserir instruções aqui.

  3. PlayStation 3 Fat 4 USB Teardown, Open the console: passo 3, immagine 1 di 1
    • Inserir instruções aqui.

  4. PlayStation 3 Fat 4 USB Teardown, Remove the power supply: passo 4, immagine 1 di 2 PlayStation 3 Fat 4 USB Teardown, Remove the power supply: passo 4, immagine 2 di 2
    • Inserir instruções aqui.

  5. PlayStation 3 Fat 4 USB Teardown, The power supply board: passo 5, immagine 1 di 3 PlayStation 3 Fat 4 USB Teardown, The power supply board: passo 5, immagine 2 di 3 PlayStation 3 Fat 4 USB Teardown, The power supply board: passo 5, immagine 3 di 3
    • Inserir instruções aqui.

  6. PlayStation 3 Fat 4 USB Teardown, Remove the bluray driver: passo 6, immagine 1 di 3 PlayStation 3 Fat 4 USB Teardown, Remove the bluray driver: passo 6, immagine 2 di 3 PlayStation 3 Fat 4 USB Teardown, Remove the bluray driver: passo 6, immagine 3 di 3
    • Be very careful to do not break the data connector because it is very fragile.

  7. PlayStation 3 Fat 4 USB Teardown, Remove the SD card slot: passo 7, immagine 1 di 3 PlayStation 3 Fat 4 USB Teardown, Remove the SD card slot: passo 7, immagine 2 di 3 PlayStation 3 Fat 4 USB Teardown, Remove the SD card slot: passo 7, immagine 3 di 3
    • Inserir instruções aqui.

  8. PlayStation 3 Fat 4 USB Teardown, Remove the bluethoot board: passo 8, immagine 1 di 2 PlayStation 3 Fat 4 USB Teardown, Remove the bluethoot board: passo 8, immagine 2 di 2
    • Inserir instruções aqui.

  9. PlayStation 3 Fat 4 USB Teardown, Remove the intire motherboard from the case: passo 9, immagine 1 di 3 PlayStation 3 Fat 4 USB Teardown, Remove the intire motherboard from the case: passo 9, immagine 2 di 3 PlayStation 3 Fat 4 USB Teardown, Remove the intire motherboard from the case: passo 9, immagine 3 di 3
    • Inserir instruções aqui.

  10. PlayStation 3 Fat 4 USB Teardown, Remove the coller and mother board shield: passo 10, immagine 1 di 3 PlayStation 3 Fat 4 USB Teardown, Remove the coller and mother board shield: passo 10, immagine 2 di 3 PlayStation 3 Fat 4 USB Teardown, Remove the coller and mother board shield: passo 10, immagine 3 di 3
    • Inserir instruções aqui.

  11. PlayStation 3 Fat 4 USB Teardown, The cooler specifications and ball bearing: passo 11, immagine 1 di 2 PlayStation 3 Fat 4 USB Teardown, The cooler specifications and ball bearing: passo 11, immagine 2 di 2
    • Inserir instruções aqui.

  12. PlayStation 3 Fat 4 USB Teardown, The gigantic and unefective cooler: passo 12, immagine 1 di 3 PlayStation 3 Fat 4 USB Teardown, The gigantic and unefective cooler: passo 12, immagine 2 di 3 PlayStation 3 Fat 4 USB Teardown, The gigantic and unefective cooler: passo 12, immagine 3 di 3
    • Inserir instruções aqui.

  13. PlayStation 3 Fat 4 USB Teardown, The mother board: passo 13, immagine 1 di 3 PlayStation 3 Fat 4 USB Teardown, The mother board: passo 13, immagine 2 di 3 PlayStation 3 Fat 4 USB Teardown, The mother board: passo 13, immagine 3 di 3
    • Inserir instruções aqui.

  14. PlayStation 3 Fat 4 USB Teardown, The processors: passo 14, immagine 1 di 3 PlayStation 3 Fat 4 USB Teardown, The processors: passo 14, immagine 2 di 3 PlayStation 3 Fat 4 USB Teardown, The processors: passo 14, immagine 3 di 3
    • Inserir instruções aqui.

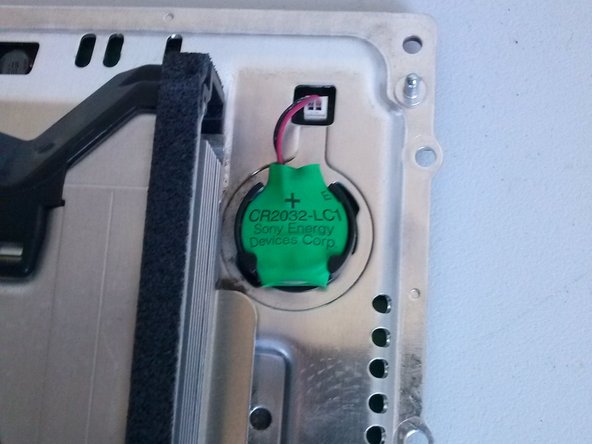
  15. PlayStation 3 Fat 4 USB Teardown, Some details: passo 15, immagine 1 di 3 PlayStation 3 Fat 4 USB Teardown, Some details: passo 15, immagine 2 di 3 PlayStation 3 Fat 4 USB Teardown, Some details: passo 15, immagine 3 di 3
    • Bios battery

    • Power on and eject sensors

    • Main AC power conector and ground conector

  16. PlayStation 3 Fat 4 USB Teardown, Some details: passo 16, immagine 1 di 2 PlayStation 3 Fat 4 USB Teardown, Some details: passo 16, immagine 2 di 2
    • HD Slot

    • HD case screw

0 Commenti

Aggiungi Commento

Visualizza Statistiche:

Ultime 24 Ore: 4

Ultimi 7 Giorni: 60

Ultimi 30 Giorni: 290

Tutti i Tempi: 6,063