Cosa ti serve
Panoramica Video
-
Questo passaggio è privo di traduzione. Aiuta a tradurlo
-
Here we have the system console fully assembled.
-
The USB Ports.
-
The S400 ports
-
The Optical Drive
-
The reset button
-
The eject button
-
-
Questo passaggio è privo di traduzione. Aiuta a tradurlo
-
These are the only tools that we will need. 4 screwdrivers and a tweezer.
-
In the next photo we can see the console, the joystick, the wires and a memory card.
-
-
Questo passaggio è privo di traduzione. Aiuta a tradurlo
-
In the Back, in this case we have a Ethernet adapter, to play online and to use with a Hdd.
-
And the cooler,
-
The power switch
-
The AC in.
-
The Av out
-
And the digital output (optical)
-
-
Questo passaggio è privo di traduzione. Aiuta a tradurlo
-
Lets start the teardown. At first we use a Flathead screwdriver to remove the ethernet adapter.
-
Remove these 2 screws with a Flathead screwdriver.
-
And is quite simple to pull.
-
-
Questo passaggio è privo di traduzione. Aiuta a tradurlo
-
This is the expansion bay, where the hard drive goes.
-
-
Questo passaggio è privo di traduzione. Aiuta a tradurlo
-
Turn the console upside down.
-
Using a small Flathead screwdriver, remove the screw protections. In this model, we have 8 of them.
-
-
Questo passaggio è privo di traduzione. Aiuta a tradurlo
-
Under the protection, suprise! a screw!
-
Remove all eight (8) screws with your Philips "0" screwdriver.
-
Yes, hard work!
-
-
Questo passaggio è privo di traduzione. Aiuta a tradurlo
-
Put the console in the normal horizontal position, and pull the top cover from back to front.
-
-
Questo passaggio è privo di traduzione. Aiuta a tradurlo
-
Remove the button structure just pulling with a small Flathead screwdriver.
-
-
-
Questo passaggio è privo di traduzione. Aiuta a tradurlo
-
The button structure comes out of the case. It have some tape to prevent a new destruction. Yes, I already destroyed this flat cable.
-
-
Questo passaggio è privo di traduzione. Aiuta a tradurlo
-
Remove the two screws with a Philips "0" screwdriver to deatach the controller port.
-
-
Questo passaggio è privo di traduzione. Aiuta a tradurlo
-
Here we remove the screws from the cooler and the main power switch
-
-
Questo passaggio è privo di traduzione. Aiuta a tradurlo
-
Pull the fan up carefully so you don't break the wire.
-
Pull up the fan mount.
-
-
Questo passaggio è privo di traduzione. Aiuta a tradurlo
-
The power cable goes further inside the case. It's better to remove it in a future step.
-
The fan wire also goes more inside the case. Take extreme care not to destroy it because it is very small.
-
-
Questo passaggio è privo di traduzione. Aiuta a tradurlo
-
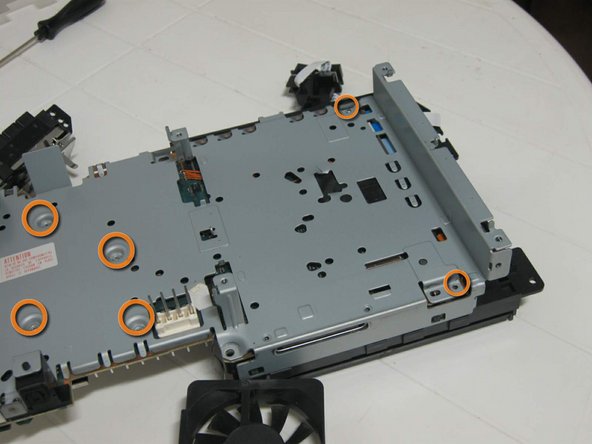
This is the power source board. remove the 4 screws where I marked in blue.
-
-
Questo passaggio è privo di traduzione. Aiuta a tradurlo
-
Looking from the back, pull up the board, releasing from the pins of the main board.
-
Finally you can remove the power switch.
-
And this is the power source board.
-
-
Questo passaggio è privo di traduzione. Aiuta a tradurlo
-
Remove the isolation cover from the metal case.
-
Remove the small screws using a thin crosshead screwdriver.
-
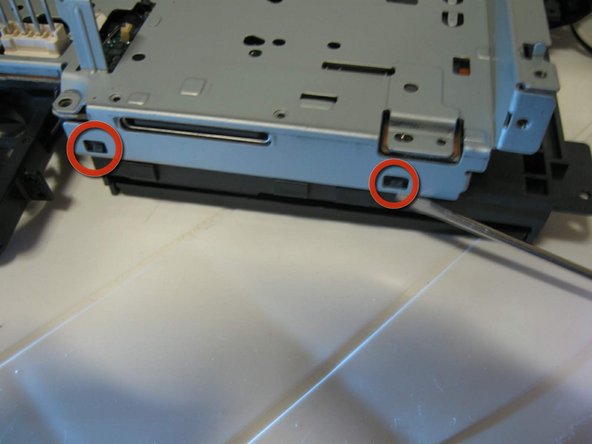
And release the metal case from the DVD player, as indicated, using a small flat screwdriver
-
-
Questo passaggio è privo di traduzione. Aiuta a tradurlo
-
Now you can remove the metal case and find the main board.
-
Look, the flat cables! Now is the time to remove them. Be gentle please.
-
-
Questo passaggio è privo di traduzione. Aiuta a tradurlo
-
There are 2 more and the DVD player is free.
-
-
Questo passaggio è privo di traduzione. Aiuta a tradurlo
-
Now you can turn upside down again, and remove the metal protection.
-
This is the other side of the main board.
-
-
Questo passaggio è privo di traduzione. Aiuta a tradurlo
-
Well, the try to remove the cooler wire was a total failure.
-
The plug is made to deatach, but it is old. The plug had turned into one piece, and broke the soldering.
-
Well, I'll find a way to fix it. I always do =)
-
-
Questo passaggio è privo di traduzione. Aiuta a tradurlo
-
This is the end of the teardown.
-
From top, from the left: Ethernet adapter, Ps2 case, Hdd, Cooler, Cooler grid, bottom metal cover protection, screws protectors, screws, Controller board, Power swtich, Power source board, Plastic cover to isolate the power source board, top metal cover, DVD Drive, Expansion Bay cover, main board, reset/eject structure.
-


12 Commenti
reverse procedures..step by step..
Yep in reverse, take your time or you'll be like me breaking things and having to rig it haha. Put the shielding back together, drive, power board, the other shield for hard drive. Everything, plug all connections. Even power-reset buttons. Then put it on the bottom casing, connect controller ports and close it up with top casing.
If a cable is ripped or broken, unfortunately there is no way to fix it. You will have to replace the cable.
I put a lot of layers of tape on mine, the last owner of my system was very naughty and disassembled the system when it was still under warranty, so the cable was brokem
John Doe -