Introduzione
In questo smontaggio, apriamo una Wii fino alla scheda logica. Non avrei potuto farlo senza l'aiuto della mia ragazza, Elizabeth.
Cosa ti serve
-
-
Scollega tutti i cavi esterni dalla console Wii.
-
Raccogli tutti gli strumenti.
-
-
-
Una piccola vite tiene ferma la batteria di memoria del BIOS.
-
Una volta rimossa quella vite, puoi far scorrere via la fessura di plastica.
-
-
-
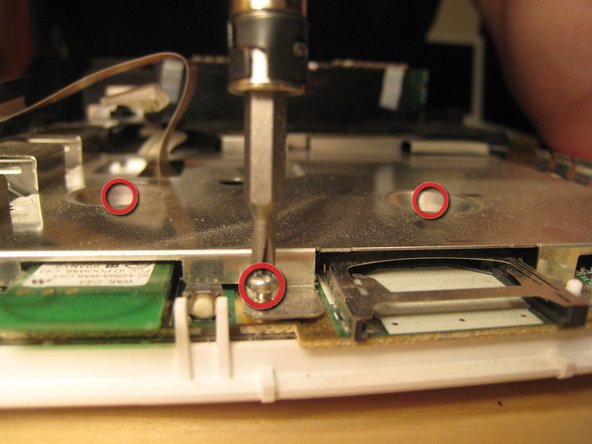
Rimuovi queste tre viti della custodia nera. Quella a destra è più lunga di qualche mm. Queste viti sono avvitate sulla copertura di plastica nera per le porte del GameCube.
-
-
-
Rimuovi tutte le viti dalla custodia.
-
Diverse viti della custodia richiedono un cacciavite Tri-Wing.
-
Il passaggio successivo ha altre immagini della rimozione dei piedini in gomma e delle viti sottostanti. I piedini e i coperchi delle viti sono autoadesivi, ma non tutti i piedini o i coperchi delle viti hanno una vite.
What tri wing screwdriver size i need?
I used Y1 in the ifixit kit
-
-
-
Una volta rimosse tutte le viti, dovresti essere in grado di rimuovere il pannello dell'unità anteriore.
-
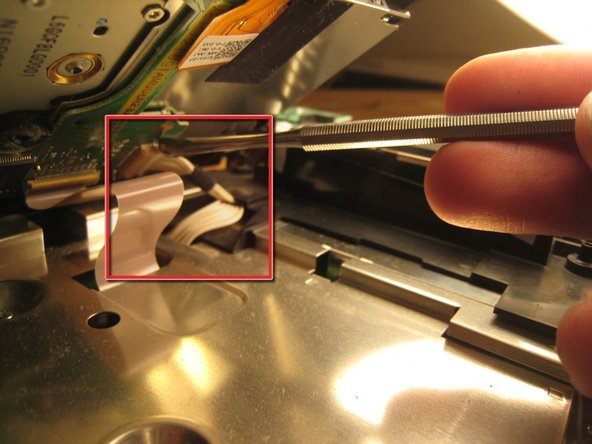
Il cavo che collega il pannello frontale (riquadri verdi nella terza immagine) può essere estratto delicatamente a mano o con l'aiuto di uno spudger.
If you actually take the time to do this step It would not have a broken holder
I was not gentle enough in removing the plastic wire connector. The red wire broke off, with a small piece of the red wire stuck in the plastic connector. I really can't get the small piece of red wire out of the connector.
Anyone know of anywhere that sells a connector, or at least what the name of kind of connector is?
-
-
-
-
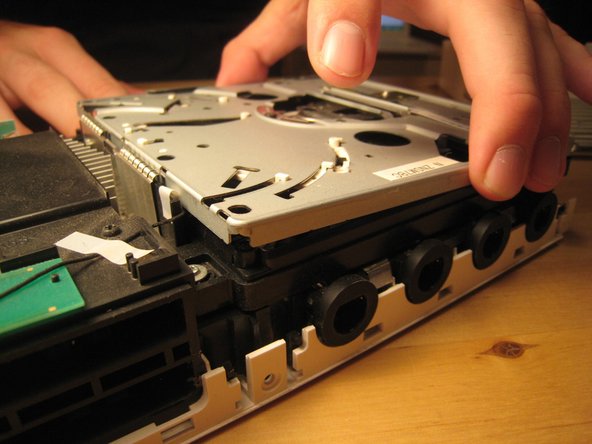
Abbiamo sollevato il coperchio dell'unità ottica rimuovendo le sei viti a croce Phillips #00. Queste sono tutte contrassegnate nell'immagine precedente.
-
Ci sono un sacco di parti nell'unità ottica, ma non c'è niente di speciale in questa unità rispetto ad altre unità con caricamento a slot, quindi non l'ho smontata completamente. Ci sono anche un sacco di ingranaggi e leve con cui non volevo avere a che fare.
The six Phillips screws are only holding in the optical drive, so if you only need to take the case off, the sides of it are just very snug against the inside wall and other components
-
-
-
Le viti che tengono l'unità erano in profondità all'interno dell'involucro.
-
Una volta rimosse quelle viti, l'intero case potrebbe essere sollevato.
-
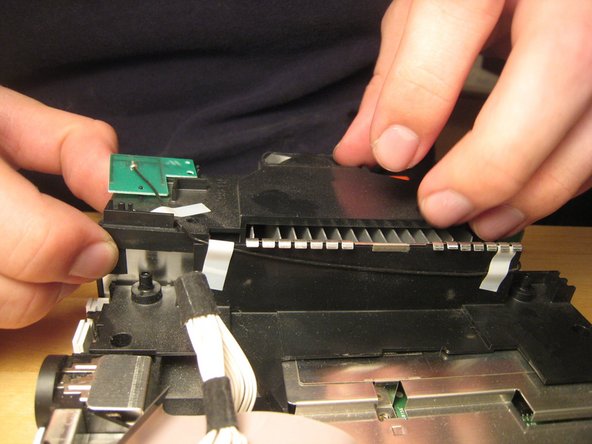
Questo cavo è scivolato fuori dalla sua fessura orizzontale. Una volta staccato, è uscito anche il cavo piatto.
-
-
-
Rimuovi tutte le viti dal coperchio della scheda logica. Due sono incassate nel mezzo; altre sono lungo il bordo. Ne diventeranno visibili altre man mano che le altre parti verranno rimosse. È come un gioco! Puoi iniziare con le viti che tengono i pezzi di plastica nera, ma ho iniziato con la più visibile e ho proseguito da lì.
-
Ci sono due cavi (mostrati nella terza immagine) provenienti dalla scheda logica e collegati alle antenne Wi-Fi. Questi sono delicati. Non romperli.
-
-
-
Stacca la ventola della custodia. Ci sono due viti che la tengono ferma.
-
È necessario staccare il connettore di alimentazione per la ventola se si desidera rimuoverla completamente.
-
-
-
Se il tuo cacciavite non è magnetizzato, avrai bisogno di un magnete per rimuovere alcune delle viti incorporate. Puoi tenere un magnete contro l'asta del cacciavite per magnetizzarlo temporaneamente.
-
Una volta che tutte le viti sono state svitate, puoi iniziare a rimuovere l'involucro nero.
-
-
-
Con i coperchi di plastica neri rimossi, possiamo vedere tutti i fori delle viti. La maggior parte delle viti è ormai stata rimossa, ma una volta che anche il resto è fuori, puoi sollevare il coperchio della scheda logica.
-
Nota che almeno una parte è imbottita termicamente sul coperchio della scheda logica. Potrebbe essere necessario sostituire questo pad termico, ma non l'ho fatto. Li ho solo rimessi insieme. Va beh!
-
Rimuovi tutte le viti rimanenti nel coperchio della scheda logica.
-
-
-
Ci siamo fermati lì.
-
Uno stampo per muffin ha funzionato molto bene per organizzare tutte le viti.
-
Rimontare la Wii ha richiesto solo mezz'ora e funziona perfettamente. Abbiamo migliorato il design di Nintendo con tre o quattro viti e un dado quadrato, ma ne abbiamo peggiorato il design con un pezzo di nastro adesivo (per tenere la batteria del BIOS).
The extra Square Nut goes in the right hand side of the plastic bracket in step 12. It is the reason you ended up needing duct tape for the battery door.
-


Un ringraziamento speciale a questi traduttori:
100%


Questi traduttori ci stanno aiutando ad aggiustare il mondo! Vuoi partecipare?
Inizia a tradurre ›
27 Commenti
I was kinda hoping you would take apart the optical drive assembly, you said there is "nothing fancy" about it, but since Nintendo designed this drive to be able to take the "mini" discs from GameCube, they have to work out a mechanism to center the disc before loading it onto the motor, hence "a ton of gear and levers" and that's the exact thing I actually wanted to see, I really wanted to know how they made it work..
:P
Maybe I can make a guide for you with it like that. I plan to replace the Hard Drive in my wii so ill make a guide.
@zeldaawesome It is not a hard drive, it is NAND. In fact, that’s about as far away from a hard drive as you can get.
Xu Xian -
I have a dud drive, so i might just do this.
Nice guide. I have one suggestion and one comment to add.
Suggestion: a different color circle in the pictures for the Tri tip screws would speed up re-installation.
Comment: the extra square nut holds in the BIOS battery cover which is quite inconvenient to discover as it is the last screw you reinstall.
Thank you! Helped a lot to change the casing. The only advice that I can give is to organize the screws properly to mount it up again.
Cheers!
Thanks for this. My Wii is now 9 and I need to do a good clean out of dust and what not. This will be really helpful.
so i got off the first two triangle screws under the black plastic on the gamecube controller ports, and after, i went to take off the four on the side of the wii. i got the ones that were deep in the console, but as i tried to get the black triangle ones that are a little smaller i messed up the screws to much and i pretty much lost the threading on the two. what can i do to get them off. i can replace them if i can get the darn things off. also i was using a flat head that worked on all the other silver triangle screws.
Would you mind answering a question? My Wii was dropped on accident, and I thought I heard something come loose. Sure enough, little black chunks of plastic came out of the fan slot when I examined it. The Wii itself appeared to work, but I can't help but worry that somehow gameplay might be effected. Any ideas where the black pieces of plastic came from? Will this effect the Wii's performance? Please respond as soon as you can!
Thanks for the 411. It was useful, with a few side notes:
1)I tried following your tool list on the cheap. Thinking that I had a ton of tool kits already, I skipped ordering the Phillips screw drivers. I panicked a little when I started my teardown, only to find all my drivers too big for the job....save one. The Phillips screw driver in the "Radio Shack 61PC Computer and Electrical Tool Set" handles all the Phillips screws on the teardown.
2)The notation about the hidden screws was a little misleading and a bit of an aggravation, as only a small percent of the feet actually covered screws (1, actually, IIRC). For a future edition of this teardown, please add some sketches to show the proper locations.The recommended "Pro Magnetic Project Mat" and my lame excuse for art skills saved me in this area.
Thanks for the brilliant and well annotated tear down! A dab of no nails with a cocktail stick will make sure the rubber feet will stay sat when you reattach them.
@gjwilder - that's the center piece out of the holder inside the game case, it probably broke off and got stuck in the center hole of the disk and loaded into the slot unnoticed.
I can't imagine how that would work; torx and tri-wings are shaped very differently. In any case, it's much better to use the right tool for the job, or you risk stripping screws and never getting them out again. Tri-wing drivers are pretty easy to get ahold of, so best not to take shortcuts ;)
the hannah mareiMedlock
misc parts (ie metal & plastic holdings) missing from the final picture. Could be useful to make sure you have all the parts when you try to put it back together…
We improved Nintendo's design by three or four screws and one square nut, but worsened their design by one piece of duct tape.
LMAO (good tutorial tho)
You missed the face and the screws for re assembling are super confusing …I stripped my case from that confusion and missing face
Hey guys, Here it is, I still have the original Wii. Still looks immaculate, and has no mechanical issues. The problem is… I wanted to play the Original Luigi’s Haunted Mansion. I picked up a memory card (Supposedly OEM Nintendo Brand), put it in the slot up top. Played the Game for a while. But, when trying to remove the card. It’s a no go. It is stuck. I used a strip of an old super thin laminated ID card. I Got in the slot to the side of the card, but now see that there is also prongs on the inside of the card too.
Any solutions, or is this going to need a complete tear down to remove?
I wanted to see the CPU, but it still looks good inside.
Where is the wireless receiver that is inside the wii console
I need to remove it and put it in
The usb part of the wii console
In order for me to play spyros adventures
Yea, I used cello tape for the bios battery too.