Salta al contenuto principale

Cosa ti serve

Panoramica Video

Questo smontaggio non è una guida di riparazione. Per riparare il tuo Motorola Moto G 2nd Generation, usa il nostro manuale di assistenza.

  1. Motorola Moto G 2nd Generation Teardown, Motorola Moto G 2nd Generation Teardown: passo 1, immagine 1 di 2 Motorola Moto G 2nd Generation Teardown, Motorola Moto G 2nd Generation Teardown: passo 1, immagine 2 di 2
    • Remove back cover. It's easy, no adhesive and no screws.

    Also remove the SIM and SDCard!

    Ben Low - Replica

  2. Motorola Moto G 2nd Generation Teardown: passo 2, immagine 1 di 3 Motorola Moto G 2nd Generation Teardown: passo 2, immagine 2 di 3 Motorola Moto G 2nd Generation Teardown: passo 2, immagine 3 di 3
    • Twist off all 14 screws together and remove the back frame easily. But the screws feature different lengths, you'd better remember their positions.

    "You'd better remember their positions" Can't you make full guides on all your devices?

    Glaceau Clara - Replica

    Hi there! This is a teardown, not a repair guide, check the full manual to see more complete guides, here for instance is a detailed screw removal step.

    Sam Goldheart -

    Just for completion as I made the same mistake today.

    The longer screws are at the top and the bottom (2x4 screws) and the shorter ones (2x3) at the left and right side of the case.

    Took me some time to find out which one goes to which position.

    Sebastian Schwägerl - Replica

  3. Motorola Moto G 2nd Generation Teardown: passo 3, immagine 1 di 2 Motorola Moto G 2nd Generation Teardown: passo 3, immagine 2 di 2
    • Take away the volume button and power button.

  4. Motorola Moto G 2nd Generation Teardown: passo 4, immagine 1 di 3 Motorola Moto G 2nd Generation Teardown: passo 4, immagine 2 di 3 Motorola Moto G 2nd Generation Teardown: passo 4, immagine 3 di 3
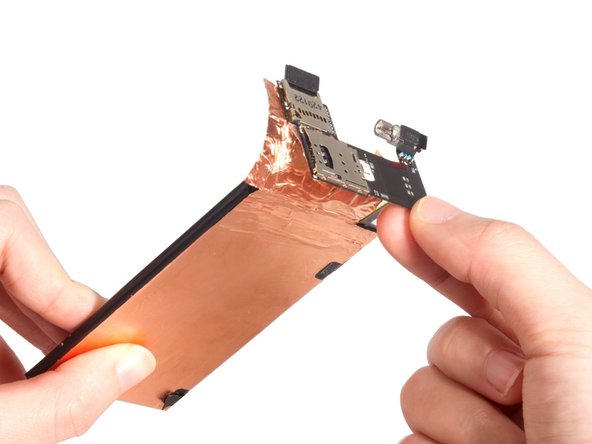
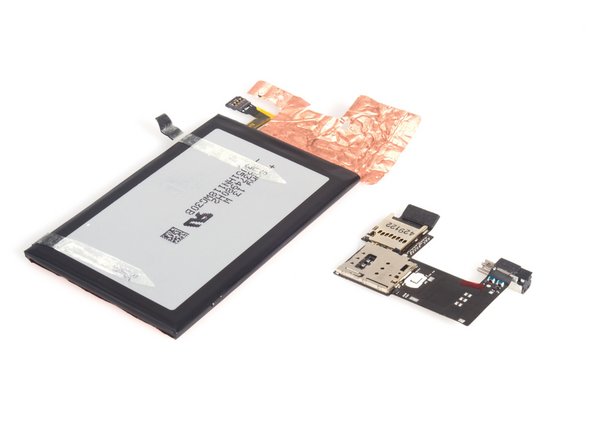
    • Release SIM&SD card reader connector and battery connector. And get the vibrator motor free from adhesive.

    Can u explain little detailed about this step. Unable to release sim connector.

    Goutham Ram - Replica

  5. Motorola Moto G 2nd Generation Teardown: passo 5, immagine 1 di 3 Motorola Moto G 2nd Generation Teardown: passo 5, immagine 2 di 3 Motorola Moto G 2nd Generation Teardown: passo 5, immagine 3 di 3
    • Loosen the platinum foil under SIM & SD card reader from plate. And then drag the stickers out which fix the battery.

  6. Motorola Moto G 2nd Generation Teardown: passo 6, immagine 1 di 1
    • At that time, remove the battery with SIM & SD card reader assembly together.

  7. Motorola Moto G 2nd Generation Teardown: passo 7, immagine 1 di 3 Motorola Moto G 2nd Generation Teardown: passo 7, immagine 2 di 3 Motorola Moto G 2nd Generation Teardown: passo 7, immagine 3 di 3
    • Separate battery and SIM & SD card reader assembly.

  8. Motorola Moto G 2nd Generation Teardown: passo 8, immagine 1 di 3 Motorola Moto G 2nd Generation Teardown: passo 8, immagine 2 di 3 Motorola Moto G 2nd Generation Teardown: passo 8, immagine 3 di 3
    • Release LCD screen connector from motherboard.

  9. Motorola Moto G 2nd Generation Teardown: passo 9, immagine 1 di 2 Motorola Moto G 2nd Generation Teardown: passo 9, immagine 2 di 2
    • Release sensor flex connector and front camera connector respectively.

  10. Motorola Moto G 2nd Generation Teardown: passo 10, immagine 1 di 3 Motorola Moto G 2nd Generation Teardown: passo 10, immagine 2 di 3 Motorola Moto G 2nd Generation Teardown: passo 10, immagine 3 di 3
    • Remove screws on the motherboard and the motherboard can be removed easily.

  11. Motorola Moto G 2nd Generation Teardown: passo 11, immagine 1 di 3 Motorola Moto G 2nd Generation Teardown: passo 11, immagine 2 di 3 Motorola Moto G 2nd Generation Teardown: passo 11, immagine 3 di 3
    • Remove rear camera.

  12. Motorola Moto G 2nd Generation Teardown: passo 12, immagine 1 di 3 Motorola Moto G 2nd Generation Teardown: passo 12, immagine 2 di 3 Motorola Moto G 2nd Generation Teardown: passo 12, immagine 3 di 3
    • Remove front camera and sensor cable.

  13. Motorola Moto G 2nd Generation Teardown: passo 13, immagine 1 di 2 Motorola Moto G 2nd Generation Teardown: passo 13, immagine 2 di 2
    • Remove earpiece and loudspeaker.

  14. Motorola Moto G 2nd Generation Teardown: passo 14, immagine 1 di 1
    • Done.

Sophia

Membro da: 03/25/14

43.810 Reputazione

62 Guide realizzate

13 Commenti

Nice work!

REQUEST: Next time you do a cell phone would you also shoot a straight down on top shot. The 3/4 is nice but I want to look straight down !

TY

Top View - Replica

P.S. Or just do a single TOP VIEW at the END like this one from Dillon ! Pretty Please!

T-Mobile Huawei Prism U8651T Teardown

Top View -

Can anyone please tell me where I can get the details of the Antenna used for the GSM connection in this phone? Like the drawing or schematic.

Please I really need this as this phone has poor cell reception.

Amol - Replica

My Moto G just burned with 12 V from a cheap auto-recharger. But I lost very important data on the 8 GB memory. Is there a possible way to save the data?

mihaibanditu - Replica

Where can I get more information about GPS module and its antenna?

Paulo Abner - Replica

how to remove the external HDD? is there any way to recover data from it after detaching it from the device?

Atul Mohan - Replica

Give mi a seting

Ashish Barvhan - Replica

Mala motoG2 chi purn settings pahije

Ashish Barvhan - Replica

Can not remove the LCD?

jm2k7 - Replica

tanto el auricular y el altavoz son iguales si se invierte de posicion

Jorge Laura - Replica

what is issue if the moto g2 phone is heating at corner of near selfie camera when put for charging..

Mak Fighter - Replica

must be reply for my question…

Mak Fighter - Replica

what’s that small ribbon (looks like a thumbs up) coming out in image on step 13. I recently replaced a screen on my motog 2g and found this ribbon lying below battery but didnt know what to do with it. It is not a connector for sure as there are no sockets to connect there. my phone is working fine without my doing anything with that connector. just curious what it is for.

pradeep - Replica

Aggiungi Commento

Visualizza Statistiche:

Ultime 24 Ore: 1

Ultimi 7 Giorni: 7

Ultimi 30 Giorni: 12

Tutti i Tempi: 53,698