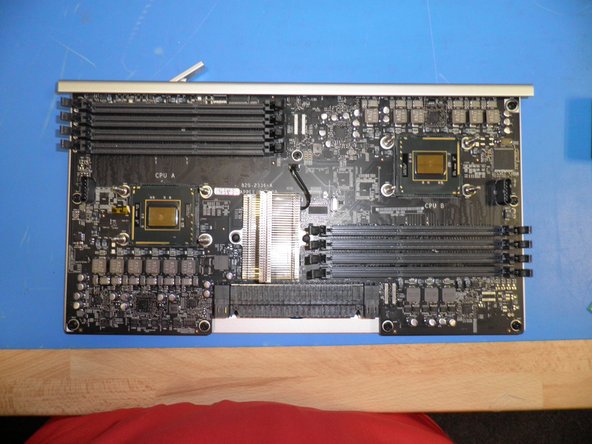
Salta al contenuto principale

Cosa ti serve

Questo smontaggio non è una guida di riparazione. Per riparare il tuo Mac Pro 2009-2012, usa il nostro manuale di assistenza.

  1. Mac Pro Early 2009 Teardown, Mac Pro Early 2009 Teardown: passo 1, immagine 1 di 1
    • I took the Mac Pro Apart.

  2. Mac Pro Early 2009 Teardown: passo 2, immagine 1 di 1
    • added the PSU

  3. Mac Pro Early 2009 Teardown: passo 3, immagine 1 di 1
    • added the backplane board

  4. Mac Pro Early 2009 Teardown: passo 4, immagine 1 di 1
    • Front Panel Board

  5. Mac Pro Early 2009 Teardown: passo 5, immagine 1 di 1
    • Here you can see the LEDs of the Mac Pros, and the DIAG_LED bottom

  6. Mac Pro Early 2009 Teardown: passo 6, immagine 1 di 1
    • The front panel board to backplane board cable

  7. Mac Pro Early 2009 Teardown: passo 7, immagine 1 di 1
    • another view of the front panel board

  8. Mac Pro Early 2009 Teardown: passo 8, immagine 1 di 1
    • Another view of the backplane board

  9. Mac Pro Early 2009 Teardown: passo 9, immagine 1 di 1
    • BackPlane Board and frontPanel Board linked by FrontPanel Board to BackPlane Board cable

  10. Mac Pro Early 2009 Teardown: passo 10, immagine 1 di 1
    • Bluetooth antenna connected to the card on the Backplane board. One needs to be careful because if not connected the Antenna needs to be attached in order not to short-circuit the backpanel board.

  11. Mac Pro Early 2009 Teardown: passo 11, immagine 1 di 1
    • A view of the PCI Slots on the Mac Pro Early 2009

  12. Mac Pro Early 2009 Teardown: passo 12, immagine 1 di 1
    • Optical Drive Cables on BackPlane Board.

  13. Mac Pro Early 2009 Teardown: passo 13, immagine 1 di 1
    • A view of the power button that needs to be connected on the front panel board.

  14. Mac Pro Early 2009 Teardown: passo 14, immagine 1 di 1
    • Processor Cage

  15. Mac Pro Early 2009 Teardown: passo 15, immagine 1 di 1
    • Left Fan in processor cage with speaker.

  16. Mac Pro Early 2009 Teardown: passo 16, immagine 1 di 1
    • right fan in processor cage. Remember, two clips to take the a fan apart. Top and Bottom.

  17. Mac Pro Early 2009 Teardown: passo 17, immagine 1 di 1
    • Unit with, PSU, BackPlane Board, Front Panel Board.

  18. Mac Pro Early 2009 Teardown: passo 18, immagine 1 di 1
    • Small parts that cover the PSU and Super Drive cables.

  19. Mac Pro Early 2009 Teardown: passo 19, immagine 1 di 1
    • Processor heatsinks 8 Core

  20. Mac Pro Early 2009 Teardown: passo 20, immagine 1 di 1
    • Processor Heatsink 4 core

  21. Mac Pro Early 2009 Teardown: passo 21, immagine 1 di 1
    • We can really see the difference between the 8 core and 4 core.

  22. Mac Pro Early 2009 Teardown: passo 22, immagine 1 di 1
    • Processor Cage & Left and right Speakers.

  23. Mac Pro Early 2009 Teardown: passo 23, immagine 1 di 1
    • A nice view of processor board 8 core.

  24. Mac Pro Early 2009 Teardown: passo 24, immagine 1 di 1
    • CPU B of the processor Board.

  25. Mac Pro Early 2009 Teardown: passo 25, immagine 1 di 1
    • CPU A of Processor Board.

  26. Mac Pro Early 2009 Teardown: passo 26, immagine 1 di 1
    • Processor & HeatSink

  27. Mac Pro Early 2009 Teardown: passo 27, immagine 1 di 1
    • RAID Card for Mac Pro Early 2009

  28. Mac Pro Early 2009 Teardown: passo 28, immagine 1 di 1
    • Graphic Card

  29. Mac Pro Early 2009 Teardown: passo 29, immagine 1 di 1
    • Fibre Channel Card

  30. Mac Pro Early 2009 Teardown: passo 30, immagine 1 di 1
    • Finally the machine is rebuilt

zongo

Membro da: 11/24/09

453 Reputazione

1 Guida realizzata

23 Commenti

Hello,

I have Mac Pro 5,1 intel Xeon W3565 at 3.2 GHz Quad-Core.

It is easy to upgrade in W3565 at 3.33 GHz 6-Core ???

Any intel Xeon W3565 fit in my Mac Pro ?

What CPU sockets supported for ?

Thank you,

Stefanos.

StefMacGR - Replica

It is socket-b(LGA 1366)

I think it is easy to upgrade your CPU

sendercustom - Replica

It should be easy to upgrade a single-cpu Pro, they use standard lidded Xeons. I am planning on upgrading to W3690s in a couple of 4,1 machines that have had their firmware flashed to 5,1.

tobiasboyd - Replica

Please let me know how you handle that upgrade!! Or add a tutorial id vey much like to see that and maybe follow suit but im not very savy with these upgrades

Will -

Is it possible to easily remove and service right processor fan (the back one)? It makes too much noise, so needs some oil apparently. I didn't find any way to remove it.

Andriy Tevelyev - Replica

Aggiungi Commento

Visualizza Statistiche:

Ultime 24 Ore: 6

Ultimi 7 Giorni: 34

Ultimi 30 Giorni: 178

Tutti i Tempi: 115,858