Introduzione
In 2018, IKEA entered the audio sector with its first Bluetooth speaker products, known as ENEBY 12” and 8”, with the latter also being fully portable with an optional battery pack. Shortly after that, a third and smaller ENEBY speaker was introduced using regular AAA batteries as a power source.
2019 brought two more speakers called SYMFONISK resulting from a collaboration with Sonos. Although we won’t tackle them this time, you can read an interesting blog post about Sonos here.
In 2020, IKEA’s FREKVENS collection introduced another set of speakers, designed by Teenage Engineering whom you might know from their synthesizers OP-1 and OP-Z (which have guides and parts for).
Since we are kind of keen to look inside portable consumer electronic products—especially those equipped with batteries and wireless capabilities—we went ahead and got a selection of IKEA’s portable Bluetooth speakers.
Since most IKEA products come with a manual and the need for assembly, we were wondering if this might be the case for those speakers too—but see for yourself.
Cosa ti serve
-
-
Our first specimen, the Eneby 8", comes with a small hex wrench in the package that can be used to attach the handle to the sides of the speaker. This is the first encounter with some IKEA-ish "assemble-it-yourself" spirit, but is there more to come? A quick look behind the removeable front cover shows no easy way inside.
-
To enjoy its mobile capabilities, a separately available IKEA-made battery pack is required, though an AC port on the back supports stationary use through a wall plug.
-
Installing and removing the rechargeable 37.4 Wh Lithium-Ion battery pack (2600 mA @16.8 V) is quick and easy—open the bay with a (large) coin, slide in the battery, close and you’re good to go. The battery also has a small pull tab for removal—that‘s what we call user-friendly.
-
-
-
The ten screws on the rear panel play hide and seek with us under some rubber plugs. And no, those are not the same type as the included hex wrench.
-
A regular Phillips #1 screwdriver does the job and some careful prying using the air vent reveals a first peek inside.
-
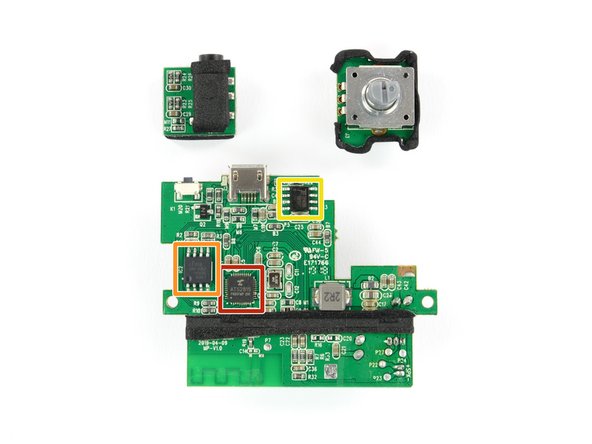
After removing the complete rear panel, some connectors with locking mechanisms need to be unplugged to have complete access to all the components: a tweeter and a woofer, the motherboard, a separate breakout board for the rotary knob and line-in, and a bass reflex tube.
-
-
-
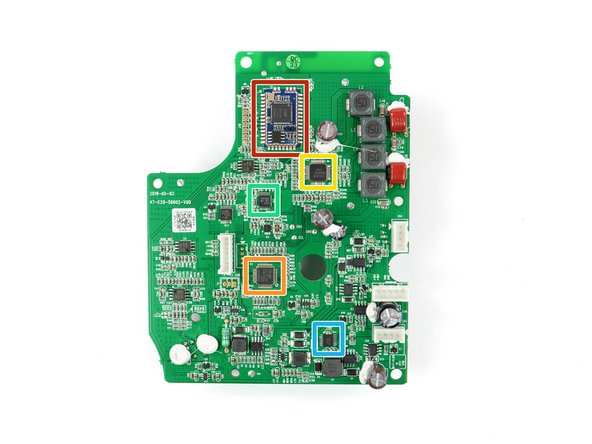
The board in the top left provides the power. The board on the right carries the juicy stuff:
-
Bluetooth Module featuring the CSRA64110 Mono Audio Module with its antenna running along the top edge of the PCB.
-
STM32F030 microcontroller featuring an Arm® Cortex®-M0
-
TAS5731M Stereo Digital Audio Power Amplifier from Texas Instruments
-
PCM1808 Stereo A/D Converter from Texas Instruments
-
Consonance Electronic CN3704 Standalone Li-ion Battery Charger
-
-
-
Continuing chronologically we take a look at the smaller ENEBY Portable. On its side it is equipped with a power button, a line-in jack, a microphone to enable hands-free calls, and a microUSB port.
-
Underneath we find a small circular cover with a groove that gives easy access to the battery compartment for three standard AAA batteries—we like!
-
Getting into this device shows to be a bit more difficult due to no visual screws on first sight. After having checked underneath the rubber feet and the bottom sticker (without success), we focus our attention on the back cover.
-
Some convincing heat and prying reveals the first set of screws which, when removed, give way to all the innards.
-
-
-
Curled around the 2.5 Watt (6 Ohm) speaker we spot a small tube for some “bass reflex” action.
-
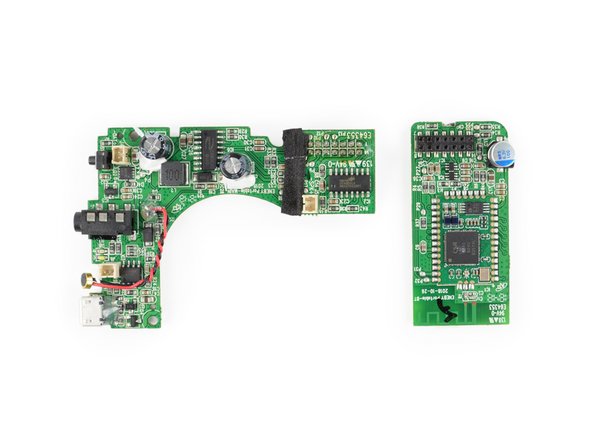
Unfortunately, the microUSB port, the power button, the line-in, and also the microphone are soldered onto the mainboard circumventing individual repairs. But we’re still happy for the user-replaceable battery option.
-
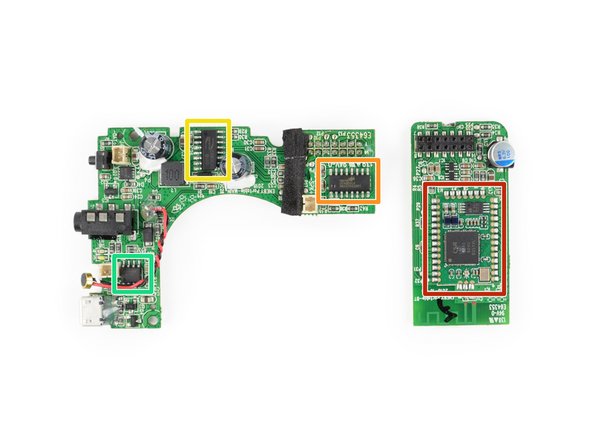
Inspecting the boards more closely we find that the main processor sits on a small breakout board. The Chips on both boards are as follows:
-
Bluetooth module with the CSR8645 dual-mode ROM audio SoC and its antenna running along the bottom.
-
HOLTEK HT46R004 A/D 8-Bit MCU (microcontroller unit)
-
CHIPSTAR CS8323S Audio Amplifier
-
Consonance Electronic CN3085 Nickel-Metal Hydride Battery Charger IC
-
-
-
-
Our next specimen is the small FREKVENS Portable 2x4". This one comes with a clip, explicitly designed for portability, and obviously with a built-in battery.
-
The way inside this device leads through the top part which interlocks with the two bottom halves via plastic clamps—time for our opening picks.
-
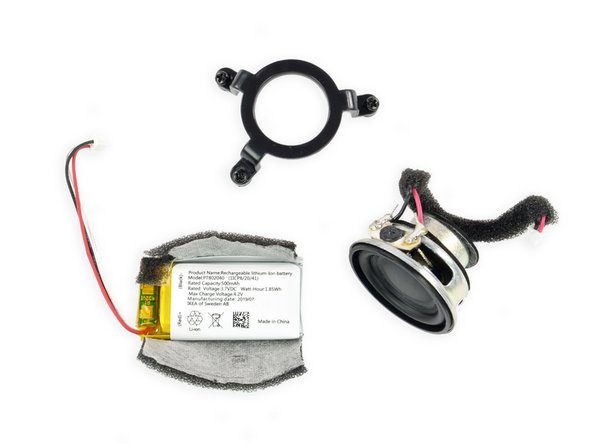
Removing four hex screws separates those two halves, revealing the speaker’s driver, battery pack and mainboard.
-
-
-
The Lithium-Ion battery can be charged through the microUSB port on the top and provides 1.58 Wh (500 mAh @ 4.2 V, model PT802040).
-
It is connected to the mainboard with a JST plug meaning it can (in theory) be replaced when it has degraded after a few years—no soldering required, yay.
-
This little 4 Ohm 2.5 Watt driver seems to have a lot of "oomph" for its size compared to the Eneby Portable.
-
-
-
The volume encoder and line-in jack can be removed separately. Unfortunately, the microUSB port and the power button are soldered to the mainboard. This leaves us with a happy and a sad eye.
-
These are the chips we find on the board:
-
Actions Technology ATS2819 Single-Chip Bluetooth Audio Solution
-
cFeon Q80B-104HIP
-
TP4056 Li-Ion Battery Charger IC
-
On this board you can see the antenna in the bottom left corner.
-
-
-
We turn to the new FREKVENS combo and see, like on the Eneby 8”, removable front covers that reveal some speaker and a reflex vent on the smaller one.
-
Both parts of the combo can be run by AC or by a separately available IKEA-made battery pack.
-
The bigger one features a srewed-on cover plate on the bottom revealing a bay that fits the same energy source as the ENEBY 8”.
-
The compartment of the smaller companion can be opened with a coin and has room for another type of IKEA battery pack named BRAUNIT.
-
Strangely this battery is also suitable for IKEA’s automatic blind FYRTUR as part of their Smart Home series.
-
This interchangeability of batteries between devices is what we’d like to see more often in electronic devices.
-
-
-
We tackle the woofer first and again find some rubber plugs hiding the screws on the back. Having a Jimmy at hand makes the prying much easier since there is no bass reflex vent to get a hold on.
-
Next to a breakout board for input and controls we also find connectors for the power routing, and the power converter and mainboard themselves.
-
This battery pack is the same 37.4 Wh Lithium-Ion battery pack (2600 mA @16.8 V) that can be used for the ENEBY 8".
-
-
-
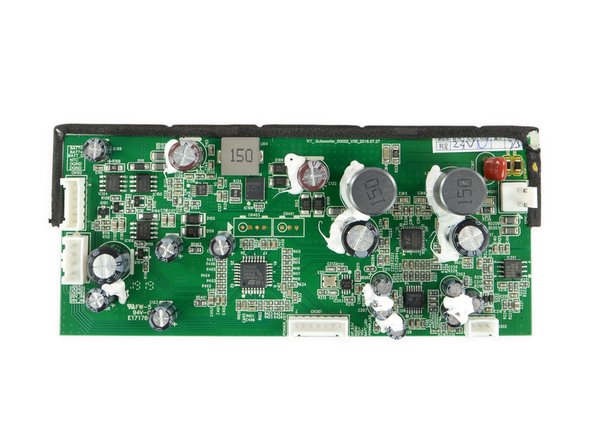
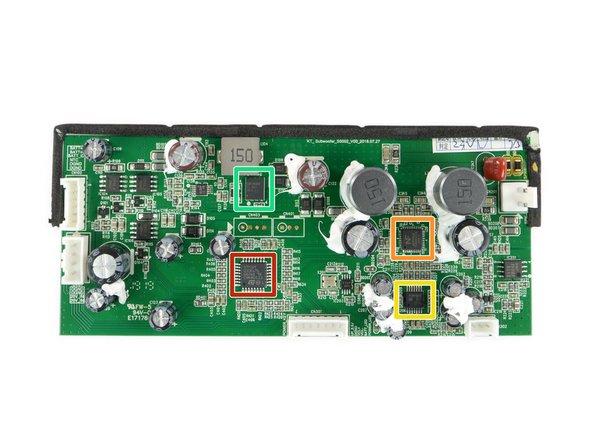
The subwoofer runs on these silicons:
-
STM32F 32-Bit microcontroller
-
NTP7513 audio amplifier by N CITRON (formerly NEOFIDELITY).
-
PCM1808 Stereo A/D Converter from Texas Instruments
-
CSD16322 Power MOSFET from Texas Instruments
-
On the rear there is the same CN3704 Standalone Li-ion Battery Charger we found on the ENEBY 8".
-
-
-
The slimmer of the two speakers puts up an equal fight as we go ahead and open it up through the back. The connectors with locking mechanism are no longer a problem since our first encounter in the ENEBY and we can quickly inspect the components inside.
-
The battery compartment takes up quite a lot of space leaving the bass reflex vent some room on the side right beneath the driver. In between hides the breakout board with the control knob.
-
On the back plate we find the power supply, some AC routing for daisy chaining, and the mainboard itself.
-
The BRAUNIT battery pack offers 18.72 Wh (2600 mAh @ 7.2 V) and can be charged via its built-in microUSB port on the top.
-
-
-
Besides some neat symbols for where the screws go the mainboard carries these chips:
-
ATS2825 Bluetooth Audio Solution from Actions Technology
-
NTP7513 audio amplifier
-
AH1834 IC
-
The two 72015 S0180 JRC are most likely audio amplifiers from the company New Japan Radio.
-
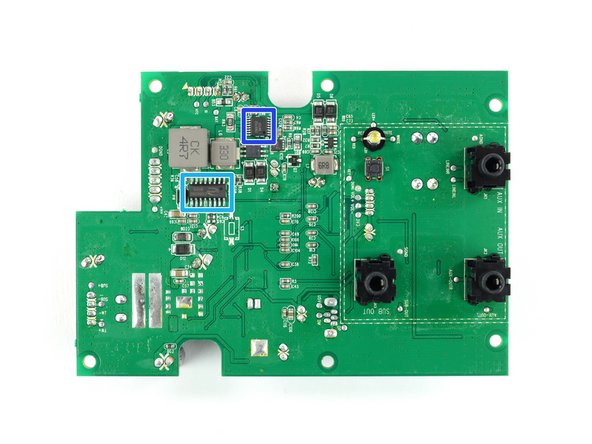
On the rear side of the board we find three line-in jacks labelled "AUX IN", AUX OUT" and SUB OUT", a button, an LED, and some additional chips:
-
CHIPSTAR CS5026E Audio Amplifier
-
And again the CN3704 Standalone Li-ion Battery Charger
-
-
-
Both ENEBYs offer a moderate degree of repairability and easy access to the battery and their inner components.
-
The FREKVENS collection seems to not only blend in with IKEA’s own product range, but also takes advantage of their ecosystem by using available battery packs for the bigger speakers.
-
We had wished for an easier solution of the FREKVENS Portable, but seeing a moderate way inside and a plug-in battery we might turn a blind eye.
-


Team

7 Commenti
Would love to see a teardown for the Synfonisk Lamp version
Noted, time will tell (I heard there might be a new improved Symfonisk Speaker?)
How the !&&* do you get the battery out of the smaller one
Bonjour,
Super vos explications ! Bravo !
Je suis confronté à une panne d'enceinte Eneby 20 type E 720 probablement due au bouton marche/arrêt/volume qui n'a plus de butée d'arrêt (peut être forcée)
Grâce à vos explications j'ai réussi à le déconnecter, pensez-vous qu'il soit possible de trouver une telle pièce pour la remplacer ? Si oui chez qui ?
Les références sont :
KT-E20-S0002-V00 2019-05-02
Merci de vos lumières...
Michel Claeyssens 19/10/2022
clamic62@live.fr
After failing to charge/start, I was unable to remove the battery from the Frekvens speaker.
- I opened the case, disconnected the battery controller from the main board, and was able to power on the unit.
- I reattached the battery connector cable, gave the battery some time to charge
- Finally, I removed the power cable and it now functions properly.
This should have been a simple matter of removing / reinserting the battery, but it appears to "lock" into place and cannot be removed easily.