Introduzione
Avrai sentito parlare molto del nuovo Fairphone 2: la piccola azienda olandese che lo produce ha fatto scalpore con il suo cellulare modulare, pacifista e facilmente accessibile. Ancora una volta siamo stati tra i primi a mettere le mani sul loro ultimo prodotto. Quando abbiamo smontato il Fairphone originale, abbiamo apprezzato molto la sua modularità e accessibilità. Oggi non vediamo l'ora di vedere che cosa ci riserva questo dispositivo di seconda generazione progettato responsabilmente. Vieni con noi e unisciti al movimento!
Vuoi le ultime esclusive notizie dall'interno su tutte le novità tecnologiche? Seguici su Facebook, Twitter e Instagram per rimanere aggiornato su tutte le notizie dal mondo delle riparazioni.
Cosa ti serve
-
-
Ecco qui la seconda generazione del Fairphone. È cresciuto in dimensioni e caratteristiche:
-
Display LCD 1080p da 5" (446 ppi) con protezione Gorilla Glass 3
-
Qualcomm Snapdragon 801
-
2 GB di RAM LPDDR3
-
32 GB di memorizzazione interna espandibile con MicroSD
-
Batteria agli ioni di litio da 2420 mAh rimovibile dall'utente
-
Fotocamera posteriore da 8 Mp
-
Android 5.1 Lollipop
-
-
-
Con le sue misure di 143 × 73 × 11 mm, il Fairphone 2 è senz'altro di una misura buona in più rispetto alla prima generazione.
-
Con 168 grammi (di cui 20 per il case), il Fairphone 2 pesa solo 6 g in più della prima generazione.
-
Già dall'esterno possiamo notare i due alloggiamenti per le SIM sotto il case vedo-non vedo. Evviva la flessibilità!
-
E questo che cos'è? Un connettore a cinque pin che sembra non possa connettersi a nulla? Ce ne occuperemo in seguito…
-
Questo telefono è etichettato simpaticamente come "Progettato per essere aperto". Musica per le nostre orecchie!
-
-
-
Il primo elemento nella nostra agenda è il case posteriore traslucido. È fissato saldamente, ma si toglie senza bisogno di alcun attrezzo.
-
Dov'è tutta la colla? Siamo in un sogno? No, assolutamente non è un sogno.
-
"Rimuovi la batteria prima di sbloccare lo schermo" Un suggerimento di smontaggio messo sopra alla batteria?
-
Nulla ci rende più felici di trovare un produttore che include le istruzioni di riparazione insieme al dispositivo. Non parliamo di quando le istruzioni sono sul dispositivo.
The picture is misleading. You cannot remove the cover as a whole, it has two pieces that must come separately.
Hi Aloïs, at the time we did this teardown the back cover was one-piece. It was the first issue ever of the Fairphone 2. A teardowns is not a guide and therefore does not represent the proper way for disassembly or replacing a part. We are planning to update the actual back cover guide to the two-piece version soon. Stay tuned
-
-
-
Proprio come ai bei vecchi tempi, solleviamo la batteria ed ecco fatto! Niente colla, niente spine, niente di cui preoccuparsi.
-
La batteria usa anche contatti a molla invece dei connettori a pressione, disposti sotto una staffa, che ormai siamo abituati a vedere. Possiamo scambiare le batterie come se fosse il 2005!
-
Questa pratica cella al litio-ioni da 3,8 V ha capacità dichiarata di 2420 mAh con un'energia complessiva di 9,2 Wh.
-
-
-
L'assenza di viti a vista ci preoccupa, ma non per molto grazie a queste clip in bella evidenza.
-
La rimozione del gruppo display è semplicemente questione di spingere le clip e far scorrere fuori il pannello.
-
Nel telaio centrale troviamo una serie di contatti tipo pogo pin, le cui controparti si trovano sul retro del gruppo display.
-
Immediatamente sotto i contatti del gruppo display, togliamo la schermatura metallica per vedere dove il display si collega alla breakout board, la semplice scheda stampata intermedia.
Hi
I just tried pulling out the screen and I must add that it's not that simple to do it safely...
The assembly is quite tough, you must give a good amount of strength to disassemble the screen from the board. My technique was to take in my 2 hands the body and to use a strong flat surface (a table is OK) to help me sliding the screen.
The brackets are very resisting.
At least it won't be too easy to tear it apart ^^
You are right. The display is mounted very well.
The steps and descriptions of the teardown aren't meant to be read as replacement guides.
You will find more information and pictures in the display replacement guide over here:
Sostituzione gruppo display Fairphone 2
(don't forget to unlock both sliders)
I saw a very useful tip on youtube, which comes from the Fairphone support: Give the phone a soft massage, push the display against the chassis forwards and backwards several times, only one or two milimeters, and after a short time it will move. I did that wearing latex gloves, because they have a very good friction and I didn't have to give to much pressure on the display, and in the end it was quite easy to remove.
hello,
I'm currently designing a modular laptop concept for a project at university and I'm trying to get my hands on some of the pogo / spring loaded contact connectors which they use in this.
Does anyone have any recommendations for where to find some?
Can't help with that, but must mention that that's pretty cool.
The wikipedia article on Pogo pins has links to manufacturers: https://en.wikipedia.org/wiki/Pogo_pin
I guess you find them in Huaqiangbei ( Shenzen, China)
-
-
-
-
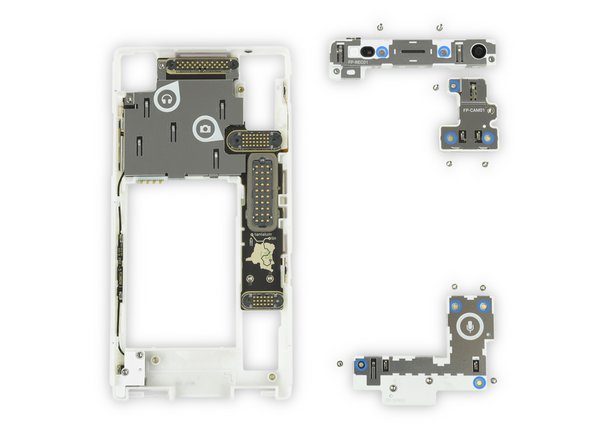
Et voilà, abbiamo il frame principale con tre moduli rimovibili in modo indipendente tra loro. Le piccole icone vicine a ognuno di essi indica che cosa dovrebbero fare:
-
Jack cuffie, altoparlante da orecchio e modulo fotocamera frontale
-
Modulo fotocamera posteriore
-
Modulo microfono
-
Abbiamo anche trovato una piccola mappa che mostra con una punta di orgoglio da dove provengono lo stagno e il tantalio "conflict free" usati nel telefono.
-
-
-
È il momento di passare
agli affari serialle viti e vedere quanto davvero sia riparabile il Fairphone 2. -
Prendiamo il nostro fedele cacciavite Phillips #0 e rimuoviamo con facilità tutti e tre i moduli.
-
Sotto i moduli troviamo un altro livello di contatti a molla: non c'è alcun cavo flessibile o connettore a pressione in vista.
-
-
-
I moduli sono tenuti insieme da viti Torx T5, presumibilmente per scoraggiare l'utente casuale dall'andare troppo a fondo, ma sono comunque facili da aprire.
-
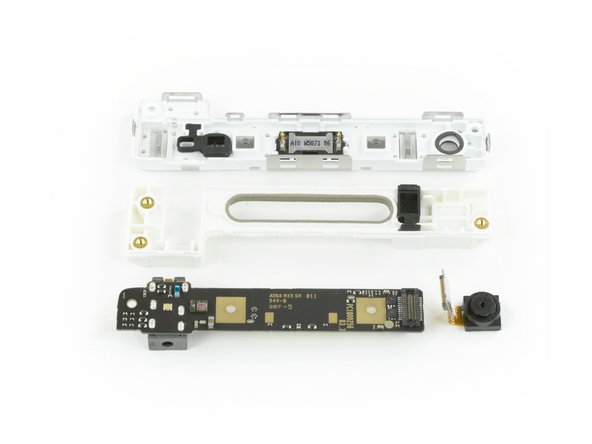
Iniziamo con il modulo superiore: la fotocamera anteriore si estrae facilmente grazie a un semplice connettore con cavo flessibile.
-
L'altoparlante da orecchio è alimentato da contatti a molla, quindi anche questo elemento è di facile sostituzione.
-
Il jack cuffie, l'ultimo componente rimasto, è saldato alla scheda. Fortunatamente non rimane nient'altro di importante, quindi una scheda sostitutiva dovrebbe costare davvero poco.
-
-
-
Avanti il prossimo: la fotocamera posteriore.
-
C'è da sperare che questa unità verrà aggiornata negli anni successivi come nel Project Ara. Dita incrociate.
-
La fotocamera ha un sensore CMOS da 1/3,2 pollici con 8 megapixel e obiettivo con apertura ƒ/2.2.
-
Questo modulo è realizzato proprio come tutti gli altri: un case di plastica attorno a un componente standard, connesso a una scheda di interfaccia pogo con un cavo flessibile e un connettore.
-
-
-
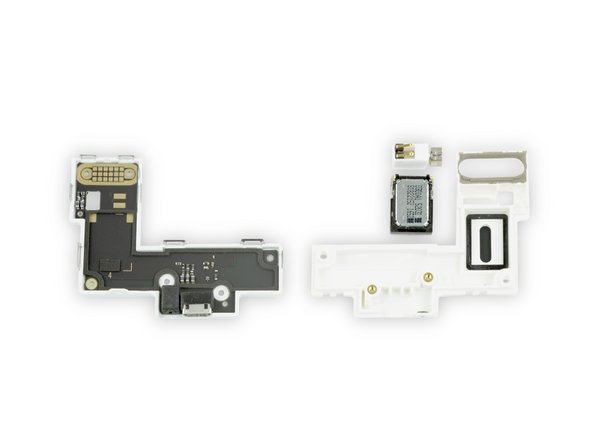
Resta un ultimo modulo da aprire. Benché sia contrassegnato solo con l'icona di un microfono, in realtà contiene diversi componenti.
-
Il motore di vibrazione e l'altoparlante sono collegati con contatti a molla. Ecco altri componenti che si rimuovono facilmente, vai così!
-
La porta USB e il microfono sono saldati alla scheda. Non è necessariamente una cosa negativa, dato che una porta USB richiede una particolare rigidità e ha molti più pin di un altoparlante.
-
-
-
È giunta l'ora di andare in profondità, nel cuore del Fairphone 2.
-
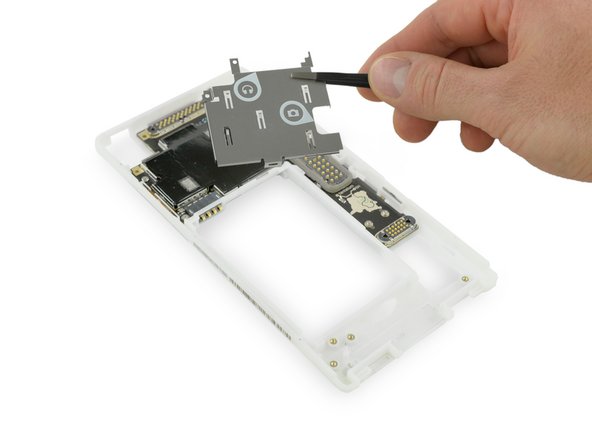
La piastra metallica di schermatura, ricca di utili icone, è il primo elemento da togliere e rivela un conduttore di calore che ancora nasconde le parti più interessanti.
-
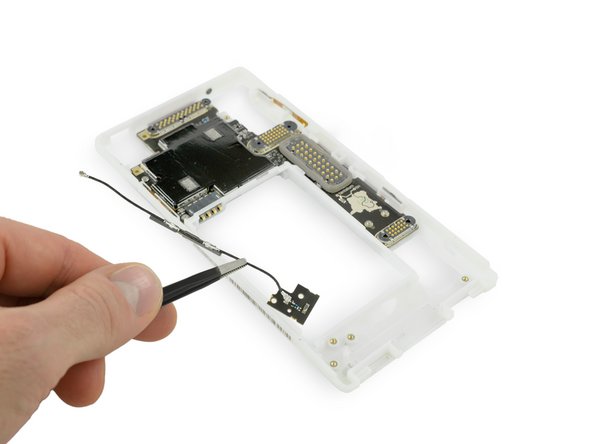
Lungo il percorso, troviamo un cavo RF, che invia il segnale radio lungo il lato del telaio fino all'antenna principale, e lo stacchiamo.
What kind of tool do i use to open the 2 screws?
Those are Torx T-5
Da mein Handy baden gegangen ist, sieht man am linken, unteren Federkontkat rote Farbe, wohl ein Indikator für den Wasserschaden im Innern, kann man als “Anfänger/Nichtskönner” diesen selbst beheben, wenn man die Metallabschirmung abschraubt oder macht man dann diesen Hitzeverteiler kaputt?
-
-
-
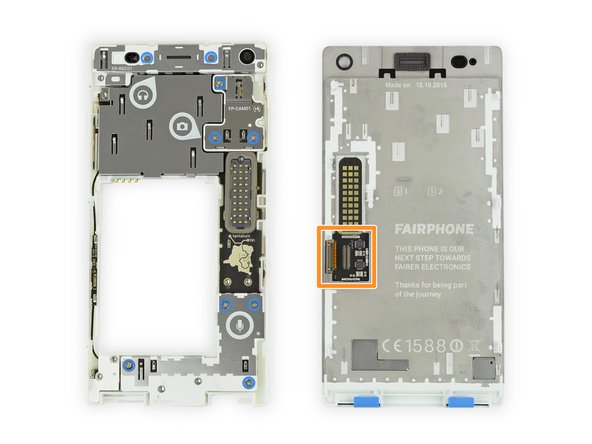
Non è una bellezza? Ci piace davvero il frame di plastica traslucida che mostra tutte le antenne e i pulsanti integrati, ciascuno dei quali è connesso alla scheda madre con contatti a molla.
-
E sulla coda della scheda ci sono i cinque pin pogo che abbiamo visto prima. Si tratta di un'interfaccia USB 2.0, con alimentazione in ingresso: pronta per espansioni future e nuove possibilità.
I've had SIM card and SD card sockets go wrong on me before so I was hoping these would be replaceable without throwing away the entire core unit. No such luck it seems. It would have been cool if these had been embedded in the frame instead. I guess that would imply a lot of spring connectors though.
Ist schon Einiges diese Bilder. Leider vermisse ich die klassische Art von iFixit mit Angabe der Schauben und der heiklen Stellen.
Grund: Ich erhielt ein FP 2 mit defektem erstem Slot. Diesen wollte ich reparieren, aber beim Anblick der geklebten gedruckten Leitungen (Antene?) von aussen habe ich es sein gelassen. War mit zu heikel, da ich nicht wusste, ob sie fest mit der Platine verbunden sind. Also habe ich diese “letzte” Platine nicht entfernt, um zu den Slots zu gelangen, die von der weissen Abdeckung geschützt sind. Hier in diesem Beitrag ist auch nichts angegeben, wie man die Platine entfernt. Ich hoffte, wenn ich an die Slots von hinten komme, dass ich die vermutlich verbogenen Kontakte mit Vorsicht wieder zurechtbiegen könnte.
-
-
-
E ora la sezione tecnologica.
-
Memoria flash NAND eMMC da 32 GB Samsung KLMBG4WEBC
-
Chip Wi-Fi 802.11ac + Bluetooth Qualcomm WCN3680B (in base a informazioni del team Fairphone!)
-
Accelerometro + giroscopio 6 assi ST Microelectronics LSM330DLC
-
-
-
Sul retro c'è molto altro:
-
2 GB di RAM LPDDR3 Samsung K3QF2F20EM, sopra il processore Snapdragon 801 MSM8974AB
-
Ricevitore RF Qualcomm WTR1625L (simile all'iPhone 6)
-
Modulo Amplificatore Multibanda Multimodale RF Micro Device RF7389EU
-
Chip gestione alimentazione con tecnologia Envelope Tracking Qualcomm QFE1100
-
Chip gestione alimentazione (PMIC) Qualcomm PM8841
-
Codec Audio Qualcomm WCD9320
-
-
-
Punteggio di Riparabilità del Fairphone 2: 10 su 10 (10 è il più facile da riparare)
-
Il pannello LCD e il vetro di copertura sono fusi insieme, semplificandone la rimozione, ma aumentando in modo significativo il costo della sostituzione.
-
I componenti che tendono a rompersi più spesso, la batteria e il display, possono essere sostituiti senza l'uso di attrezzi.
-
I moduli interni sono fissati con viti Phillips #0 e semplici connettori a molla.
-
I singoli moduli possono essere aperti e molti dei loro componenti possono essere sostituiti individualmente.
-
Tutti i pulsanti e i cavi sono facilmente accessibili. I contatti a molla permettono aggiornamenti futuri e la facile sostituzione dei componenti.
-
Oltre alle icone e alle istruzioni leggibili dentro il telefono, il Fairphone 2 è commercializzato con la documentazione di riparazione integrata.
I would have given this a 9/10, and 10/10 if the glass and LCD could be replaced separately, as the glass is a very common point of breakage in drops, as well as being susceptible to scratching. Knowing that replacing damaged glass will not result in the cost of an entire LCD assembly definitely gives a bit more peace of mind. A 9/10 reparability score is still very good though.
i disagree. for now a perfect 10 score is fair,.
it might warrant a drop in point in the future if a better phone comes out, but for now Repairability Score of 10 is a valid point, as it is the easiest to repair compared to other phone.
milkboy -
I disagree, the fusion of display and front glass has a good reason. By removing the air gap between the LCD and the front glass, they can reduce the Light reflections in this surfaces by a good amount.
So I wouls give this Phone a 10 out of 10.
Thoth -
Just to be fair, I believe the idea is to make the phone so robust that the glass is unlikely to get cracked in the first place. Cracked screens are absurdly common because it doesn't hurt the manufacturer to make them fragile. LCD faults are also pretty common though. If you reduce the smashed glass rate to lower than the LCD fault rate, then the risk tradeoff looks much better. And so the phone is designed so that you can drop it from 6 feet without smashing the glass, something I wouldn't suggest trying with an iPhone.
At least that's the idea. Nothing short of real-life statistics will prove it true or false.
I agree, the fused front assembly should make it a 9/10.
but they are fused by design and repairability doesn't involve that. You could maybe give it a 7/10 or 8/10 on modular design but it shouldn't affect repairability score which we're concerned with here.
By that logic even phone gets 10/10 because it's a single module and you can replace the whole thing.
From the overall design, I'm expecting this phone to be very user repairable, but also pretty unreliable.
For most users that is a pretty negative trade off.
alex -
Hi, the fusion between the LCD ans the screen is understandable but FP should offer discount the price for those who send back the broken screen units for refurbishing.
I think a 10/10 is warranted because a 9/10 would put it in the same class as many lesser phones.
But being a happy owner I'm potentially bias.
Ist es denn möglich einen einzelnen Prozessor (Schritt 14) zu tauschen und wo würde ich den bekommen?
Hanno
Da der Prozessor am Motherboard verbaut ist, würde dies einen Tausch des Boards bedeuten. Lediglich den Chip zu tauschen (auslöten und wieder einlöten) würde einen sehr großen bis technische fast unmöglichen Aufwand für einen normalen Verbraucher bedeuten. Ob die Chip-Architektur kompatibel ist mit den restlichen Komponenten ist eine ganz andere Frage.
Is it technically possible to extract the nand flash without damaging it from one Fairphone (totally dead) and to put it into another working Fairphone ? I need this in order to recover the otherwise lost pictures from the dead phone…
If yes, could you please give me some tips / advice on how to do it properly ?
Thank you in advance !
Yes this absolutely is possible! You ideally would need an reflow oven but an heatgun should work too. Look up how to reball/reflow chips for more info.
t h -
-


Un ringraziamento speciale a questi traduttori:
87%

albertob ci sta aiutando ad aggiustare il mondo! Vuoi partecipare?
Inizia a tradurre ›

Team

20 Commenti
Hi people, I am a volunteer in the Repair Café of Deventer and we are very excited about the new Fairphone2 because it showcases what we are working for: Repairable design. We are with over 300 Repair Café's in Holland now and promoting the Fairphone is one of the things I like to do. I cannot wait to receive mine, should be end of this month. So I can take it to Paris on the 12th Decmber for the big Climate March. Super glad and proud with Fiarphone, they deserve 10/10 score all the way!
Aside from making the phone thinner, fusing the display and digitizer eliminates the issue of dust infiltration (specks of crap under the glass that just can't be cleaned off) which is a warranty/service concern on devices where the two are separate. The combination is also more rigid, providing a subjectively better (firmer) "feel" when the user taps the screen. It's also, all else equal, more resilient against impact or drop damage. From an engineering standpoint, the case can easily be made that these advantages outweigh the potentially increased repair cost, especially since the fused glass is less likely to break to begin with.
Hey iFixit, there is a dead link in step 6 (Smontaggio Fairphone 2 link in the word 'map'). We changed our site so that is probably the reason. Can you fix it?
Thanks!
@Riqz: The GPS is in the Core module.
@Mgehrking: It can, but you have to research yourself where there is coverage with which carrier. Do realise we do not ship outside Europe (also not for after sales support). https://fairphone.zendesk.com/hc/en-us/a...
Esmée - Fairphone Customer Support
The dead link is now fixed. Thanks for the tip! :)
The Philips #1 Screwdriver didn't work that well, I had to use a flat 1.4mm driver to remove the screws. Maybe better to recommend using a #00?
Victor
Is there going to be a US LTE variant available anytime soon? Me want!
I'm unable to get beyond step #4 - I flipped the blue switches but I can't slide the screen out. Too bad there is no real-life Fairphone community nearer to me than London (I'm in Leamington Spa in Warwickshire). I would so much rather have a hands-on demonstration than attempt to follow a video.
Hello louisaradice, a teardown is not meant for repairs. You might want to look at the display assembly guide for that. There are also additional comments on step 4 to get the display off. Here you go: Sostituzione gruppo display Fairphone 2
I have looked at Fairphone 2 Display Assembly Replacement but I'm still none the wiser. Try as I can, I still can't slide the screen out.
Louisaradice, Have you looked at Fairphone's screen replacement video guide on YouTube? It's also possible that your clips have somehow jammed? If you are still unable to replace the display I suggest posting a question inn our Answers forum, and take photos of the clips to share with our users. Hopefully we can help you troubleshoot!
Hello,
my Mother's phone has fallen in the water. How can I diagnose which module(s) have to be replaced?
Hello Francesco,
first, make sure it is completly dry. You should have removed the battery immediately after the dive.
you can remove all three modules. Then clean the contacts with alcohol.
Then WITHOUT the modules (just screen and core) try start the phone.
If its boots up replace one module at a time then check again.
For futher help: check the fairphone forum https://forum.fairphone.com/
pa sch -
Hi, Do you know the spec of the antenna, and where I can order another one? Thanks!
Mine does also very often NOT connect to a telephone network (either 2G, 3G or 4G), all other phones I tried are much better (at the same location and with the same network provider). Would changing the antenna resolve this (I mean, how likely does such a simple part become defective)?
Ist schon Einiges diese Bilder. Leider vermisse ich die klassische Art von iFixit mit Angabe der Schauben und der heiklen Stellen.
Grund: Ich erhielt ein FP 2 mit defektem erstem Slot. Diesen wollte ich reparieren, aber beim Anblick der geklebten gedruckten Leitungen (Antene?) von aussen habe ich es sein gelassen. War mit zu heikel, da ich nicht wusste, ob sie fest mit der Platine verbunden sind. Also habe ich diese “letzte” Platine nicht entfernt, um zu den Slots zu gelangen, die von der weissen Abdeckung geschützt sind. Hier in diesem Beitrag ist auch nichts angegeben, wie man die Platine entfernt. Ich hoffte, wenn ich an die Slots von hinten komme, dass ich die vermutlich verbogenen Kontakte mit Vorsicht wieder zurechtbiegen könnte.
Im Teardown findest du solche Angaben generell nicht. Allerdings haben wir tatsächlich keinen Guide um das Motherboard zu entfernen. Hier im Bild lässt sich erkennen, dass es mit Torx Schrauben befestigt ist (ich schätze Größe T4 oder T5). Viel Erfolg
Now that the FairPhone 5 came out with a new 10/10 score, with more modularity than ever, I would be curious to know what the score of the FP2 would be if released today.
Wow! That is one ugly looking brick of a phone!
The cheap looking plastic and design would make me stay way clear of it, even if offered to take itself apart.before repairs.
I find it hard to believe that there really is a market for something like this... What's the price?
Victor Szulc - Replica
I'm not too sure what makes this black rectangle any uglier than the rest available for purchase. The clear back is something of a turn-off, personally, but that's hardly a difficult thing to remedy.
Dave Davidson -
The price is 529.38€. The back cover is also available in black matte, black translucent, blue matte, blue translucent.
Julian Andres Klode -
a) Beauty is in the eye of the beholder, so you finding this phone ugly is uninteresting. b) If you prefer to continue using a 'beautiful' phone like an iPhone or Samsung, then you understand nothing about the fairphone project.
Doc Brown -
I totally love the idea and engineering behind this phone. They even noted how almost all consumers buy a rubberized case after they buy a phone, so they built that right in. That save $30 right there.
I would buy one in a second if it worked well on American phone frequencies. For all it’s modular design, they didn’t make the radio modular or global which is the only failing I can see.
The original comment optimizes what is wrong with the phone market today. There isn’t a single high end phone made today that has a removable battery (except this one) or slide out keyboard. Things I miss from my old G1. They all worry about aesthetics rather than repair-ability and battery life. Sure, it’s obvious why the phone manufacturers don’t want these devices to be easily repaired, built in obsolescence. It’s the consumers acting like sheeple parroting the manufactures promotional material that really disappoints.
Ben Zack - Replica
The main problem is not the phone companies but the people who will spend $1,300.00 for the latest models. These new units do not make phone calls any better or you internet service any faster than what is available. Yes they may have a lot of fancy bells and whistles. But in the end they are just cell phones. Now I must admit I do like the camera/ video cability, but do not buy them for that. ITS A PHONE. And my old flip phone will do the job just as well as the latest Apple IPhone.
tjhoodless - Replica