Salta al contenuto principale

Modello A1419 / EMC 3070 / Metà 2017 / processori Core i5 3.4, 3.5 o 3.8 GHz o Core i7 Kaby Lake 4.2 GHz (id ImAC18,3) / Retina 5k display. Fai riferimento alle guide del modello più vecchio dell'iMac 27" Retina 5K display (fine 2014 & 2015), dato che il sistema è molto simile.

293 Domande Visualizza tutte

Upgrading CPU & blade SSD to NVMe M.2 SSD

Hi all!

I’m in the process of upgrading the Fusion Drive and the CPU of my 2017 27” iMac. I have already maxed the memory with 64gb Crucial 2400 MHz DDR4 RAM.

I have been reading around, regarding upgrading to M.2 NVMe, and its all quite confusing and often contradicting which SSD use and which adapter to get.

Below are my current components, and what I wish to get my nerdy hands on:

CPU:

SSD:

I currently have the 1TB Fusion Drive, and to be honest, It just isn’t fast or reliable. Thus, I want to:

SSD Adapter:

I hope to get some feedback, so I can make the right decisions from the get-go.

I will update this thread:

  • During the upgrade phase
  • Post-upgrade,
  • Before-after performance

Hope to hear back soon!

regards,

Frederik

Update (03/15/2020)

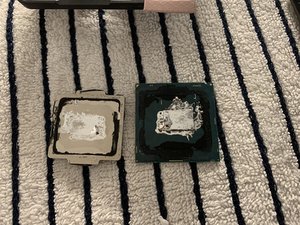
Disassembling and the installation process is not for the faint hearted - it takes a long time, and just a simple small error can prevent the iMac from powering on at all - after installing the CPU, the iMac didn’t power on, so I had to disassemble everything again, and after retracing my steps, I hadn’t properly seated the new CPU (it is not easy to hold the heat sink in place and screw in the bracket on the backside of the motherboard).

however, after reseating the CPU properly, the iMac powered on, and I checked everything was working before I applied the adhesive strips from Ifixit.

The following has successfully been installed in my 2017 27” iMac:

  • i7-7700K (4.2Ghz) CPU
  • 2TB Samsung 970 EVO Plus NVMe M.2 (I had to update the firmware with a bootable USB drive before the macOS could detect the drive)
  • 500GB Samsung 860n EVO SATA 2.5”.

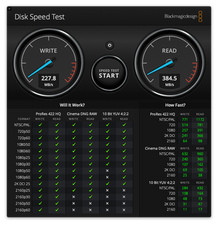
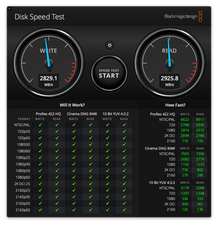
So, how is the performance? it is faster, MUCH faster, in everything from boot-up to document browsing and photo editing in various Adobe C programmes.

In gee bench 5, this Mac has a similar single-score performance to Intel’s I9-9960X (this is a 16 core processor costing $1600+) and a multi score has a better multi score than Intel’s i7-9850H (this is a 6 core processor costing $450+) - however, most surprisingly, this upgraded Mac performs better than the i7-7700K Apple shipped in their 2017 iMacs.

Here are some results:

Block Image

Block Image

Block Image

Block Image

Block Image

Block Image

It has been an exciting (and nerve-wrecking) experience to upgrade this iMac, and if you have any queries or wanting tips, just ask on this thread!

Frederik over-and-out :-)

Risposto! Visualizza la risposta Anch'io ho questo problema

Questa è una buona domanda?

Punteggio 1
50 Commenti

Forget about the Sabrent 2TB Rocket NVMe/PCIe 4.0 SSD as your system is not able to support the PCIe 4.0 spec,

I'm not a lover of M.2 SSD's in iMac's given how far you need to get into the system to replace it. I've seen too many failed SSD/adapter combo's to shake a stick at.

While I too wish Apple has embraced the M.2 SSD directly they didn't and while very similar their drives are still different! Here's a good reference: The Ultimate Guide to Apple’s Proprietary SSDs As you can see here Samsung 2 GB SSPOLARIS NVMe/PCIe 3.0 x4 interface blade SSD. This is the best they ever offered before going to the T2 with direct flash access.

da

@dan

I know that it is difficult to get to the motherboard and change the SSD part of the fusion drive.

The blade SSD Apple offered is simply too overpriced (it alone is what a new IMac costs), and it’s thus not an option.

As I thought, the motherboard in my Mac won’t support the Sabrent 4.0 SSD - then, since I want to push through with this, which of the Samsung evo NVme would be best compatible (using one of the two adapters listed above)?

The evo plus, does it still require a software update before it works, or are the brand new ones or them shipped with the up-to-date software?

Thanks in advance

da

@frederik.juul.eilersen - What did you alter? You'll need to back off the changes to find which one didn't work correctly. I'm suspecting the CPU is not properly seated or is bad.

da

@danj

I simply installed the cpu and put everything back together (didn’t even replace the fusion with the new SSD yet).

Do you think it is to do with the cpu not seated, or due to the POwer supply unit?

da

I would focus on the CPU!

da

Mostra altri 45 commenti

Aggiungi un commento

2 Risposte

Soluzione Prescelta

While we don’t have explicit guides for your 2019 iMac the iMac Intel 27" Retina 5K Display (Late 2014 & 2015) guides will also work for your’s.

Do be very careful in removing the display follow this guide Sostituzione Schermo Retina 5K iMac Intel 27" and make sure to use the pizza cutter and plastic cards as described in the guide.

If you are going to use the M.2 SSD’s then you’ll want the long Sintech adapter and you’ll want to cover the exposed pins just along the edge to protect the SSD contacts from shorting. As far as which SSD I would use stick with either the 970 EVO or PRO drives the 790 EVO Plus will likely require a drive firmware update via a Windows or Linux system. Hibernation is still an issue in all Mac’s as the custom SSD’s have line the M.2 SSD’s don’t have. While one can alter the OS to get around this it too has its issues Turn off Macbook automatic hibernation mode?

Before you do anything you’ll need to break the Fusion Drive set before you start and I would recommend making a good backup first. Split Your Fusion Drive Apart if you are planing on reusing the HDD drive.

Questa risposta è stata utile?

Punteggio 3

15 Commenti:

Hi dan!

Thanks for the answer again!

It’s the 2017 27” model, not the 2019 - do you have that guide or no? :-)

If I decide to go down the route of buying an original Apple SSD, which is the best (and fastest) for my 2017 machine? (You showed me the one for 1,400’ish US$ and that’s too much).

I would ideally want 2TB, but at least 1TB, and in the price range of $250-$550 (similar performance and price range as the Samsung M.2 SSDs).

Thanks

da

Sorry typo, for either 2017 & 2019 use the 2015 guides.

Yes, the custom Apple SSD's are expensive! I recommend sticking with a smaller 512 GB or 1 TB SSPOLARIS SSD.

The trick is not loading the SSD down with stuff. All I would put on the blade SSD is the bootable OS, all of your apps (tool libraries) and thats it! Leave the rest of the drive for the OS and the apps to leverage for Virtual RAM, Caching, Paging and Scratch Space if your apps use it. Have your data and content libraries on the second internal drive. While my Mac Pro I referenced only offers one drive you should see the similarities here with by work drive is also a SSD (SATA based RAID). one of my endeavors is creating large photographic backdrops for museums and photographers. This are 20 x 40~60 ft in size! Which is why I needed such a large blade SSD in my system. I was using a 512 GB for many years working on much smaller images.

da

@danj

thanks for that! I will not move into M.2 drives - however, I stumbled upon OWC's Aura Pro X2 (with 2TB) - that has the identical connector interface as the OEM apple blade ssd; is that a viable option for this?

also, I have, as mentioned, the Samsung evo 860 (500GB); is it a viable option or waste to do a fusion drive with this and the possible Aura Pro X2, (thus, having the faster read speeds from Aura, and have the additional 500GB from the Samsung Sata ssd)?

thanks in advance and hope to hear from you soon!

once I am certain on the ssd, I will order it and document my upgrades so I can share it on this thread :)

da

Yes the OWC drive will work here and is the best option beyond the custom Apple blade SSD's.

Let's look at a dual SSD fusion drive like a relay race... You have a slow runner and faster runner the total time is a unit of 10 to run the distance. The slow runner took a unit of 6 and the fast runner took only 4. Is that better than having the one runner run the full distance alone assuming that don't get winded? So that fast runner would take less time to run the race!

So what I'm I saying here?? Don't setup a dual SSD Fusion Drive all you're doing is slowing your system!

Having a dual drive setup (independent drives) is by far the better setup! The blade SSD is your boot drive with your OS and Apps with nothing else! The rest of the drive is reserved for the Virtual RAM, caching, paging & scratch space. Your data and any music, podcast or video content is held on the slower SATA drive whether or not it is a HDD or SSD.

So do you need to spend more money on the SATA drive going to a SSD? Depending on what you are using your system for a better performing HDD might be a better direction. As an example a Seagate 3.5" FireCuda SSHD might be a better choice.

Don't get me wrong! I love the Samsung 2.5" SSD's. Its just sometimes people get so wrapped up speed they loose sight of what it needed.

Think of it this way... Do you need a Maserati race car to go shopping? Or will a Kia Soul be all you really need. But if you are running a race then clearly the Maserati would be the better choice!

Here with the Blade SSD and SSHD we have both needs covered! The PCIe SSD for its speed and the SSHD for being a cheaper option for the bulk storage.

da

@danj

Thanks for the explanation! As I’ve gathered, the OWC is best option in this case (it’s new and cheaper and faster than the OEM Apple ones).

I already have the 500gb Samsung SSD which I’ve salvaged from an old MacBook Pro I sold for parts.

So I have made a time machine back up and then I’ll install the new OWC SSD, and then replace the current HDD with my existing Samsung SSD (but then I don’t need the thermal sensor cable, as it won’t be my bootable drive, right?).

I will format the OWC SSD as APFS, and install the os on that and then transfer my data from the time machine backup - but how do I then make the VRAM, cache, etc, store on the ‘external’ (internal) Samsung SSD, and not on the 2TB of OWC SSD drive?

Regards,

Frederik

(thank you so much for taking your time to answer my queries Dan)

da

Mostra altri 10 commenti

Aggiungi un commento

@frederik.juul.eilersen I'm still waiting for the adhesive to arrive. After that, I got everything I need to proceed :)

I told you I was gonna go all in on the cooling, so I even bought sandpaper to sand down the IHS until its shiny.

This is either going to be the coolest iMac ever, or a dead iMac.

Update (10/14/2020)

@danj I just reopened the cpu to confirm what you said and f****ck! Apparently I didn’t apply a thin enough layer…. have I roasted my cpu ??

Block Image

Questa risposta è stata utile?

Punteggio 0

8 Commenti:

@frederik.juul.eilersen i think I fried my iMac :(

After doing a perfect job on disassemble, apply new paste and cooling and then re assembling – I now get a black screen on the display.

I get two leds lighting up on the logic board. I read that the first one indicates that PSU is supplying power just fine, and the second that the cpu is running. So my delid and appliance of liquid metal on the die should be OK.

However the third is not lighting up, indicating there is failure of communication between GPU and the logic board.

I even dis assembled everything and re assembled again. Still same issue.

The ONLY thing extra I did during this whole thing was airing the CMOS battery on the backside for 5 minutes, because I thought why not reset any old configs spooking around while it’s opened up. Surely this can’t be the issue of me getting no picture?

Anyways, I’ll keep updating.

da

@danj you seem to know iMacs very well too. Do you have any idea on what I can try for troubleshooting?

da

@eckelhesten - You either didn't seat the CPU properly in its socket or damaged some of the socket pins.

You also talk about de-liding the CPU and applying liquid metal on the chip and the heat spreader. One of the problems with liquid metal is just that! Its a liquid!

So when you hold your morning coffee you don't tilt it as the coffee will spill out! While liquid metal appears more like tooth paste when it gets hot is gets thinner!

So the mounting of the CPU to the logic board needs to be considered. A horizontally mounted logic board CPU is not going to have problems with liquid metal as the surface is on is in the correct plane. But, an iMac logic board is vertical! So the liquid metal will slowly migrate to the bottom edge.

So you do run the risk of damaging things here. I would stick with a non-conductive paste to be safe. In this case I think you will need a new CPU chip to be sure its not damaged.

da

@danj thank you for the answer. Doesn’t the 2nd LED indicate that the CPU is working fine?

I applied a super thin layer of liquid metal on the CPU die to make sure it doesn’t run off or drip like you said, I then relidded the CPU to make sure that everything stays closed and that there are no moving parts when reattaching the heatsink.

If LED 2 isn’t a proof of the CPU working, I might get another Kaby Lake cpu to try with.

Please tell me if you know.

da

Here's Apple's description for LED-2:

LED 2 - Indicates that the main logic board has detected proper power from the power supply when the computer is turned on. This LED will be ON when the computer is turned on and the power supply is working correctly.

So it's not telling you the CPU is good at all! And yes, Your CPU is blown! Sorry ;-{

I don't recommend de-liding CPU's in iMac's as it really doesn't offer enough improvement given the risks of damaging the chip. Thats independent of the TIM used between the chip and lid. The best net gain is moving the heat from the heat sink out of the system as much as you can.

Think how your drip coffee maker works... How fast you fill the cone without over filling it is the limit you can't overcome without altering the cone frame.

If you enlarged the cones hole at the bottom you can move more water through quicker! But, the strength of the coffee will be diluted as the water has less time to gain the flavor. So then you need to increase the grind so the coffee is finer. And then depending on the filter material you may find the particles are so small they pass through.

Now apply that same logic here! We need to increase the fans RPM's to pull away the heat. Making sure the fan blades and heat sinks fins are clean of dust. And lastly using a good TIM on the heat sink pads on CPU & GPU chips. I would use a good monitoring app like TG Pro so I could see things clearly and boost the fans when needed.

da

Mostra altri 3 commenti

Aggiungi un commento

Aggiungi la tua risposta

frederik.juul.eilersen sarà eternamente grato.
Visualizza Statistiche:

Ultime 24 Ore: 0

Ultimi 7 Giorni: 6

Ultimi 30 Giorni: 33

Tutti i Tempi: 4,424