Salta al contenuto principale

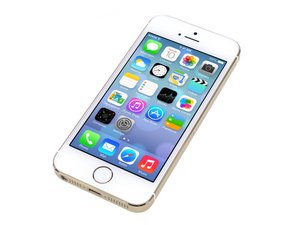
L'Apple iPhone 5s è stato presentato il 10 settembre 2013. La riparazione di questo dispositivo è simile a quella dei modelli precedenti e richiede cacciaviti e strumenti di apertura. Disponibile nelle versioni GSM o CDMA con capacità di 16 , 32 o 64 GB nei colori Argento, Oro e Grigio Siderale.

3531 Domande Visualizza tutte

I cannot get my connector to fit on the logic board.

I've tried for hours and hours to get this cable to fit onto the logic board. It is the power flex cable/power and sensor cable/upper component cable and everything goes fine until I have to actually connect it to the logic board. This is the second replacement I've ordered and neither fit, they both kind of snap/slide on but the force of the cable wanting to unbend throws them right back off with no effort. When I try to fit the original power flex connector it does fit. I even taped it to the logic board one time and it didn't work at all.

I tried for 30 minutes to plug my iPad into my computer so I could upload pictures to have a viable question, but it's a piece of work too, and I'm going to bed since it's 3:30 AM. Thanks for anyone who tries to help.

Risposto! Visualizza la risposta Anch'io ho questo problema

Questa è una buona domanda?

Punteggio 0
Aggiungi un commento

2 Risposte

Soluzione Prescelta

The upper component cable on the iPhone 5S has attached to it, from top to bottom:

The power/screen-lock button; a mic; the back-camera led/flash; the 2 vibrator golden pads; the mute slide button; and finally the 2 volume up/down buttons.

There are no sensors on that cable.

So to make sure we are talking about the same thing, is this the cable you're referring to? The guide also has a link to the part/flat-cable.

If yes, it is a bit of a PIA to plug the cable back in, but it's not mission impossible, unless you are getting the wrong part or trying to plug it into the wrong connector.

And/or try again, but first connect the cable to the board before setting the board inside the phone and before installing the cable inside the phone.

Questa risposta è stata utile?

Punteggio 2

2 Commenti:

Yes, that's the cable, I had just heard it called the sensor cable before so I added that. I'll try to install it out of the board and get back to you, thanks for the answer. Sorry for my attitude :)

da

I tried and not even the original fits now. I think the connector has been mangled from enough trying that I just have a dead board to learn microsoldering on now. Thanks for your help.

da

Aggiungi un commento

Microsoldering the connector is not mission impossible. Make sure you use good flux, leaded solder and a decent enough microscope. Make sure to not remove pads since you can damage the board more and if you decide to mail it in to someone will be more expensive for you. Let me know if you have trouble finding the connector :)

Questa risposta è stata utile?

Punteggio 1

7 Commenti:

I need to take part in your optimism but I'm just not an experienced solderer and not once have I microsoldered. I just haven't had the opportunity to learn (or I'm just too undetermined). If you want to help me out, I have a few questions, like...

what temperature should the iron be?

does each individual pin need soldered or do they just make contact?

is the pad the black piece that covers that section of the logic board?

I watched one video where the fixer covered the surrounding areas with some liquid that hardened to protect them, do you know what this is?

is there just a guide you could link that covers all of this...?

I understand if you don't want to bother with this

Thanks for your answer

da

Also I just don't think I could bring myself to spend enough for an expert board level repair on a phone that's out of contract in a couple months. The camera plug is also missing a pin I severed/bent when I pried the connector off the first time I tried to open the phone using the pointy side of the spudger since the flat end would not seem to work, I guess you have to learn somewhere. My point is I could practice on that.

da

I guess it is a good phone to learn on then. I usually set my iron at 400celsius. Each pin needs to be soldered. A pad is each little copper piece sitting under each pin of the connector where the pin is soldered to, make sure to remove the black tape sitting on the top of the board. That liquid is this one here http://www.amazon.com/MG-Chemicals-Peela... - there is not one that I know of but I'll get a blog post about this later this week with pictures, more details and pointers. Dude we are here to help other people to repair, ask away! (Votes up always welcomed) -- I understand and I think if this is something you are interested in then it might be fun to at least try it out, especially if you are willing to give up on the phone! Camera plug can also be replaced so you might get it to work :)

da

This phone is not scrap yet. As Israel said, replacing a couple of connectors is feasible. But it is very likely that it'll become scrap if you practice on it. I'd practice on a dead board first. There are so many things that can go wrong like ruining the connector, the pads, and the surrounding components. Once you are able to REMOVE a connector without tearing pads, and soldering a new one in place, then do try to repair the one on hand. At least this is how I do it. When I encounter a board that COULD be fixed but not at my current level, I set it aside in a "future projects" stack until I'm able to perform this kind of repair, then come back and do it. Those are my 2 cents worth anyhow.

da

How I would do it: apply Kapton tape around the connector to protect surroundings. Apply flux paste on connector. Apply hot air back and forth at high temp (300-360 degrees celsius. Depending on how well your hot air is calibrated. My rule of thumb: apply hot air for 20 sec. If solder on the pads starts to melt, it's a good temp. If not, increase heat. If it melts before 20 sec, it's too high). Once the solder starts to melt and stays liquid, poke at connector to remove it. No force should be needed or applied, otherwise the pads will be removed as well.

da

Mostra altri 2 commenti

Aggiungi un commento

Aggiungi la tua risposta

Ethan Z sarà eternamente grato.
Visualizza Statistiche:

Ultime 24 Ore: 0

Ultimi 7 Giorni: 0

Ultimi 30 Giorni: 0

Tutti i Tempi: 140