

We at iFixit are fans of DIY car maintenance and repair just as much as for electronics. We feel it’s our civic duty to share with the world if we’ve found some product that was absolutely brilliant, or produced excellent results.
One such product is the 3M Lens Renewal Kit.
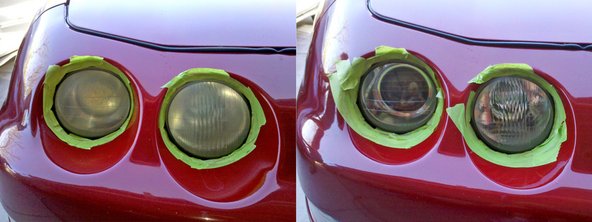
Some of my relatives had really crappy headlight lenses. So crappy, in fact, that the light coming through the lenses was severely compromised—enough to present a potential danger from not seeing an object during the night. Something had to be done, and I took matters into my own hands.
This weekend, I performed a headlight restoration intervention.
3M’s instructional video on headlight restoration outlines the entire procedure really well. It’s definitely worth five minutes of your time if you’re considering embarking on such an adventure. You’ll get to see first-hand how all the attachments are used to make the headlight go from crap to awesome. Note that the blue Ford Taurus’ headlight looked almost identical to the one in the video before I began the procedure.

So how did it go? Absolutely smashing. It took me a little over two hours to mask six headlights (two Taurus lights, and four Integra lights) and perform the procedure on all six. I did them in “assembly line” style, where I’d use the 500 grit sanding disk on all six, then the 800 grit disk on all six, etc. That way I didn’t have to switch disks (in theory, at least—the 800 grit disk wore out and I had to swap it for a fresh one), even though I ran the risk of ruining all six lights instead of just one. I figured they couldn’t possibly look worse than they already did. The kit contained everything I needed for the procedure, minus the drill, and had more than enough materials for six lights:
- 1 – 3M drill backing plate
- 1 – 3M Masking Tape PN 0000 25 ft.
- 4 – P800 grit white abrasive discs
- 6 – P500 grit yellow discs
- 1 – P3000 Trizact foam disc
- 1 – Orange foam compounding pad
- 1 – 1 oz. 3M headlight lens polish sample
In the end, I used just one 500-grit disc, two 800-grit disks, and 2/3 of the headlight rubbing compound. The “Trizact” disc was 50% worn after the procedure, and there was at least half the masking tape remaining. The kit definitely contains enough materials to clean up even the largest of headlights, even though 3M’s instructional video strangely cautions you that it might not.
Originally I had considered purchasing some of the components separately, especially because I already had some of the sandpaper required for the job. But I soon realized that the full cost of the kit would be significantly more expensive had I acquired everything individually, and my hodge-podge of stuff would not be as user-friendly. For example, the kit’s sanding discs come pre-cut and with velcro backing, making it super-simple to attach to the backing plate. This would not have been nearly as easy had I chose to do the “cheaper” method, which would have invariably cost me more time and money.
I had to pay full retail price ($25) at Autozone (as opposed to $16.34 on Amazon), since even Amazon’s Prime shipping couldn’t get it to my relatives’ door in time—and it was still worth every penny.


0 Commenti