Introduzione
In this guide, you will learn how to replace an iPhone screen with 0 prior knowledge. Doing this can save you so much money in the long run compared to just paying for the repair.
WARNINGS!!!!!!
When replacing your screen, True Tone will be disabled even if using the original Apple part.
Wait for the battery to go below 25% before attempting this repair/fix. A charged lithium-ion battery can be a fire hazard if punctured.
Tired of getting charged $100+ for a simple screen replacement, that doesn't even take the repair shop 10 minutes to do? You've come to the right spot. After watching/reading this, you will now know how to replace a damaged, broken, or non-functional screen. With more practice, you can become the guy everyone takes their phone to.
Cosa ti serve
-
-
To begin the screen replacement process, start by removing the two screws located at the bottom of the device on either side of the charging port. Use a P2 Pentalobe screwdriver to complete this step.
 Chiedi a FixBot
-
-
-
After removing the screws, prepare the iOpener according to the provided instructions. Once heated, position the iOpener along the bottom edge of the phone, as shown in the reference image. Allow it to sit for 30 seconds to 1 minute to soften the adhesive for easier screen removal. (Be cautious, do not let the phone overheat)
-
-
-
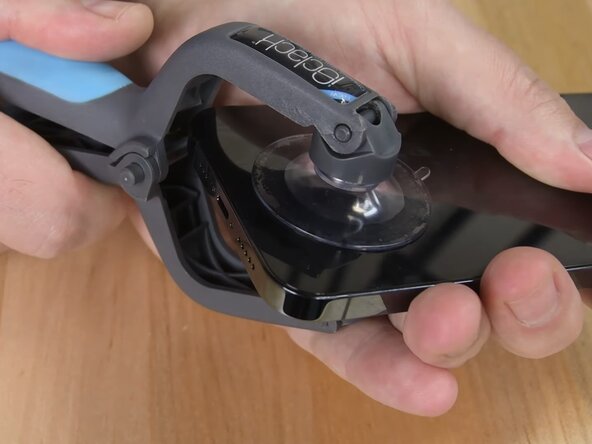
After heating the device, position the suction cup just above the charging port area. Firmly press down to create suction, then gently lift until a small gap appears. Once an opening is visible, carefully insert a pick to begin separating the screen.
-
-
-
Once the screen has slightly lifted, carefully insert the pick into the small opening. Gently work the pick around the entire perimeter of the screen to release the adhesive/clips. This process will allow the screen to lift freely and be safely removed.
-
-
-
-
Once the screen is lifted, you’ll see several ribbon cables coming from the screen connected to the device. Focus on the ones near the center of the screen first. The first two are covered. Use a Y000 screwdriver to remove the cover, then carefully disconnect all three ribbons.
-
(Video) First Ribbon = Battery Ribbon (after finishing, do not forget to plug this back in, or else your phone will not power on.) | Second/Third Ribbon = Display Ribbons
-
-
-
After disconnecting the initial ribbons, you’ll notice the screen remains attached by one additional ribbon. Remove the cover and carefully detach this final connection.
-
(Do not unplug any other components unless you are certain of their function.) (Keep track of screws location for this part, some screws are longer than the others. Attempting to put a screw in the incorrect spot can damage your phone)
-
-
-
Now that the screen is detached, proceed to remove the proximity sensor. Begin by unscrewing the four screws shown in the reference video. (Keep careful track of each screw’s position, as they vary in size. Installing a screw in the wrong location can cause permanent damage to the Face ID hardware, rendering it inoperable.)
-
-
-
After taking out all four screws, gently fold the proximity sensor to prevent strain on the ribbon. Warm the top of the screen with the iOpener for 15–20 seconds to loosen the adhesive. Once ready, carefully lift the sensor from its spot. Be very careful, as even a slight tear in the ribbon can permanently disable Face ID.
-
-
-
After installing the proximity sensor, gently reconnect its ribbon cable to the iPhone. Once secured, reinstall the protective cover and reinstall each screw in its proper location. Double-check screw placement, as inserting the wrong size can damage internal components.
-
-
-
After completing the proximity sensor installation, reconnect the display ribbon cables, followed by the battery ribbon. Ensure all connections are secure and properly aligned. Once verified, reinstall the protective cover and fasten the screws carefully to avoid over-tightening.
-
-
-
Before securing the screen, power on the device to confirm it boots up and functions correctly. If everything operates as expected, power it off again and carefully press the screen into place, ensuring all edges snap in evenly and securely.
-

Learn how to replace a faulty, broken iPhone screen.
(also teaches how to replace front sensor assembly)
Annulla: non ho completato questa guida.
Altre 2 persone hanno completato questa guida.