Salta al contenuto principale

iBook G4 14" 933 MHz-1.33 GHz Keyboard Replacement

Cosa ti serve

  1. iBook G4 14" 933 MHz-1.33 GHz Keyboard Replacement, Battery: passo 1, immagine 1 di 1
    • Use a coin to rotate the battery locking screw 90 degrees clockwise.

  2. iBook G4 14" 933 MHz-1.33 GHz Keyboard Replacement: passo 2, immagine 1 di 1
    • Lift the battery out of the computer.

  3. iBook G4 14" 933 MHz-1.33 GHz Keyboard Replacement, Keyboard: passo 3, immagine 1 di 1
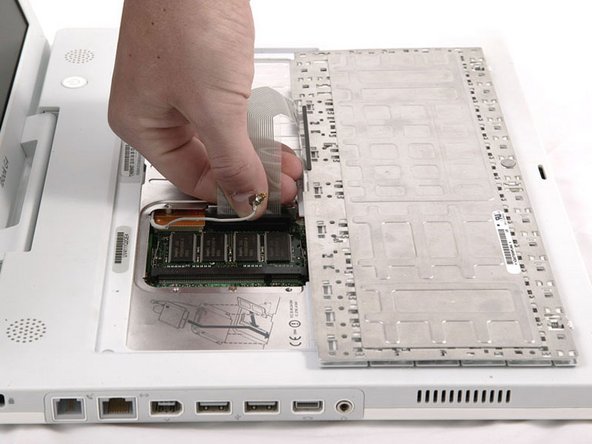
    • Pull the keyboard release tabs toward you and lift up on the keyboard until it pops free.

    • If the keyboard does not come free, use a small flathead screwdriver to turn the keyboard locking screw 180 degrees in either direction and try again. The locking screw is in between the F5 and F6 keys and is a clear piece of plastic.

    • Flip the keyboard over, away from the screen, and rest it face-down on the trackpad area.

  4. iBook G4 14" 933 MHz-1.33 GHz Keyboard Replacement: passo 4, immagine 1 di 1
    • If the computer has an AirPort card installed, follow the next three steps to remove it.

    • Push the wire clasp away from the AirPort card and toward the display, then rotate up to free it from the RAM shield.

  5. iBook G4 14" 933 MHz-1.33 GHz Keyboard Replacement: passo 5, immagine 1 di 1
    • Grasp the clear plastic tab on the AirPort card and pull toward the display.

  6. iBook G4 14" 933 MHz-1.33 GHz Keyboard Replacement: passo 6, immagine 1 di 1
    • Hold the AirPort card in one hand and use your other hand to remove the antenna cable.

  7. iBook G4 14" 933 MHz-1.33 GHz Keyboard Replacement: passo 7, immagine 1 di 1
    • Remove the four silver Phillips screws that secure the RAM shield.

  8. iBook G4 14" 933 MHz-1.33 GHz Keyboard Replacement: passo 8, immagine 1 di 1
    • Grasp the metal bracket on top of the RAM shield and pull upward to remove the shield.

  9. iBook G4 14" 933 MHz-1.33 GHz Keyboard Replacement: passo 9, immagine 1 di 1
    • Pull the keyboard cable up from the logic board, holding the cable as close to the connector as possible.

    • Make sure that you reconnect the keyboard cable before replacing the RAM shield.

Conclusione

To reassemble your device, follow these instructions in reverse order.

Altre 4 persone hanno completato questa guida.

Documenti Allegati

iRobot

Membro da: 09/24/09

1 Reputazione

636 Guide realizzate

0 Commenti

Aggiungi Commento

Visualizza Statistiche:

Ultime 24 Ore: 1

Ultimi 7 Giorni: 2

Ultimi 30 Giorni: 6

Tutti i Tempi: 12,222