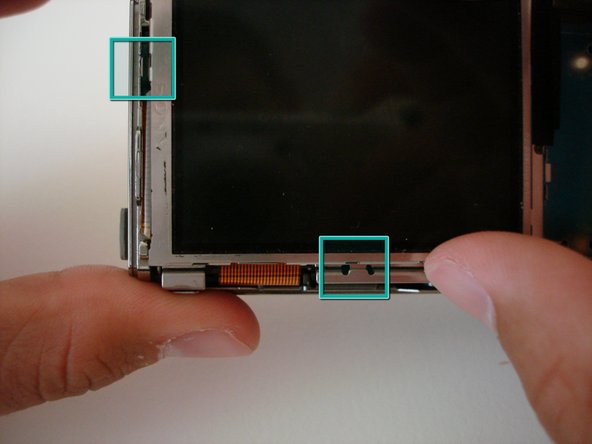
Salta al contenuto principale

Sony Cyber-shot DSC-W5 LCD Screen Replacement

Cosa ti serve

  1. Sony Cyber-shot DSC-W5 LCD Screen Replacement, Back Cover: passo 1, immagine 1 di 1
    • Remove Memory Stick Pro from the card reader slot on the bottom of the camera.

    • Remove both batteries.

  2. Sony Cyber-shot DSC-W5 LCD Screen Replacement: passo 2, immagine 1 di 2 Sony Cyber-shot DSC-W5 LCD Screen Replacement: passo 2, immagine 2 di 2
    • Remove the single visible screw from both sides of the camera.

    • Remove the two screws that are adjacent to the warning label, which is on the underside of the camera.

    • Do NOT remove all four screws from the bottom.

  3. Sony Cyber-shot DSC-W5 LCD Screen Replacement: passo 3, immagine 1 di 2 Sony Cyber-shot DSC-W5 LCD Screen Replacement: passo 3, immagine 2 di 2
    • Gently remove the back cover from the camera.

    • The first time the case is removed, it will be stiff. Be patient and gently rock the cover back and forth until it slides free.

  4. Sony Cyber-shot DSC-W5 LCD Screen Replacement, LCD Screen: passo 4, immagine 1 di 2 Sony Cyber-shot DSC-W5 LCD Screen Replacement, LCD Screen: passo 4, immagine 2 di 2
    • Remove the two screws holding the circuit board down.

  5. Sony Cyber-shot DSC-W5 LCD Screen Replacement: passo 5, immagine 1 di 1
    • Detach the orange cable from the board.

    • Use a thin object, like a paperclip, to gently pry the cable off the connector.

  6. Sony Cyber-shot DSC-W5 LCD Screen Replacement: passo 6, immagine 1 di 2 Sony Cyber-shot DSC-W5 LCD Screen Replacement: passo 6, immagine 2 di 2
    • The LCD screen sits in two slots; one on the bottom, and one on the left edge.

    • Slide LCD screen from the two slots.

    • Do not attempt to completely remove the screen, as it is still attached to the camera.

  7. Sony Cyber-shot DSC-W5 LCD Screen Replacement: passo 7, immagine 1 di 3 Sony Cyber-shot DSC-W5 LCD Screen Replacement: passo 7, immagine 2 di 3 Sony Cyber-shot DSC-W5 LCD Screen Replacement: passo 7, immagine 3 di 3
    • To remove the LCD screen, detach the orange cable from the board.

    • If needed, replace the LCD screen.

Conclusione

To reassemble your device, follow these instructions in reverse order.

Altre 4 persone hanno completato questa guida.

Thomas

Membro da: 04/14/10

133 Reputazione

6 Guide realizzate

Team

Cal Poly, Team 15-50, Garner Spring 2010 Membro di Cal Poly, Team 15-50, Garner Spring 2010

CPSU-GARNER-S10S15G50

5 Membri

12 Guide realizzate

0 Commenti

Aggiungi Commento

Visualizza Statistiche:

Ultime 24 Ore: 1

Ultimi 7 Giorni: 3

Ultimi 30 Giorni: 17

Tutti i Tempi: 11,355