Cosa ti serve
-
-
Use a nylon spudger to release the black tabs on either side of internals.
-
-
-
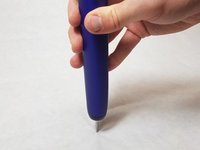
Put the metal head on a solid surface with handle perpendicular to the surface. Firmly, yet gently, push down until the internals start to slide out.
-
-
-
-
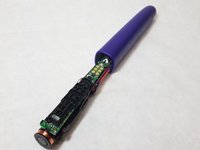
Remove rubber covers from the top of the motherboard and the back of the battery.
-
-
-
Using a soldering iron, remove the solder from the three marked spots.
-
The pins are labeled "F1", "R6", "JP1"
-
-
-
After de-soldering, the battery should be loose. If this is not the case, spend more time removing the solder.
-
When the battery comes loose, gently wiggle it out and away from the device.
-
-
-
Carefully reinsert the new battery into the same spot as the old one. Gently press until it is firmly pressed against the toothbrush.
-
-
-
Green batteries have a black horizontal stripe at the top on the green wrap. That is the positive terminal that goes towards the top of the unit
-
-
-
Apply a small amount of solder to the three points shown to attach the battery.
-
The pins are labeled "F1", "R6", "JP1"
-
-
-
Replace the rubber covers on the motherboard and battery.
-
Reverse the case replacement guide to finish putting the toothbrush back together.
-


To reassemble your device, follow these instructions in reverse order.
Annulla: non ho completato questa guida.
Altre 14 persone hanno completato questa guida.
Team

IUPUI, Team S22-G1, Bayer Fall 2017 Membro di IUPUI, Team S22-G1, Bayer Fall 2017
IUPUI-BAYER-F17S22G1
4 Membri
12 guide realizzate
3Commenti sulla guida
I recommend to soak the bottom of the brush in a cup of warm water to make it easier to remove the bottom cap. The plastic is very easy to crack when cold.
This is a decent guide. Thank you to the author! Problem is that they don't make these devices user serviceable, so we basically have to pry and force the cap off. ARGH! RIGHT TO REPAIR NOW!!
Die Anleitung ist bei Schrit 6 etwas irreführend, es sind nur 2 Lötstellen, die Batterie hat ja auch nur 2 Lötfahnen wie man sieht. Eine bei F1, die andere bei R6 und JP1. Der unterste Pfeil im Bild der auf JP1 zeigt ist falsch. Ich empfehle das Lötzinn mit einer Entlötpumpe mit Silikonspitze komplett zu entfernen da die Batterie in einer Kunststofffassung fest eingeklemmt ist und nur durch erhitzen des Lötzinns schwer herauszubekommen ist und sich direkt neben der unteren Lötstelle auch ein IC befindet sollte man beim löten sehr vorsichtig sein.