Salta al contenuto principale

Palm m500 LCD Screen Replacement

Cosa ti serve

  1. Palm m500 LCD Screen Replacement, Back Panel: passo 1, immagine 1 di 1
    • Remove the stylus from the side of the PDA by sliding it upwards.

  2. Palm m500 LCD Screen Replacement: passo 2, immagine 1 di 2 Palm m500 LCD Screen Replacement: passo 2, immagine 2 di 2
    • Remove the 4 screws from the corners of the back panel of the device using a size T6 Torx screwdriver.

    • Place screws in a plastic bag or another safe place.

  3. Palm m500 LCD Screen Replacement: passo 3, immagine 1 di 3 Palm m500 LCD Screen Replacement: passo 3, immagine 2 di 3 Palm m500 LCD Screen Replacement: passo 3, immagine 3 di 3
    • Insert the edge of the plastic opening tool between the back panel and the black stylus holder.

    • Carefully and forcefully pry the panels apart.

  4. Palm m500 LCD Screen Replacement, Battery: passo 4, immagine 1 di 3 Palm m500 LCD Screen Replacement, Battery: passo 4, immagine 2 di 3 Palm m500 LCD Screen Replacement, Battery: passo 4, immagine 3 di 3
    • Use tweezers to unplug the battery cable from the motherboard socket.

    • Gently remove the battery from the motherboard using your thumb and forefinger to pull upwards.

    • The battery may be difficult to remove because of light adhesive on the back. It may require some force to pry the battery away from the motherboard with your fingers.

  5. Palm m500 LCD Screen Replacement, Motherboard: passo 5, immagine 1 di 3 Palm m500 LCD Screen Replacement, Motherboard: passo 5, immagine 2 di 3 Palm m500 LCD Screen Replacement, Motherboard: passo 5, immagine 3 di 3
    • Use the plastic opening tool to pry the orange clamp away from the motherboard.

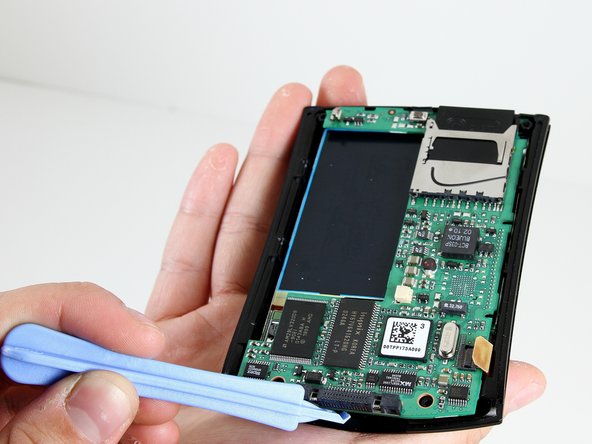
    • Use the plastic opening tool at the bottom of the device to pry the motherboard away from the front plate.

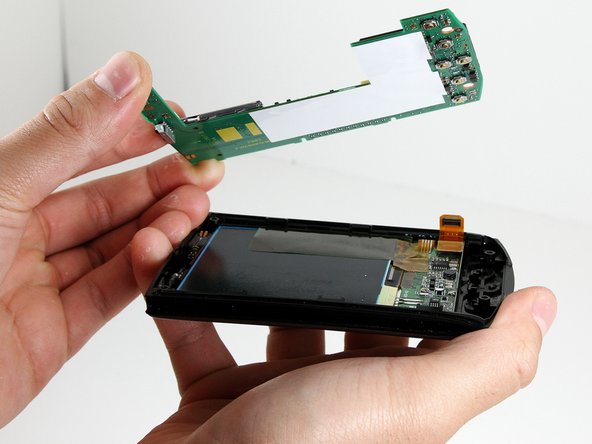
    • Gently and forcefully lift the motherboard away from the front plate by using your thumb and forefinger.

  6. Palm m500 LCD Screen Replacement, LCD Screen: passo 6, immagine 1 di 2 Palm m500 LCD Screen Replacement, LCD Screen: passo 6, immagine 2 di 2
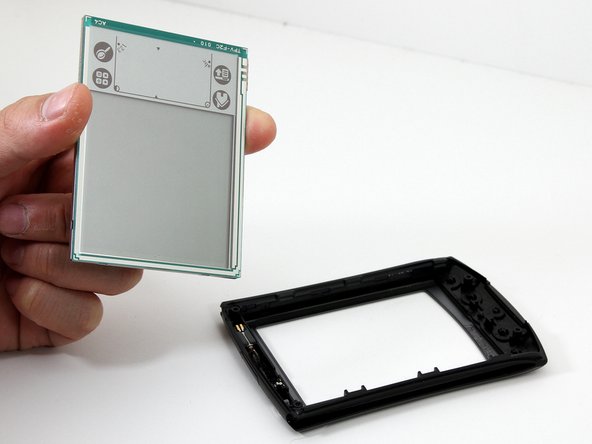
    • Pull the LCD screen up from the bottom of the device using your forefinger.

    • The LCD screen will easily come away from the front panel.

Conclusione

To reassemble your device, follow these instructions in reverse order.

Un'altra persona ha completato questa guida.

Miles Johnson

Membro da: 01/11/11

579 Reputazione

4 Guide realizzate

Team

Cal Poly, Team 14-9, Forte Winter 2011 Membro di Cal Poly, Team 14-9, Forte Winter 2011

CPSU-FORTE-W11S14G9

6 Membri

6 Guide realizzate

Un commento

The hardest part is getting the back plate off, I throttled my plastic spudger.

dpchoung - Replica

Aggiungi Commento

Visualizza Statistiche:

Ultime 24 Ore: 0

Ultimi 7 Giorni: 0

Ultimi 30 Giorni: 1

Tutti i Tempi: 2,144