Introduzione
Even years after its release in 2014, the OnePlus One is a popular smartphone. However its built-in batteries will probably have worn out after all these years of usage.
Although the built-in batteries were not intentionally designed to be replaced by end-users, this is still possible. Replacement batteries are available through online shops. Some of them even maintain the original design of the OnePlus One batteries.
The batteries are connected to the motherboard via a ribbon that needs to be carefully disconnected first. To this end, you open the smartphone and unmount the motherboard cover. The batteries themselves are not packed in a hard cover. Hence, extra care is required when removing them.
This guide will walk you step by step through the process of removing the batteries and give useful advices on the mentioned dfficulties. After you will have removed the battery, you can just plug in your own by executing the steps in reversed order.
Cosa ti serve
-
-
Remove the SIM tray.
-
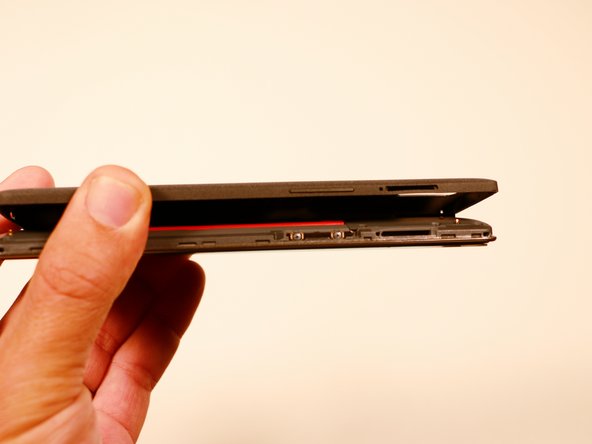
Using a plastic opening tool, carefully separate the back panel from the main body assembly of the phone. Be extra careful around the SIM slot or other weak areas.
-
You may encounter some resistance due to hidden locking clips around the inside edge of the phone. Not to worry; just move in one consistent direction around the phone as opposed to jumping from spot to spot!
-
Top to bottom, left to right, clockwise or counter clockwise, once we make it about half way around the device, the panel is easily removable by hand.
-
-
-
-
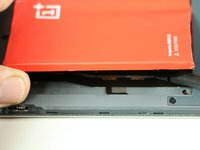
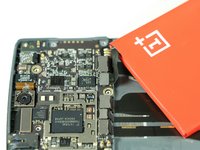
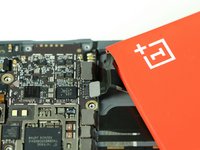
After we have removed the motherboard cover, we notice that the battery is intact and has a black ribbon attached to it, which is mounted on the logic board.
-
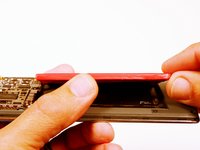
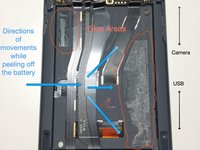
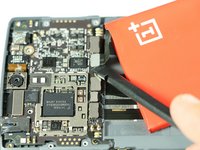
Using the spudger, carefully begin to lift the the battery up from the side opposite the ribbon. Be aware that there is high-grade adhesive holding the battery in its bay, so proceed with caution.
-


To reassemble your device, follow these instructions in reverse order.
Annulla: non ho completato questa guida.
Altre 201 persone hanno completato questa guida.
Team

USF Tampa, Team 3-3, Brown Fall 2014 Membro di USF Tampa, Team 3-3, Brown Fall 2014
USFT-BROWN-F14S3G3
3 Membri
20 Guide realizzate
36Commenti sulla guida
The Apple iPhone sim ejector is not long enough to work on an OPO. A paper clip is a better option.
There will be a compatible battery with one pin OnePlus
Successfully accomplished, thanks to your clear instructions. One note: the adhesive on my unit was applied in about a quarter inch strip along the right underside of the battery as you view it from the back. Peeling up the left side allowed me to reach and release the adhesive on the opposite side with the spudger or knife blade.
Thank you! I use a slim (but not sharp) butter knife to nudge the battery out slowly by poking the adhesive tape along its length. It was a bit unnerving because I was afraid of damaging the soft battery. Worked out in the end.
One note to add is that the original battery connector's top was glued to the motherboard cover. I had to remove the battery before I could successfully sepearte the 2. My phone is still working and I'm charging it right now! :)
Thanks for the very detailed guide.