Salta al contenuto principale

Macintosh Powerbook 5300cs Hard Drive Replacement

Cosa ti serve

  1. Macintosh Powerbook 5300cs Hard Drive Replacement, Battery: passo 1, immagine 1 di 1
    • The battery compartment is located in the front-right side of the laptop.

  2. Macintosh Powerbook 5300cs Hard Drive Replacement: passo 2, immagine 1 di 1
    • To insert the battery, gently slide it into the compartment until it clicks in place.

    • To remove, slide the button highlighted in the red rectangle to the right to release the battery and slide it from the compartment.

  3. Macintosh Powerbook 5300cs Hard Drive Replacement, Keyboard: passo 3, immagine 1 di 1
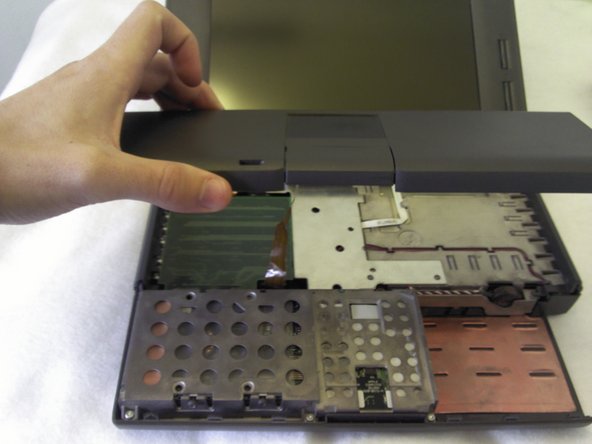
    • With the laptop upside down and with the battery removed, use a Torx #9 screw driver to remove the three .84 in. screws shown.

  4. Macintosh Powerbook 5300cs Hard Drive Replacement: passo 4, immagine 1 di 2 Macintosh Powerbook 5300cs Hard Drive Replacement: passo 4, immagine 2 di 2
    • Carefully pull up on the front of the keyboard to pop it out from the case.

    • Then slide the back out so the keyboard becomes nearly free.

  5. Macintosh Powerbook 5300cs Hard Drive Replacement: passo 5, immagine 1 di 3 Macintosh Powerbook 5300cs Hard Drive Replacement: passo 5, immagine 2 di 3 Macintosh Powerbook 5300cs Hard Drive Replacement: passo 5, immagine 3 di 3
    • Disconnect the ribbon that is connecting the keyboard to the rest of the computer.

    • Pull the keyboard out and repair or replace as needed.

  6. Macintosh Powerbook 5300cs Hard Drive Replacement, Hard Drive: passo 6, immagine 1 di 3 Macintosh Powerbook 5300cs Hard Drive Replacement, Hard Drive: passo 6, immagine 2 di 3 Macintosh Powerbook 5300cs Hard Drive Replacement, Hard Drive: passo 6, immagine 3 di 3
    • Remove the front plastic panel of the laptop by carefully lifting it up.

  7. Macintosh Powerbook 5300cs Hard Drive Replacement: passo 7, immagine 1 di 1
    • With a Torx #9 screwdriver, remove the three .30 in. screws that hold the metal frame in place.

  8. Macintosh Powerbook 5300cs Hard Drive Replacement: passo 8, immagine 1 di 3 Macintosh Powerbook 5300cs Hard Drive Replacement: passo 8, immagine 2 di 3 Macintosh Powerbook 5300cs Hard Drive Replacement: passo 8, immagine 3 di 3
    • Remove the metal chasis that holds the hard drive.

  9. Macintosh Powerbook 5300cs Hard Drive Replacement: passo 9, immagine 1 di 1
    • In order to remove the hard drive, remove the four .22 in. screws circled in red found on both sides of the metal chassis with a Torx #9 screwdriver.

  10. Macintosh Powerbook 5300cs Hard Drive Replacement: passo 10, immagine 1 di 2 Macintosh Powerbook 5300cs Hard Drive Replacement: passo 10, immagine 2 di 2
    • Pull the hard drive out.

Conclusione

To reassemble your device, follow these instructions in reverse order.

Altre 2 persone hanno completato questa guida.

Ronan

Membro da: 10/10/11

63 Reputazione

4 Guide realizzate

Team

Cal Poly, Team 6-1, Regan Fall 2011 Membro di Cal Poly, Team 6-1, Regan Fall 2011

CPSU-REGAN-F11S6G1

4 Membri

6 Guide realizzate

0 Commenti

Aggiungi Commento

Visualizza Statistiche:

Ultime 24 Ore: 1

Ultimi 7 Giorni: 3

Ultimi 30 Giorni: 8

Tutti i Tempi: 1,736