Salta al contenuto principale

Sostituzione scheda MagSafe DC-In MacBook Pro 13" Display Retina Late 2013

Cosa ti serve

  1. Sostituzione scheda MagSafe DC-In MacBook Pro 13" Display Retina Late 2013, Case inferiore: passo 1, immagine 1 di 1
    Attrezzo utilizzato in questo passaggio:
    Magnetic Project Mat
    $19.95
    Compra
    • Rimuovi le 10 viti seguenti che fissano il coperchio inferiore al case superiore:

    • Due viti Pentalobe P5 da 2,3 mm

    • Otto viti Pentalobe P5 da 3,0 mm

    • Nel corso di tutta la riparazione, tieni traccia di ogni vite e assicurati che ritorni nel suo posto originario per evitare danni al tuo dispositivo.

  2. Sostituzione scheda MagSafe DC-In MacBook Pro 13" Display Retina Late 2013: passo 2, immagine 1 di 1
    • Infila le tue dita tra il case superiore e quello inferiore.

    • Con delicatezza, tira il coperchio inferiore per staccarlo da quello superiore.

  3. Sostituzione scheda MagSafe DC-In MacBook Pro 13" Display Retina Late 2013: passo 3, immagine 1 di 2 Sostituzione scheda MagSafe DC-In MacBook Pro 13" Display Retina Late 2013: passo 3, immagine 2 di 2
    • Il case inferiore è collegato a quello superiore con due clip di plastica in posizione centrale.

    • Durante il rimontaggio, spingi con delicatezza il centro del case inferiore per riattaccare le due clip in plastica.

  4. Sostituzione scheda MagSafe DC-In MacBook Pro 13" Display Retina Late 2013, Connettore batteria: passo 4, immagine 1 di 1
    • Se necessario, rimuovere la copertura in plastica attaccata alla scheda contatti della batteria.

  5. Sostituzione scheda MagSafe DC-In MacBook Pro 13" Display Retina Late 2013: passo 5, immagine 1 di 2 Sostituzione scheda MagSafe DC-In MacBook Pro 13" Display Retina Late 2013: passo 5, immagine 2 di 2
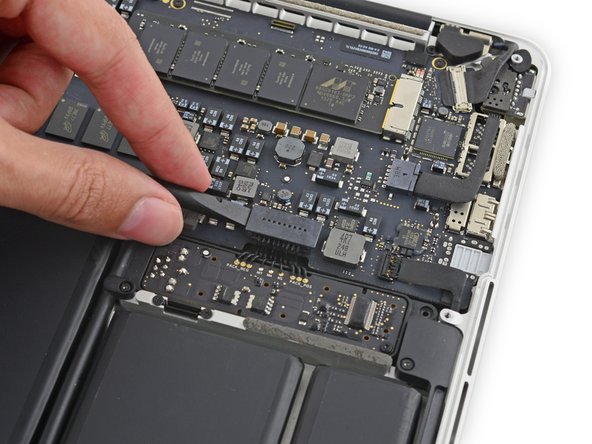
    • Usa l'estremità piatta di uno spudger per sollevare il connettore della batteria in verticale dal suo zoccolino sulla scheda logica.

    • Accertati di sollevare solo il connettore e non lo zoccolino, per evitare il rischio di danni permanenti alla scheda logica.

  6. Sostituzione scheda MagSafe DC-In MacBook Pro 13" Display Retina Late 2013: passo 6, immagine 1 di 1
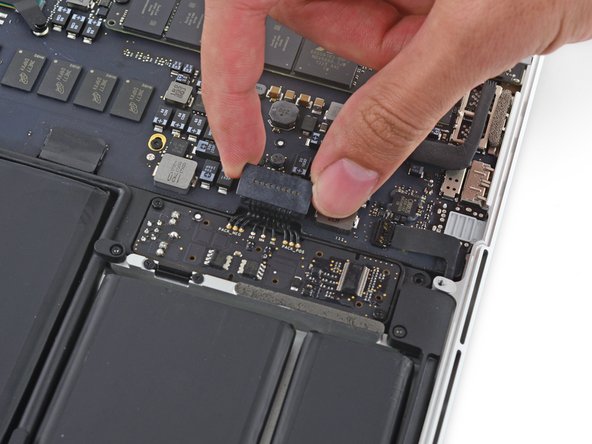
    • Piega il connettore della batteria in modo che non interferisca, per prevenire un contatto accidentale con lo zoccolino durante la riparazione.

  7. Sostituzione scheda MagSafe DC-In MacBook Pro 13" Display Retina Late 2013, Scheda MagSafe DC-In: passo 7, immagine 1 di 3 Sostituzione scheda MagSafe DC-In MacBook Pro 13" Display Retina Late 2013, Scheda MagSafe DC-In: passo 7, immagine 2 di 3 Sostituzione scheda MagSafe DC-In MacBook Pro 13" Display Retina Late 2013, Scheda MagSafe DC-In: passo 7, immagine 3 di 3
    • Afferra la linguetta di plastica nera per aprire il connettore del cavo dello schermo e rimuovilo dalla sua presa sulla scheda logica.

    • Tira nella direzione del cavo, parallelamente alla scheda logica. Non tirare verso l'alto.

  8. Sostituzione scheda MagSafe DC-In MacBook Pro 13" Display Retina Late 2013: passo 8, immagine 1 di 2 Sostituzione scheda MagSafe DC-In MacBook Pro 13" Display Retina Late 2013: passo 8, immagine 2 di 2
    • Rimuovi il connettore della scheda DC-In dalla sua presa sulla scheda logica.

  9. Sostituzione scheda MagSafe DC-In MacBook Pro 13" Display Retina Late 2013: passo 9, immagine 1 di 1
    • Rimuovi le due viti Torx T5 da 3,5 mm che fissano la scheda MagSafe DC-In al case superiore.

    • Potresti dover spostare delicatamente il cavo dello schermo per esporre le viti.

  10. Sostituzione scheda MagSafe DC-In MacBook Pro 13" Display Retina Late 2013: passo 10, immagine 1 di 3 Sostituzione scheda MagSafe DC-In MacBook Pro 13" Display Retina Late 2013: passo 10, immagine 2 di 3 Sostituzione scheda MagSafe DC-In MacBook Pro 13" Display Retina Late 2013: passo 10, immagine 3 di 3
    • Usa il cavo della scheda MagSafe DC-In per rimuovere la scheda, tirandola verso l'esterno e verso l'alto del case superiore.

Conclusione

Per rimontare il dispositivo, segui queste istruzioni in ordine inverso.

Altre 26 persone hanno completato questa guida.

Un ringraziamento speciale a questi traduttori:

en it

100%

Sara Balestra ci sta aiutando ad aggiustare il mondo! Vuoi partecipare?
Inizia a tradurre ›

Sam Goldheart

Membro da: 10/18/12

465.762 Reputazione

538 Guide realizzate

Team

iFixit Membro di iFixit

Staff

135 Membri

16.817 Guide realizzate

7 Commenti

How can I know if the magsafe is not working ?

lpelaez - Replica

Thanks for great tutorial!

Yep, what are the signs of bad dc-in board?

When I plug in the charger, LED on magsafe connector doesn't light up.

AC Charger Information:

Connected: Yes

ID: 0x0000

Revision: 0x0000

Family: 0x0000

Serial Number: 0x00000000

Charging: No

For some reason charging doesn't start, my battery has only 600 cycles on it.

Can you guys help?

P.S. I tried plugging other adapters thats working, same thing (

Olga Kolina - Replica

Did you ever get a solution? I got a new MacBook Pro and didn’t use this one for 2 months, then went to charge it and nothing happens! No light on the charger and the battery is totally dead! I’m going to replace this DC board and maybe the battery. Did you get yours working?

Billy May -

I Have replaced the battery and the machine still works under the power from the new battery but the LED won’t come on the magsafe charger. Now I have replaced the DC In board and still not charging. the charger works on the other Mac in the house. What could the issue be?

Christopher Culler - Replica

Will you have the replacement piece available anytime soon ?

hergas - Replica

Aggiungi Commento

Visualizza Statistiche:

Ultime 24 Ore: 8

Ultimi 7 Giorni: 49

Ultimi 30 Giorni: 170

Tutti i Tempi: 18,815