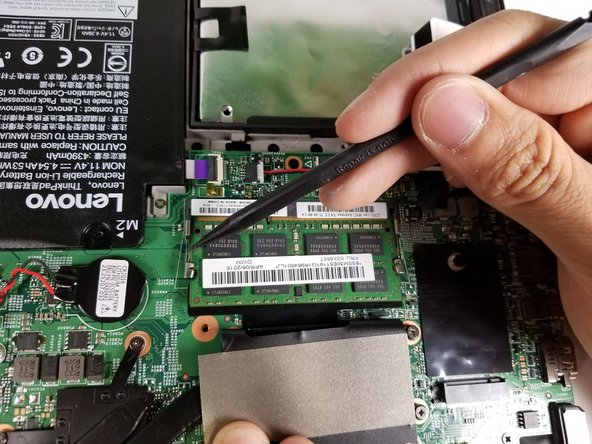
Salta al contenuto principale

Lenovo ThinkPad Yoga 14 20FY RAM Replacement

Cosa ti serve

  1. Lenovo ThinkPad Yoga 14 20FY RAM Replacement, Back Cover: passo 1, immagine 1 di 2 Lenovo ThinkPad Yoga 14 20FY RAM Replacement, Back Cover: passo 1, immagine 2 di 2
    • Remove the indicated nine M2 x 6 mm nylon-coated screws using a Phillips head screwdriver.

    • The screws do not come all the way out. Do not force them out.

  2. Lenovo ThinkPad Yoga 14 20FY RAM Replacement: passo 2, immagine 1 di 2 Lenovo ThinkPad Yoga 14 20FY RAM Replacement: passo 2, immagine 2 di 2
    • After removing all of the screws, gently lift up on all covers to remove the back plate and reveal the interior of the device.

  3. Lenovo ThinkPad Yoga 14 20FY RAM Replacement, RAM: passo 3, immagine 1 di 2 Lenovo ThinkPad Yoga 14 20FY RAM Replacement, RAM: passo 3, immagine 2 di 2
    • The RAM is hidden behind the black piece of plastic. Pull the plastic back.

  4. Lenovo ThinkPad Yoga 14 20FY RAM Replacement: passo 4, immagine 1 di 3 Lenovo ThinkPad Yoga 14 20FY RAM Replacement: passo 4, immagine 2 di 3 Lenovo ThinkPad Yoga 14 20FY RAM Replacement: passo 4, immagine 3 di 3
    • The RAM is held in place by two metal pieces on both sides.

    • Use the spudger to push off both metal pieces to release the RAM.

  5. Lenovo ThinkPad Yoga 14 20FY RAM Replacement: passo 5, immagine 1 di 1
    • Take the ram card out of its slot.

Conclusione

To reassemble your device, follow these instructions in reverse order.

Altre 3 persone hanno completato questa guida.

jose aguirre

Membro da: 04/19/17

264 Reputazione

2 Guide realizzate

Team

Cal Poly, Team S14-G2, Banghart Spring 2017 Membro di Cal Poly, Team S14-G2, Banghart Spring 2017

CPSU-BANGHART-S17S14G2

5 Membri

6 Guide realizzate

0 Commenti

Aggiungi Commento

Visualizza Statistiche:

Ultime 24 Ore: 0

Ultimi 7 Giorni: 4

Ultimi 30 Giorni: 13

Tutti i Tempi: 2,328